Choosing an engine for a homemade tractor
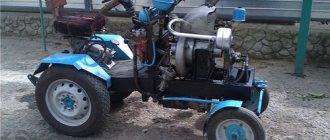
If you decide to assemble a mini tractor with your own hands, then first of all you need to select a power unit for it. The ZID engine is often used as the latter. This is a four-stroke unit with a volume of 0.52 liters. and a power of 4.5 l/s, which is quite suitable for cultivating 2-3 hectares of land. The engine is easy to maintain, so it is often installed on various home-made equipment; moreover, it is easy to buy on the Internet.
Another option for homemade products is the UD-25 engine. This is a two-cylinder unit with a power of about 12 l/s and a volume of 0.42 l. Although this type of motor has long been discontinued, there are a large number of offers on the Internet for the sale of this unit. It can be bought for approximately 5,000 – 8,000 rubles.
Often, when making homemade tractors, craftsmen use motors from cars. For example, you can find mini tractors with an Oka engine.
This engine has a power of 29.3 l/s and a volume of 0.649 l. In fact, this is a VAZ engine (VAZ 21083), only in a lightweight version, since it weighs 2 times less. A distinctive feature of the Oka engine is its low gasoline consumption and high efficiency.
A more expensive option is a Zhiguli engine. The engines of the VAZ car line have an engine power of 59 l/s (VAZ 2101) and higher. A tractor with a VAZ engine is a fairly powerful unit that can cope with almost any agricultural work.
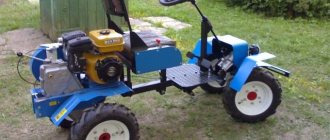
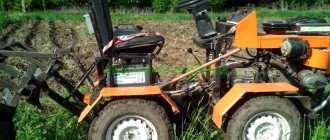
It is easiest for owners of walk-behind tractors to make a mini tractor for the household, since this unit already has all the necessary control units. All that remains is to make a suitable frame, and the tractor is ready.
DIY mini tractor: homemade tractors based on various walk-behind tractors, video examples
Owners of farms or houses in the village cannot do without land cultivation equipment. However, not everyone can afford to buy a mini tractor. As an alternative, craftsmen make tractors with their own hands. If you have enough skill and a small workshop, you can create excellent homemade equipment for working on land.
Homemade tractor design
A mini tractor is an ordinary tractor, which can be made on the basis of a walk-behind tractor. Such units are divided into three types:
- produced at the factory;
- rebuilt using factory tools;
- completely homemade.
You can assemble a mini tractor from various parts and components from old domestic machines. The main details of homemade equipment are:
- Engine.
- Control system.
- Chassis.
- Power take-off system.
- Tow hitch.
- Transmission.
All of them are installed on a rectangular frame made of channel.
What to make a frame from
Assembling a mini tractor always begins with making the frame. The frame of the mini tractor acts as a base on which all components and parts of this unit are fixed. The frame should be strong enough and at the same time not very heavy. It is usually made from a metal angle, a profile pipe or a channel. The parts are connected by welding. The frame can be solid or consist of two parts.
A solid frame is the easiest to make. It is enough to weld a rectangle from a channel or corner. Frame dimensions are calculated based on the dimensions of the engine, gearbox and other components.
Also among owners of personal plots, 4x4 mini tractors are very popular. These are all-wheel drive mini tractors with a breakable frame. The word “all-wheel drive” means that the unit has both drive axles, front and rear. An example of such a frame, made from channel No. 10, is shown in the following photo.
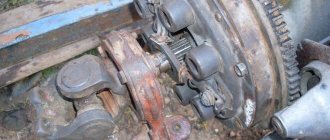
The frame fracture unit is most often made from the driveshaft of a car, for example, from a GAZ-52.
The main advantage of a homemade tractor with a breakable frame is the small turning radius of the unit. Thanks to its high maneuverability, the fracture minitractor is successfully used in small areas where turning a minitractor with a solid frame would be difficult.
Below are drawings of a frame connected by a hinge.
DIY homemade tractors + video
Purchasing a new mini-tractor is expensive and not everyone can afford it. However, it is difficult for an owner to care for a home farm without equipment.
Craftsmen get out of the situation quite simply. They make homemade tractors from old spare parts or remake walk-behind tractors.
We will now try to consider how this all happens in general terms.
Features of assembling a homemade tractor
It is impossible to provide exact instructions for assembling a homemade product, since the entire technical part of this process depends on the spare parts available. To understand how to make a tractor with your own hands, we will look at the main components of this equipment.
Maybe someone will not be satisfied with such an answer, because every person is looking for specifics. Let's talk about why this happens. For example, let’s take the owner’s existing motor. It can be diesel or gasoline with air or water cooling.
These technical characteristics must be taken into account, since the entire design of the homemade product will depend on this. You will have to install a fan in front of an air-cooled motor. The water cooling system is complex and has a completely different design.
Advice! When making your own tractor, try to find an air-cooled motor. It makes it easier to assemble a homemade product.
If you decide to assemble a homemade tractor from a walk-behind tractor, then the engine, wheelset and gearbox remain original.
All you have to do is weld the frame and add another axle for the wheels. When converting a walk-behind tractor, the original wheel pair is the leading one.
It can be located at the back or front. It all depends on what part of the frame the motor will be mounted on.
Regardless of the available spare parts, you need to start assembling a homemade tractor by drawing up a drawing. Having an exact diagram at hand will help you figure out what needs to be put where. We suggest looking at the photo for an example of a drawing of a tractor with the layout of all components.
They begin to assemble the tractor with their own hands by making the frame. Regardless of the existing motor, even if you are remaking a walk-behind tractor, the design is made in two types:
- Fracture. This frame consists of two semi-frames connected to each other by a hinge mechanism. A homemade tractor with a breakable frame is characterized by high maneuverability. A motor with a gearbox is installed on the front half-frame. The rear axle and towbar for additional equipment are attached to the second half-frame.
- One-piece frame. The budget option is considered a classic. The frame is a single fixed structure with two traverses and side members. Jumpers are installed for reinforcement. Sometimes the front of the frame is made narrower than the rear. That is, the shape is a trapezoid.
Advice! A solid frame is easier to manufacture, but in terms of maneuverability such a tractor will be inferior to a broken one.
Any type of frame is welded from a channel. For jumpers, a profile pipe is used. Metal corners of different sizes, as well as sheet steel 5–10 mm thick, will be useful.
The video provides an overview of a homemade tractor:
Spare parts for tractor assembly
So, we continue to consider how to make a homemade tractor, and now it’s time to select spare parts:
- We have already talked about the engine, but we will stop again. For a tractor, it is advisable to find an engine with a power of about 40 horsepower so that the equipment can cope with any tasks. In general, craftsmen install everything that is on the farm: a motor from a Moskvich, a motorcycle, a power plant, etc. If they remake a walk-behind tractor, then the problem with the motor disappears. It is reasonable to convert a walk-behind tractor into a tractor if its power is more than 6 horsepower. Otherwise, the homemade product will turn out to be weak, and it will be of little help on the farm. In addition to power, it is important to take into account the operating speed of the engine. Speed is not an important parameter. The motor must produce high torque at low speeds. Diesel engines have these characteristics.
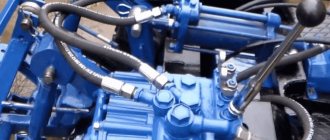
- When remaking a walk-behind tractor, the gearbox remains original. For a different engine, the gearbox will have to be selected from a different vehicle. This unit fits best from a GAZ-51 or 53 car. There is a lot of work to be done to remake the clutch basket so that it fits the mount to the existing engine.
- It wouldn’t hurt to install a PTO on the tractor yourself. Then a homemade product with hydraulics will significantly expand its functionality through the use of attachments.
- Wheel sets are usually used from passenger cars. The rear axle is also taken from there. If the axle shafts are too long, they are shortened. When converting a walk-behind tractor, the drive wheel pair remains original. If the engine from a walk-behind tractor is placed on the rear of the frame, then the track width is increased for the stability of the tractor. On a homemade tractor, the front beam will fit perfectly from a loader. You can simply make a balancing beam yourself on one hinge in the center.
- It is better to find the steering control from a passenger car. When converting an MTZ walk-behind tractor, a three-wheeled tractor is sometimes assembled. In this case, the front wheel along with the steering is removed from the motorcycle. But motorcycle or walk-behind handles are inconvenient to control while reversing. Here it is better to give preference to a traditional round steering wheel.
- Another important component is the towing mechanism. It is welded onto the tractor with your own hands to the rear of the frame. The cart will be hooked up here.
- When converting a walk-behind tractor, the original brake system is used. In another case, it is also removed from other equipment. Do the same with the fuel tank.
What to make a chassis from
To assemble a mini tractor, you need to prepare its chassis. It includes wheels, front and rear axles, and transmission elements.
When choosing wheels for a mini tractor, you should take into account the purpose of using the latter. If the unit is being built for transporting and pulling loads, then a disc diameter of 16 inches will be sufficient. When using a tractor in field conditions, it is better to use more massive wheels with discs with a diameter of 18 to 24 inches.
If the drive axle in your tractor is only the rear one, then the front beam is made quite simply.
- It is necessary to prepare 2 steering knuckles from a VAZ Classic car.
- A piece of the required length is cut from a profile pipe (40x40 mm square). The width of the track will depend on the length of this beam.
- Next, racks of 35x35 mm corners are welded to this pipe. The steering knuckles will be attached to them. There is no need to disconnect the steering bipod - it will be useful when installing the steering mechanism.
- Brackets are welded to the corners into which ball joints are installed.
- The front beam of the mini tractor also has a swinging mechanism in the center. In this case, it, together with the cross, was removed from a UAZ vehicle.
To make a homemade front axle, as well as its rear analogue for an all-wheel drive unit, you will need to take 2 identical chassis units, for example, from a VAZ or Moskvich car, and shorten them. You can learn how to shorten the bridge from a VAZ car from this video.
Important! Axles must have the same gearboxes, with the same gear ratio. Otherwise, the front and rear wheels will rotate at different speeds when the tractor moves.
Since the bridges already have a built-in mechanism for transmitting rotational motion to the wheel axle, there is no need to make a homemade gearbox.
Pros of installing hydraulics
Hydraulics are installed on a minitractor in order to ensure the operation of some of its mechanisms and facilitate the control of this unit. A unit with installed hydraulics has its advantages.
- The car becomes easy to control. The steering wheel can be turned with virtually no effort, with one hand.
- Hydraulics makes it possible to use various attachments.
- The use of hydraulics allows you to modernize the brake system. Thanks to the hydraulic cylinders installed on the unit, the unit brakes instantly.
Why do you need a PTO?
The power take-off shaft (PTO) is designed to drive various agricultural machinery connected to a mini tractor, for example, various tillers for tillage, potato diggers, mowers, snow blowers, etc.
PTO can be either dependent or independent. In the first case, the shaft is driven by a transmission that transmits rotational motion to the wheels. As soon as the wheels stop, the PTO stops rotating. The independent PTO receives rotation from the engine crankshaft. Therefore, the higher the engine speed, the faster the shaft rotates.
In addition, there are tractors with a synchronous PTO. The rotation speed of the synchronous shaft directly depends on the transmission ratio of the moving tractor. Synchronization of movement and rotation is required when the unit operates with sowing equipment.
How to make a front beam for a mini tractor with your own hands
Garage for 2 cars. The width of the gate is 4 m. There is a circular reinforced concrete belt along the top, which serves as a lintel over the gate. After the construction of the 2nd floor, Victor, the lintel above the gate sank in several places, no more than 0.5 cm, Peter.
How can you strengthen the lintel over the gate?? ? We are thinking of placing a square channel with 2 metal plates in the center of the lintel, on the floor and under the lintel.
There is another option - to throw a rail, which at both edges, near the walls where the gate is attached, will stand/attached by welding on square channels. How can you strengthen the lintel over the gate?
Alexandra Samostroy always pays twice because it’s a pity to spend money on a completed project. Reinforce with a vertical channel stand.
Polina Or maybe it’s not the lintel that has sagged, but the foundation that has subsided due to the additional load of the second floor. And your second option is preferable, only instead of a rail you need to put a channel, but a U-shaped one.
Nikolay It’s still the designer who calculates such weights. And maybe 5mm. normal and permissible deflection for this railway. b. jumpers. The gate had to be installed with a gap filled with foam in case of deformation. b. jumpers. According to table 10.7. SNiP 2.01.07-85 clause 5. For lintels over openings, the permissible deflection is 1/200 of the length of the opening. i.e. 20mm. .
True, that's not all! A more accurate value of the permissible deflection is calculated based on the characteristics of the beam materials. That is, how it is reinforced, what concrete it is made of, etc. Most likely, the permissible deflection should be less. But nevertheless, I think 5 mm. , permissible deflection for a span of 4m. . The gate is not installed correctly.
Whether to reinforce the beam or not depends on what and how you did with the reinforcement of the belt. It is possible and unnecessary to reinforce anything if everything is properly reinforced, since deflection is permissible. And if everything there is crazy or like a neighbor’s, then the deflection may be the first bell! You can strengthen it with an I-beam or a rail.
But to do this, you will need to make good supports for the rails at the edges, perhaps build them into the walls if possible, or make additional masonry. Then install the beam correctly with good tight support at the edges and then start working. That is, make it so that it begins to take part of the load. This can be done with jacking. b.
beam and then releasing it after installation of the steel, or using a type of wedge. Naturally, the height of the openings will suffer due to this beam.
Fyodor Strengthen your metal with metal Margarita. If it is possible to place the stand in the middle, then place it. If you need a gate for a car, then install it at 2.5-2.7 m. But you still need to take it into the clip.
Manufacturing a three-point hitch
The hitch is used to connect additional equipment, such as a plow, to the tractor.
The hitch must be movable both in the horizontal and vertical planes . In the first case, mobility helps to reduce the overhang of the nozzle when taxiing. Vertical movement of the suspension is required to lower the equipment into a working position or raise it into a transport position.
The hitch on a mini tractor is made from various parts removed from old agricultural machinery. It is quite difficult to describe how to make a three-point hitch at home. Therefore, it would be more correct to use the following video, which shows the dimensions of all parts of the device.
Selection and installation of brakes and clutch
Brakes must be installed on the rear wheelset. The easiest way is to take ready-made blocks from a UAZ car. The brake pads must be installed on the wheel disks, and the control must be placed on a pedal or lever installed inside the cabin.
To install a clutch on a homemade mini tractor, you can also use a ready-made version from a car. For example, you can use a belt clutch from a Moskvich or UAZ.
The clutch unit is attached to the gearbox, also taken from a car. You can see how the clutch is installed in this video.
Steering installation
Making a steering mechanism yourself is quite difficult, and in principle there is no point, since all the parts can be taken from any passenger car.
The following is a diagram that shows how the standard steering control installed on most self-propelled vehicles works.
When installing the steering mechanism, the steering shaft with gear is connected to the steering bipods, which are located on the steering knuckles mounted on the front beam (the manufacture of the beam was discussed above).
How to make a cabin for a mini tractor
If in the summer you can work on a mini tractor without a cab, then with the onset of the autumn-winter period, using the unit becomes quite uncomfortable or even impossible. Therefore, craftsmen are trying to assemble tractors with cabins in order to use this equipment all year round.
The cabin for homemade equipment is made of sheet steel according to a pre-prepared drawing. You can take the cabin from the MTZ tractor as the basis for the calculations. The following photo shows a drawing, based on which you can make a cabin yourself.
The cabin is manufactured as follows.
- First of all, you need to assemble a frame from wooden blocks according to the dimensions of the drawing.
- Next, a metal profile pipe is cut to the size of the wooden frame parts. All parts are connected by welding.
- The welded structure is placed with the roof on the ground and glass holders are welded inside the cabin.
- The roof is made of 1 mm sheet steel. The fragment can be cut out with a grinder and welded to the top of the cabin.
- The floor and side parts of the cabin are made of 2 mm thick sheet steel.
- The door frame is also welded from a profile pipe. To automatically close the doors, gas elevators can be installed on the frame.
- After installing the glass, the inside of the cabin can be lined with foam rubber and covered with leatherette.
- The cabin is installed on the frame, in a place prepared in advance for it.
In general, to better understand how to make a mini tractor with your own hands, you can watch this video, a kind of guide for beginners.
The nuances of making a caterpillar tractor
Homemade tracked mini tractors are a technique whose main feature is high maneuverability and good cross-country ability. Also, a tractor on tracks creates minimal pressure on the soil, which cannot be said about its wheeled counterpart.
To make a mini tractor on caterpillar tracks, you will need the following structural elements.
- Frame. It is made from a profile pipe or channel.
- Engine. For a caterpillar mini tractor, it is better to use a diesel engine.
- Main bridge. As in the manufacture of a wheeled tractor, for a tracked unit you can also use a ready-made axle from an old car, which should be shortened.
- Transmission. The ideal option would be a box from GAZ-53.
- Clutch. A clutch block from a GAZ-52 will do.
- Caterpillars. They are made from tires from the wheels of large equipment, for example, from a tractor.
To make tracks, you need to take 2 tractor tires and cut off the side parts of them. These tires are then put on the wheels mounted on the frame, as shown in the following photo.
In order for the tractor to turn, a differential must be installed on the rear axle, which will disconnect the right or left wheel from the drive. Also, each wheel must be equipped with a brake that can be controlled separately. When you press the brake pedal and shift the differential, one wheel of the drive axle stops, while the opposite wheel continues to rotate. Due to this, the tractor turns in the desired direction.
Making a mini tractor for households and farms can greatly facilitate the performance of many types of work, and also makes it possible to use it as a vehicle. The article describes in detail how to make a homemade mini tractor and everything for it.
Homemade mini tractors and everything for them: trailer, do-it-yourself front beam
Making a mini tractor for households and farms can greatly facilitate the performance of many types of work, and also makes it possible to use it as a vehicle. The article describes in detail how to make a homemade mini tractor and everything for it.
Making a homemade mini tractor
In a private house, on a plot of land and in a field, the owners have a large amount of work to do. The use of small-scale mechanization can provide significant assistance. Usually we are talking about using:
- simple homemade mechanical devices;
- devices powered by an electric motor;
- walk-behind tractor;
- mini tractor.
Although, at first glance, it may seem that making a tractor yourself is a very difficult task, in fact, making a mini tractor is quite possible. To do this, you need to choose a suitable design and use not only home-made parts and assemblies, but also purchased ones.
Note! When creating such equipment, skills in working with metal, in particular welding, will be of significant benefit.
The following describes in detail the process of independently creating such a machine.
Mini tractor design
In order to design and assemble a simple and reliable mini tractor, the first thing you need to think about is the motor that will ensure its operation. It is important to take into account here that the power plant is needed not only for moving the tractor, it will become an important help in ensuring the operation of attachments.
The basis on which the structure should rest will be a metal frame. The tractor chassis consists of four wheels on two axles.
On a note. Installing hydraulics is not mandatory, but it will make working on the tractor much more comfortable.
A large number of useful attachments on the farm is one of the most important reasons for owning a mini tractor. The design must necessarily provide for the use of a three-point hitch, which is necessary for the reliable connection of additional devices.
What is a mini tractor made of?
The following is a description of the main mini-tractor systems for a farmer or private home owner.
Engine selection
You can use an engine from an old car. It could be a VAZ, GAZ, Oka or Zhiguli.
Mini tractor design
In order to design and assemble a simple and reliable mini tractor, the first thing you need to think about is the motor that will ensure its operation. It is important to take into account here that the power plant is needed not only for moving the tractor, it will become an important help in ensuring the operation of attachments.
The basis on which the structure should rest will be a metal frame. The tractor chassis consists of four wheels on two axles.
On a note. Installing hydraulics is not mandatory, but it will make working on the tractor much more comfortable.
A large number of useful attachments on the farm is one of the most important reasons for owning a mini tractor. The design must necessarily provide for the use of a three-point hitch, which is necessary for the reliable connection of additional devices.
Making a homemade mini tractor
In a private house, on a plot of land and in a field, the owners have a large amount of work to do. The use of small-scale mechanization can provide significant assistance. Usually we are talking about using:
- simple homemade mechanical devices;
- devices powered by an electric motor;
- walk-behind tractor;
- mini tractor.
Although, at first glance, it may seem that making a tractor yourself is a very difficult task, in fact, making a mini tractor is quite possible. To do this, you need to choose a suitable design and use not only home-made parts and assemblies, but also purchased ones.
Note! When creating such equipment, skills in working with metal, in particular welding, will be of significant benefit.
The following describes in detail the process of independently creating such a machine.
What is a mini tractor made of?
The following is a description of the main mini-tractor systems for a farmer or private home owner.
Engine selection
You can use an engine from an old car. It could be a VAZ, GAZ, Oka or Zhiguli. If the farm has a walk-behind tractor, its engine can also be used for this purpose. In order to reduce noise during operation, use a homemade muffler for a mini tractor. A hydraulic device can also be used.
When creating a frame, you need to use a profile pipe. From it you can weld a rectangular structure using a cross member, it will become the basis for the tractor. The dimensions of the minitractor frame are selected in accordance with its design.
There is another manufacturing option called a “breakable frame”. It consists of two smaller frames, which are connected by an adapter.
It is advantageous to use such a frame with all-wheel drive tractors that have a homemade front drive axle for a mini tractor in addition to the rear one.
When choosing how to make a frame for a mini tractor, you need to take into account its dimensions and design features.
Chassis
When installing the chassis system, you need to install wheels, transmission, front and rear axles with hubs.
When choosing wheels, it is necessary to take into account the tasks for which the tractor is being manufactured. If this is done to solve transport problems, wheels with a diameter of about 40 cm are suitable. If you need to work in the field, then it makes sense to use larger wheels to increase maneuverability.
Usually only the rear axle is driven. It is taken ready-made from a passenger car, for example, from a UAZ or Moskvich. In this case, the front beam for the mini tractor is made by hand.
If there is such a need, a homemade gearbox for a mini tractor can be made.
Hydraulic installation
A hydraulic system is necessary when creating a mini-tractor in order to ensure its controllability. This is necessary for the following reasons:
- A tractor equipped with hydraulics is easy to operate. In this case, you can turn the steering wheel almost effortlessly, even with one hand.
- The hydraulic drive makes it possible to ensure the operation of various attachments.
- With this system in place, the brakes will work almost instantly.
Important! You cannot make hydraulics for a mini tractor yourself. It is bought ready-made and installed on a tractor.
You need to understand that some of the engine power will be spent on hydraulics. Therefore, it is not customary to install it on a car if a low-power motor is used.
Is a PTO needed?
This working unit (power take-off shaft) plays an important role when using a mini-tractor. As you know, its use is mainly for transportation or for using various attachments, some of which require a motor to operate.
When using a power take-off shaft, the engine energy will be transferred to the linkage.
There are two main types of PTO:
- Dependent, in which rotation is transmitted from the movement of the wheels. In this case, as soon as the tractor stops, the PTO will stop rotating.
- In the independent version, rotation occurs based on the operation of the motor and will continue even if the tractor does not move.
If you are looking for which hydraulic motor is best to install on a homemade mini tractor, then you can use one from the military-industrial complex or from an SZD motorcycle.
Manufacturing a three-point hitch
This node is very important for this design. The fact is that any attachment must be securely attached to the tractor in order to do its job. This node is just designed for this.
For high-quality work, it is necessary to ensure the mobility of this unit both horizontally and vertically. Horizontal free play is important when making turns; vertical free play will allow you to install the attachment in the lower (working) or upper (disabled) position.
Usually, to manufacture this unit, parts are taken from old agricultural machinery.
Selection and installation of brakes and clutch
In order for the tractor to have brakes, it is recommended to take the ones used on the UAZ. The brake pads will need to be installed so that they are on the wheel rim. To manage them, use one of two options:
They are installed in the driver's cabin.
As a clutch system, you can take a ready-made one, which is intended for use on a UAZ or Moskvich. The gearbox to which the clutch must be attached is also taken ready-made from any car.
Steering installation
Creating a steering wheel can, in principle, be done independently, but it is a rather complicated job, which you can still do without.
Interesting. Usually they use a ready-made steering system taken from a passenger car.
Trailer selection
There are two main types of trailers commonly used:
- Trolley semi-trailer. The tractor carries it behind itself, carrying useful loads.
- A dump trailer for a mini tractor is also used. It has a raised bottom on one side, which makes it easy to unload the dump truck trailer.
How to make a front beam for a homemade mini tractor video
How to remake Zaporozhets.
A serious passion for technology came to me in my youth, when I began not only repairing mopeds myself, but also assembling them from various old parts. Then, as he grew up, he switched to motorcycles, remodeling them in his own way: covering them to his own taste (the word “design” was not yet in my everyday use), making them more convenient, more fashionable, more powerful, more comfortable.
After serving in the army, in 1985 he purchased a VAZ-2108 Sputnik. At that time, the car was not studied, it was reluctantly accepted at a service station, and therefore I had to repair it myself for the most part, delving into its structure, and this “tied” me even more to the technology.
After driving the V8 for two years, I started tuning the car: I redid the bumpers, installed spoilers - then all this was just becoming fashionable.
The car began to look attractive, stand out among its peers, and leaving it near the house overnight became unsafe.
My garage was a bit far away, and I had to get up for work early, when public transport was not yet available. Then I decided to buy at a cheap price an old ZAZ-965 (“humpbacked” “Zaporozhets”) from 1965, which, sleeping under the window, would drive me to the garage in the morning, and back in the evening. I went through it, adjusted it, and along the way I studied it, as they say, down to the screw.
It started for me in any frost, but the stove practically did not warm up. I tried to invent my own gas-powered car, but I never achieved the desired effect.
And then I decided to install a liquid-cooled engine from a VAZ-2103 on the Zaporozhets in order to solve the problem at once. Preliminary estimates showed that the Zhiguli engine fits in the Zaporozhye engine compartment, but the hood cover will still have to be redone.
The increased mass required strengthening the suspension, and the increased power required strengthening the drive of the drive wheels and increasing the efficiency of the brakes. And the wheels themselves had to be changed to ones that would match the engine. Remaking the hood, although it required careful execution, did not cause much trouble.
It was much more difficult to connect the VAZ engine and the Zaporozhye transmission unit, or rather its clutch housing. I made this connection through an adapter plate (flat ring). Its thickness is 24 mm, but I don’t even dare to reproduce the location of the holes in the drawing - everything was done “on the spot”, according to the plaster prints on the cylinder block and clutch housing.
The task was further complicated by the fact that it was also necessary to include holes and a recess for non-standard mounting of the starter. In addition, we had to make a special release bearing fork. Parts and components of the brake system, as well as front hubs and rear shortened axle shafts, were “borrowed” from the VAZ-2101 car. Wheels with tires size 175/70 R13 used from the VAZ “five”.
The front suspension was strengthened with parts from the ZAZ-968, installing new torsion bars, steering knuckles, shock absorbers and other components - only the transverse beam remained standard. I also replaced the steering linkage. At first, I didn’t take any drastic measures with respect to the rear suspension - I just made it stiffer and slightly reduced its travel.
the task at hand—solving the heating problem—somehow naturally became of secondary importance. But I also solved it quite successfully along the way by installing a Zhiguli stove in front under the dashboard.
True, the supply (hot) and return (cold) water pipes had to be stretched from the engine through the entire cabin. A homemade plastic air intake was installed on the trunk lid (I’ll call it the front hood). I cut out a hatch in the roof with a sliding lid.
Thus, the interior was not only well heated in cold weather, but also effectively ventilated in hot weather. But with the cooling system, not everything worked out right away. First of all, I was unable to install the radiator in the nose of the car. Therefore, taking a radiator from a GAZ-53 truck and cutting it in half lengthwise, I installed the halves in the engine compartment on both sides of the engine.
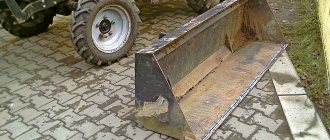
Types of hanging equipment
The attachment for connecting additional equipment can be made at the front or rear of the tractor. In the first case, this is necessary for devices that are attached in front of the tractor (for example, a blade), in the second - for those that must be attached to the rear (this could be, in particular, harrows, rakes or mowers).
Making your own mini-tractor is, although difficult, but a very real task. It is useful for automating labor-intensive household and farm work.
A beam or bridge for a mini tractor serves as the basis to which the systems and elements of the machine are attached. The front beam on a motor tractor serves as a support for various components, and the wheels are also attached to it. Often, craftsmen encounter a beam during the conversion of a walk-behind tractor, when they have to make the front beam of a mini tractor with their own hands.
The rear axle of a mini tractor is the same system to which the wheels and some elements of the overall system are attached. When designing a mini tractor, many people take the front and rear axles from old cars. As a result, the design is strong and reliable. If you have the necessary tools and materials, as well as knowledge on the subject of equipment, then you can make these parts yourself from what you have in your garage.
Which version of a homemade mini tractor to choose?
Homemade mini tractor for household use with a broken frame.
The best option for a homemade mini tractor is a machine with a broken frame. Such a unit consists of 2 parts, rear and front, the coupling of which is carried out by a special hinge mechanism. In the front part are all the control mechanisms, as well as the entire chassis. Control is carried out through a steering wheel and hydraulic cylinders; the entire structure bends on a hinge and changes the relative position of the two parts of the tractor. Thus, if you use this design, you can save on some parts designed to mount the controls, which would normally be located at the rear of the machine.
Differential from loader
The rear part of such a mini tractor is much simpler in design than the front. It consists of a rear axle, which is fixed in cradle on the side members of the axle shaft; a seat for the driver and a device for attaching attachments from the Belorus tractor are installed on this structure. The differential and axle shafts can be taken from any loader. Suspension on the rear can be done, but this is not very advisable; usually shock absorption is achieved due to low pressure in the wheels.
How to make a bridge for a mini tractor?
A mini tractor is a technique that helps a person in the process of cultivating land, transporting goods, planting plants, caring for them, and much more. Factory equipment today is quite expensive, not everyone is ready or has the opportunity to spend such money. But in villages you can often find old cars that are already out of order, but there is still hope to give them a second life. It is from them that craftsmen take various parts to construct a homemade mini tractor.
Creating a mini tractor includes designing the chassis. First of all, bridges need to be installed. It is better to make the rear axle for a mini tractor with your own hands the same as the front one. This will save you from selecting a subordinate number, which is impossible to do without the proper experience and knowledge.
The chassis can be taken from a Zhiguli, but it will need to be shortened. You do not have to additionally look for a gearbox that is already on the rear axle. How to make a beam for a mini tractor? The cross beam can be made from a square pipe or from metal corners.
A driven front axle differs from a non-driven one in that it transmits torque from the cardoon transmission to the wheels. With its help, the machine turns, the steered wheels are stabilized, and pushing forces are transmitted from the drive wheels to the tractor frame. How to make a driving front axle for a mini tractor? You will need:
- Beam;
- Main gear. Consists of bevel gears. Serves to increase torque and transmit it to the differential;
- Differential. Serves to transmit power;
- Wheel reducers. Necessary to increase torque, which is transmitted from the main gear to the wheels. They are also needed to make a turn.
All these elements can be taken from old cars or other equipment. If you don’t know how to calculate the front axle, then you can watch this formula with a detailed description and explanation in the video.
Do-it-yourself mini tractor (homemade): how to make it?
Working on a summer cottage or a small farm constantly requires great effort on the part of the owner. Tilling the land, removing hay, garbage, snow, delivering and applying fertilizers to the soil. Doing this type of work manually can be an overwhelming burden.
A small-sized tractor can make the task easier. In addition, making a mini tractor with your own hands is as easy as shelling pears if you have experience in working with machinery.
Advantages of a homemade mini tractor
It’s quite easy to make the main components of a homemade mini tractor with your own hands. In addition, the cost of such a procedure, if the necessary parts are available, is much lower than purchasing a factory version.
Most often, units are taken from old (broken) home appliances, and the remaining components are purchased in addition. If the farm already has other small-sized equipment, for example, a walk-behind tractor, the task becomes even simpler. Therefore, efficiency is the main advantage of homemade mini tractors.
Also, the advantages of such equipment include the ability to customize the dimensions and combine components on your homemade mini tractor. Standard factory equipment excludes this possibility.
Homemade mini tractor with a breaking frame
As for the disadvantages, here we can highlight:
- the difficulty of developing the correct drawing;
- maintained condition of most parts;
- problems in the functioning of the machine, in case of lack of skills in manufacturing.
What does a homemade mini tractor consist of?
The first thing you need to do before assembling any equipment is to determine what components it consists of. The simplest device of a small-sized tractor includes the following components:
- engine (the engine can be a walk-behind tractor or a scooter);
- a durable power frame on which all other units are mounted;
- hydraulic brake system;
- assembly with brake discs;
- chassis, including wheel axles and wheels (also suspension or a mechanism that replaces it);
- mechanism for attaching attachments with the ability to lift;
- steering column;
- comfortable chair for the operator;
- rear and front lights.
Each of the listed components should be assembled based on a clear general drawing so as not to disturb the proportions of the machine.
Which engine to choose?
As a power unit, you can select a variety of options. You can make a small-sized tractor with a zid engine.
A single-cylinder four-stroke engine with a displacement of 4.5 liters is quite suitable for cultivating land up to 2-3 hectares.
This engine was originally intended for home-made cars, is very easy to maintain and can be easily found on the Internet.
If you have an old Cossack in stock, then the power unit from it is perfect for a homemade tractor.
A car with a ZAZ engine has a power of up to 40-50 horsepower (depending on the engine type). Moreover, if the transmission on the car also works, it is installed on the frame along with the engine.
Engine from Moskvich on a homemade tractor
If you select the most optimal engine for a homemade tractor, then it is better to make a machine with a UD 2 engine.
Like the ZID power unit, UD 2 was developed by the Ulyanovsk plant specifically for home-made machines for agricultural needs. The power of such an engine is only 4 liters. With.
But for processing a small field it is quite enough. In addition, it is very easy to repair.
If the home craftsman has a walk-behind tractor, then the task becomes even simpler. In this case, not only a power device is installed on a homemade mini tractor, but also a front axle with brakes and clutch, part of the frame and steering.
What to make the frame of a homemade mini tractor from?
Before making a power frame, you need to decide on its type. Many craftsmen make tractors with a breakable frame.
This type is an assembly of two halves connected by means of a movable coupling.
The breakable frame allows you to reduce the turning radius, which makes it easier to work on small plots of land and near buildings.
To make such a frame, you need iron corners or channels marked 8. In this case, the front half-frame should be slightly longer. Recommended dimensions – 900 by 360 mm. The back of the frame is assembled to a size of 680 by 360.
Homemade channel frame
After assembling the frame, two pipes with a square cross section are welded across the front part. This is an engine stand. All other stands and corners are installed based on the intended design. It is advisable to weld the elements. Ordinary bolts may not withstand the load.
Two forks and a hinge will be used as a connection between the half-frames. For the hinge, bearings and axle are taken from a Kamaz vehicle. Such a cardan will allow the rear half to move not only horizontally, but also vertically. A plate for mounting is welded to the frame at the back.
If it was decided to make a cast frame, two half-frames are welded with additional channels.
How to make a chassis for a mini tractor with your own hands?
First of all, bridges are installed. To install them, vertical posts reinforced with corners are welded onto the frame. It is best if the homemade front beam for a mini tractor is of the same type as the rear one. In this case, there will be no need to select a subordinate number, which is almost impossible without proper experience.
If the frame is not breakable, the easiest way would be to take the chassis from a Lada. Having slightly adjusted it to size, we immediately install it on the frame. In this case, you will not have to separately look for a gearbox for a mini tractor. It is already installed on the rear axle.
If the frame is broken, it is better to use another scheme. In this case, the front axle on a mini tractor is best made from a cast rod with a diameter of at least 50 mm.
How to shorten the bridge from a VAZ?
Sometimes, in order to construct a homemade mini tractor, it is necessary to shorten the building bridge. Let's consider this process using the example of a rear axle from a VAZ. A shortened axle is necessary in order to reduce the width of the wheelbase, thereby making the car more compact and maneuverable.
First you need to carefully prepare for the process. You need the rear axle itself, as well as tools such as a welding machine, grinder, vice, screwdrivers, and more.
You need to trim the rear axle of a VAZ as follows:
- You need to cut off the cup for the spring;
- The end flange must be pulled out;
- The removed axle must be measured, compared with the drawing, and cut to size with a grinder;
- At the tip of the segment, place a notch, which will serve as a mark for the “male” groove;
- Drill a hole inside the cup;
- After this, the axle shaft is joined together and welded;
- The last stage - the finished axle shaft is inserted into the bridge. Welding is done on both sides.