How to Adjust Ford Drum Brakes
Repeatedly restoring the correct brake pedal height and parking brake function is just a matter of adjusting your Ford rear drum brakes. As brake pads wear, the distance between the pad and the drum increases. This causes the brake pedal or parking brake lever/pedal to move further before the shoes make contact with the drum. Adjusting a Ford drum brake system is within the capabilities of the average home mechanic.
- 1 Step 1
- 2 Step 2
- 3 Step 3
- 4 Items you will need
Ford Focus | Adjusting the parking brake
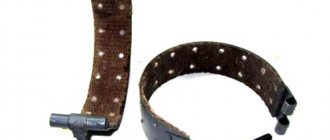
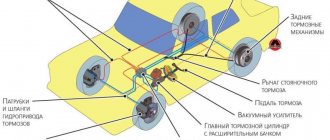
The parking brake lever activates the brake mechanisms of the rear wheels through cable rods. A steel cable in a flexible twisted braid is used as rods. The wear of the parking brake during operation is insignificant.
The parking brake is adjusted when the service brake system is in good working order in the following cases:
— after replacing the parking brake cables;
— after replacing the guide pads of the brake disc mechanism;
— after replacing brake pads or brake discs;
- with a large stroke of the parking lever.
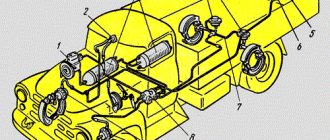
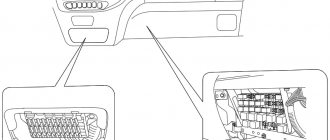
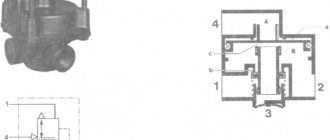
In vehicles with rear drum brakes, the parking brake is adjusted in the parking brake lever mounting area inside the vehicle. Access to the brake cables is open from the side of the parking brake lever bracket.
On vehicles with rear disc brakes, the parking brake is adjusted in the area of the brake cylinder.
WARNING
The cable drive and all moving elements of the parking brake system must move smoothly, and the rear brake mechanisms of the working system must be adjusted.
Adjusting the parking brake
with rear drum brakes
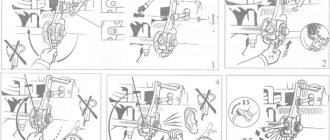
Adjust the parking brake with rear drum brakes in the following order:
- press the brake pedal firmly several times to set the correct gaps between the pads and drums or discs;
- release the brake pedal and apply and release the parking brake several times,
— lower the parking brake lever to the lower position;
— remove the rear section of the center console to gain access to the parking brake lever;
— place the stops under the front wheels, then jack up the rear of the car and place it on the supports;
On some vehicle models, the parking brake adjusting nuts can be accessed by removing the ashtray at the rear of the center console.
— tighten the parking brake lever to the fourth tooth of the lock latch, loosen the lock nuts and tighten the adjusting nuts to the same angle until both rear wheels are still difficult to turn;
— release the parking brake lever and check whether both wheels can rotate freely;
— check the adjustment. To do this, fully tighten the parking brake and count the clicks of the ratchet, then, if necessary, repeat the adjustment;
— after completing the adjustment, tighten the locknuts while holding the adjusting nuts;
— depending on the design, install a section (or ashtray) of the center console.
Adjusting the parking brake
with rear disc brakes
Adjust the parking brake with rear disc brakes in the following order:
- Press the brake pedal firmly several times to set the correct gaps between the pads and drums or discs, release the brake pedal and apply and release the parking brake several times, then lower the parking brake lever to the down position;
— remove the rear section of the center console to gain access to the parking brake lever;
— place the stops under the front wheels, then jack up the rear of the car and place it on the supports;
— unscrew the locknuts and adjusting nuts of the parking brake, turning them at equal angles until the parking brake levers of the rear calipers move back to the stops;
Basic malfunctions of the brake system and their elimination
Car pulls or skids when braking
| Car pulls or skids when braking | |
| Cause of malfunction | Elimination methods |
| Wheel cylinder piston jamming | Replace cylinder |
| Blocked brake lines: tubes or hoses | Replace damaged tubes and hoses |
| Separation of the lining from the base of the brake pad | Replace the block (it’s better to have everything on the same axis at the same time) |
| Oiling of brake discs, drums, linings | Clean oily discs and drums and replace pads. Eliminate the cause of the oiling |
| An ice or salt crust has formed on the surface of the linings (in winter). The pads are wet | When starting to drive, check the brakes at low speed. In the rain and after driving through deep puddles, dry the brakes by lightly pressing the brake pedal. |
| Different tire pressures on left and right wheels | Set normal pressure |
| Significant difference in tire wear | Replace your worn tire |
| The pressure regulator drive is incorrectly adjusted | Adjust the drive |
| Pressure regulator faulty | Replace regulator |
| One of the circuits of the service brake system does not work (braking efficiency is significantly reduced) | Eliminate fluid leakage from the brake system, bleed the system |
| Brake disc deformation | Replace both drives |
| Wheel axial play (severe wear of the front wheel bearings or loosening of the hub nut) | Tighten the wheel hub nut, replace the bearing if necessary |
| Brake drum ovality | Grind or replace the drum |
| The strut shock absorber is faulty | Replace both shock absorbers |
| Uneven spring settlement of the front suspension | Replace both springs |
| Wheel alignment angles are incorrect | Adjust wheel alignment |
Increased brake pedal travel
| Increased brake pedal travel (the pedal is “soft” or “falls in”) | |
| Cause of malfunction | Elimination methods |
| Air in the brake system, brake fluid leakage through leaks in hydraulic drive connections, damage to the seals in the master brake cylinder, pressure regulator, damage to brake pipes and hoses | Inspect all lines, their threaded connections and cylinders, and eliminate leaks. Restore the normal fluid level in the brake reservoir and bleed the system. If you find damage to the brake hoses (cracks, swelling or traces of brake fluid), replace the hoses. If you suspect defects in the master brake cylinder, replace it with a good one. |
| The rubber cuffs of the cylinders are swollen due to oil, gasoline, etc. getting into the brake fluid. | Replace cylinders, hoses, completely drain the brake fluid, flush the system with fresh fluid and bleed |
| Overheating of brake mechanisms | Allow the brakes to cool. Use only DOT-4 brake fluids in the system. Replace brake fluid promptly |
| The gap between the pads and the drum has been increased (the automatic gap adjustment device does not work) | Replace the wheel cylinder, bleed the system |
| One of the circuits of the service brake system does not work | Eliminate fluid leakage from the brake system, bleed the system |
| Increased (more than 0.15 mm) runout of the brake disc | Replace both drives |
The car brakes poorly
| The brake pedal travel is within normal limits (the pedal is hard), but the car brakes poorly | |
| Cause of malfunction | Elimination methods |
| Wheel cylinder piston jamming | Replace cylinder |
| Blocked brake lines: tubes (due to dents) or hoses (due to swelling or delamination of rubber) | Replace damaged tubes and hoses |
| Oiling of brake discs, drums, linings | Clean oily discs and drums and replace pads. Eliminate the cause of the oiling |
| Complete wear of the brake linings (brake grinding) | Replace the brake pads (all on one axle at the same time) |
| An ice or salt crust has formed on the surface of the linings (in winter). The pads are wet | When starting to drive, check the brakes at low speed. In the rain and after driving through deep puddles, dry the brakes by lightly pressing the brake pedal. |
| Low quality lining material | Replace the pads (all on the same axis at the same time) |
| Severe corrosion of the brake disc (due to poor quality disc and/or lining material) | Replace drives |
| The brake pad lining has peeled off from the base. | Replace the pads (all on the same axis at the same time) |
| The pressure regulator drive is incorrectly adjusted | Adjust the drive |
| Pressure regulator faulty | Replace regulator |
| The vacuum booster is faulty or the hose connecting the booster to the receiver is leaking | Check the integrity of the hose, its fit on the fittings, and the tightness of the clamps. Check the amplifier's operation |
Incomplete release of all wheels
| Incomplete release of all wheels | |
| Cause of malfunction | Elimination methods |
| There is no free play in the brake pedal | Adjust pedal free play |
| The rubber cuffs of the cylinders are swollen due to oil, gasoline, etc. getting into the brake fluid. | Replace cylinders, hoses, completely drain the brake fluid, flush the system with fresh fluid and bleed |
| The master cylinder piston is jammed (due to corrosion, broken return springs) | Replace the master cylinder, bleed the system |
Braking one of the wheels when the brake pedal is released
| Braking one of the wheels when the brake pedal is released | |
| Cause of malfunction | Elimination methods |
| Wheel cylinder piston jamming | Replace cylinder |
| The rubber cuffs of the cylinders are swollen due to oil, gasoline, etc. getting into the brake fluid. | Replace cylinders, hoses, completely drain the brake fluid, flush the system with fresh fluid and bleed |
| Blocked brake lines: tubes (due to dents) or hoses (due to swelling or delamination of rubber) | Replace damaged tubes and hoses |
| Seizing of pads due to severe contamination of the caliper supporting surfaces | Remove the pads, clean the pad and caliper bearing surfaces |
| Rear brake pad lining peeling off | Replace the pads (all on the same axis at the same time) |
| Rear brake pad tension spring is loose or broken | Replace the spring |
| Deformation of the spacer bar, misalignment of the pads due to deformation of the brake shield | Straighten or replace spacer bar, brake shield |
| The attachment of the shoe guide to the steering knuckle is loose | Tighten the bolts |
| The parking brake is too tight, the cables are jammed in the sheaths | Adjust the tension of the cables, lubricate them with engine oil if the sheath is damaged or the cable wires are frayed, and if there is severe corrosion, replace the cable |
Insufficient effectiveness of the parking brake system
| Insufficient effectiveness of the parking brake system | |
| Cause of malfunction | Elimination methods |
| Incorrect drive adjustment | Adjust the drive |
| Drive cables are jammed in sheaths | Lubricate the cables with engine oil if the sheath is damaged or the cable wires are frayed, and if there is severe corrosion, replace the cable |
| Oily brake drums and linings | Clean oily discs and drums and replace pads. Eliminate the cause of the oiling |
| An ice or salt crust has formed on the surface of the linings (in winter). The pads are wet | When starting to drive, check the brakes at low speed. In the rain and after driving through deep puddles, dry the brakes by lightly pressing the brake pedal. |
When the parking brake lever is released, the wheels do not release the brakes.
| When the parking brake lever is released, the wheels do not release the brakes. | |
| Cause of malfunction | Elimination methods |
| Incorrect drive adjustment | Adjust the drive |
| After parking the car for a long time, the pads stuck (or froze) to the drum | While pulling the lever or cables, try to carefully (so as not to tear off the brake pads) turn the wheel. When parking the car, if possible, do not tighten the brake, but engage the gear |
Technical characteristics of Ford Econoline E-150 Cargo Van 4.6 / Ford Ecoline in the back of 4 doors. van with 225 hp engine, 4 automatic transmission, produced from 2003 to 2009.
Source
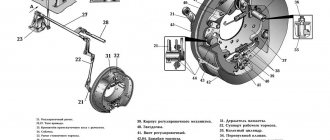
Replacing pads and linings
Brake pads and linings are the working part of the system that is subject to the greatest degree of wear and tear and requires frequent replacement. The pads in drum brakes wear out a little slower than in disc brakes due to the lack of thermal shock. If, as a result of diagnosing and determining the fault code, our technicians find out that at least one set of pads has worn below the permissible limit, then the pads are changed on both wheels of the axle. Uneven wear of the pads on one axle requires diagnostics of the entire brake system to determine the cause. Common causes are malfunction of the caliper, or PGU - pneumatic brake booster.
We carry out work on replacing pads and linings in the following order:
- The car is lifted, the wheels are removed;
- Removing the drum or caliper;
- Diagnostics of pads, drums or discs;
- Worn ones are removed and new linings are installed;
- Adjusting the brake system;
- Assembling and checking the operation of brakes.
Is it possible to turn it off without consequences?
The main thing that threatens a driver who has de-energized the anti-lock braking system is an increased risk of getting into an accident. Therefore, disabling ABS in constant mode or when driving in urban conditions is not permissible. This may be a temporary measure in difficult driving conditions and cannot be used permanently due to the increased likelihood of being involved in an accident.
It must be taken into account that a modern car is a high-tech product, so interfering with its structure can lead to negative consequences. Many manufacturers additionally insure against those wishing to disable the ABS. For example, on Renault cars, de-energizing the ABS will lead to failure of the speedometer, odometer and fuel consumption sensor.
Exterior and interior of the cabin
The Ford Cargo cabin is quite compact in size. At the same time, it has special side compartments, which are quite roomy and convenient for the size of the machine. The working area in the car is minimalist, having only the most important functional features. The handrails at the entrance, as well as the hatch handles, are not covered with anything, which is why in severe frosts this causes some inconvenience.
The windows in Ford Cargo are equipped with electric lifts, which are located in the center of the dashboard, and not on the door itself. Directly next to them is a mechanism for adjusting the rear-view mirrors.
The Ford Cargo also has sleeping places - they are located directly behind the front seats. Their overall dimensions are quite convenient. Both are 190 centimeters long and 67 and 58 centimeters wide.
A small on-board computer is installed in the central part of the dashboard on the Ford Cargo. In order for the driver to conveniently store things, several compartments are equipped in the upper part of the cabin. There are cup holders near the gearshift lever.
Description of the Ford Cargo cabin as a whole is quite comfortable. The truck is trying to become an analogue of its European competitors, only slightly inferior to them in some things.
Ford Cargo 2022 review and specifications
Ford Cargo is the most successful series of trucks from the American manufacturer. Their production began back in 1982, when model 1812 trucks first appeared on the market. Initially, sales started in three countries - Turkey, Brazil and the UK. Despite the company's financial problems, which began in 1997, the series of trucks continued to be produced, and their sales reached India and the USA.
Content:
The vehicles are designed for transporting construction, agricultural and other materials, or some other large-tonnage cargo. One of the most successful series is considered to be the H298, which began to be actively supplied to the CIS countries starting in 2007.
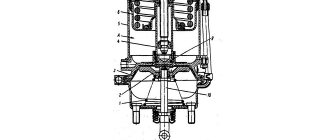
Checking the wear of brake pads on a Ford Cargo
- Number of lifts:
4 - Number of places:
8
- ‹
- 1
- ›
How to choose a service station?
Choose a service station based on the range of services provided, their cost and rating on the auto portal. The more services a company provides, the more specialists of various profiles work for them. This may indicate that the technicians will be able to solve your problem and repair your car.
What is the nearest service station to me?
Go to the website and see which mark of which company is located closest to your location. All companies are displayed on the map with separate types of markers.
What is the cost of car service services?
Car service services are assessed by complexity, duration of work and cost of replacement parts. Before the repair, you will be inspected and informed about the estimated cost of the repair, the “From” and “To” indicator.