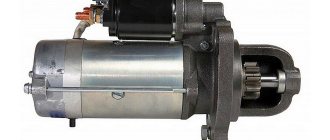
Disassembly and assembly of the P-23U starting engine
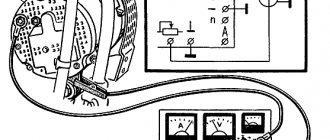
The starting motor uses a magneto M149 of left rotation, with a starting accelerator, two-spark, three-terminal: two terminals are connected to the engine spark plugs, one terminal is additional, closed to ground.
The magneto has a remote ignition cut-off terminal. The magneto is attached to the engine by a flange, with nuts on three studs. The magneto drive is carried out from the end of the magneto drive roller.
Remove the magneto for maintenance or replacement in the following cases:
- the magneto causes interruptions in spark formation (interruptions in the operation of the starting motor);
- The magneto does not produce a spark or produces a weak spark (the starting motor does not start).
The magneto must be replaced if there are cracks and breaks in its body or if its functionality cannot be restored during routine repairs, which is determined after preliminary disassembly and checking the technical condition of its assembly units and parts.
Disassemble, repair and test the magneto in specialized workshops.
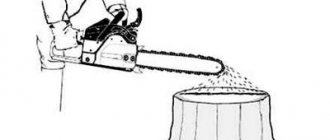
Difficulties
Our people don’t want to buy pullers and they put everything under the rotor and even try to knock it down with a hammer, and once I came across a scooter with a piece of some kind of metal welded to the rotor. They probably welded a hook and wanted to pull it off with a KAMAZ.
On the one hand, you can understand people: why buy an expensive tool for a one-time job?.. On the other hand, I don’t understand people: why buy and personally damage a scooter with a hammer, if you can give it to a mechanic for repairs? A dilemma, whatever one may say.
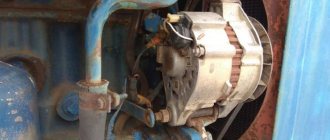
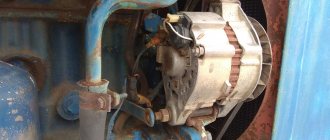
Theory
The generator consists of two main parts: the rotor and the stator. The stator is attached to the engine crankcase and can be removed very easily, literally “by hand”. But the situation with the rotor is different. The rotor is mounted on a cone and clamped with a nut, and it is clamped tightly, and in order to remove it from there, you must first secure it from turning, then unscrew the nut and only then use a puller to pull it off the cone.
How to make a disc harrow for a mini tractor with your own hands
Let's look at how a homemade disc harrow for a mini tractor is made.
First of all, you need to prepare the following materials:
- channel;
- corner;
- used car wheels;
- durable metal pipe;
- strong belt;
- disks;
- wheels of small diameter.
A do-it-yourself harrow for a mini tractor is made from these materials.
The structure will consist of the following components:
- frame made of metal corners;
- disks;
- bracket;
- rotation mechanism;
- beams;
- wheels.
Let's consider the process of assembling attachments. First you need to take 8 disks with a diameter of 56 cm. Attach them to a metal pipe having a length of 2.6 m. The distance between them should be 15 cm.
After this, you need to assemble the frame from metal corners. Using welding, the corners are connected in the form of a square structure. A three-point fixation method is used: at the top of the frame, with the right and left pins.
You can also connect using a belt. Then the finished product is supplemented with wheels, then it will be much more maneuverable when cornering.
How to unscrew the nut?
To fix the rotor, I sometimes use a homemade puller similar to the factory one. I made it from old unnecessary pieces of hardware, and it works no worse than the factory one.
If you don't mind the money, you can buy yourself a factory one. It is inexpensive and easier to operate than a steamed turnip: insert the pins into special holes in the rotor, rest the lever on something and calmly unscrew the nut. By the way, such clamps are sold not only in spare parts stores, but also in power tool stores.
In power tool stores, traders position this device as a universal wrench for loosening nuts on angle grinders (angle grinders). It’s called: “universal wrench for angle grinders.” It costs only 160 rubles, and the original, supposedly “correct” one costs 350 rubles.
If you buy the same one for yourself, immediately cut its pins, otherwise they are very long in stock and can damage the generator windings during operation.
We examine the scooter from all sides to see if there is a generator on it, remove the casing and cooling impeller from it.
Unscrew the bolts and remove the impeller from the rotor.
Let me digress a little: do not lose the bolts that secure the impeller to the rotor, but it is best to immediately remove them. I had the opportunity to repair a scooter, the owner of which lost the original bolt and tightened another one in its place, but it turned out to be a little longer and broke the windings when starting the engine.
The bolt was only a few millimeters longer than the original one.
We fix the rotor and unscrew the nut. As I already said: in my work I sometimes use homemade tools, in this case a puller.
We unscrew the nut and remove it together with the washer from the rotor. If the puck is not there, then someone has already managed to dig around there before you...
Disc harrow for mini tractor
A disc harrow is used when the tractor speed is no more than 7 km/h. In this case, the draft force of the tractor itself is used. When loosening the soil, the structure is used together with a plow to improve the harrowing process.
Disc harrows for tractors are used in regions where the soil moisture level is no more than 25%. This design consists of several disks located vertically at a slight angle to the main axis of the mechanism. At the same time, it becomes possible to adjust the depth and angle of tillage.
When the equipment is operating, the discs perform the function of a blade and a plowshare, which reduces the load on the tractor and effectively loosens the soil.
Such equipment is used in fields with a large amount of plant residues, while the grass is wound onto the disks and does not clog the space between them. Currently, these devices are sold for tractors with a width of 1100 mm or 1500 mm. Depending on the power of the minitractor, attachments with a certain number of disks are used.
Such equipment can be made at home from scrap materials.
Self-made structures have the following advantages:
- productivity increases to 2 ha/h;
- the design can perform many tasks;
- the mechanism has a large working width;
- Such attachments have a low cost.
Factory puller
The rotor can be removed using either a factory puller or a homemade one. The option with a factory and homemade puller has its pros and cons. I'll start with the disadvantages of the factory puller.
The main disadvantage of a factory puller is its price. A factory puller is very, very expensive. About 500-600 rubles. But price is essentially not a very important criterion for me. Versatility, reliability, ease of use and durability are much more important to me. Unfortunately, the factory puller does not have all these advantages, except perhaps ease of use.
The versatility of the factory puller is zero and, unfortunately, it is only suitable for a certain series of engines. And if you need to repair a scooter that is not widely used in our country, then you will also have to buy a new puller for it. And this will be very, very difficult to do, since tools for rare models of scooters are as rare on sale as spare parts.
The reliability of the factory puller is extremely low. I won’t say that the problem is in the design itself, rather the opposite: the design is more than perfect. Where else could it be more perfect?.. Nut + bolt - that’s its entire design.
But the quality... There is something to discuss here. The quality of factory pullers leaves much to be desired. They are enough for literally several times, and I’m talking about expensive pullers for 500-600 rubles.
Cheap ones at 220-250 rubles in terms of quality are completely out of the question. Not only are they made of some kind of plasticine, but even this seems not enough for the manufacturer of this shit. He still manages to make them thinner or even thicker than necessary.
This is what the cheapest puller looks like, or rather, what’s left of it: a bolt from it is lost somewhere. It was used only once - the thread was immediately torn off, both on the puller itself and on the rotor, although before using this guan it was good there.
And even if you imagine the situation. that I will be able to buy a good branded puller, even if it costs 1,500 rubles, but it costs about that much. So where do I put the tusks (or rather, where can I get away from them???), who kill the threads under the puller and then, with an innocent look, roll their garbage dumps to me for repairs?
This is what a high-quality factory puller looks like. Their prices are real - from 500 rubles and above.
Cons are minuses, but the factory puller also has its advantages. One of which is ease of use. And it is really convenient and easy to use. What's inconvenient about that?.. Screw it into the rotor, tighten the bolt and the rotor itself jumps into your hand.
"Big Mask" - the largest walking excavator
The heaviest walking excavator in the world was created in the 60s. This is a 4250-W excavator that was used at a coal mine in Ohio. The “height” of the excavator was 67.8 m, width - 46.2 m, length - 148.6 m, and the volume of the machine body inside was 46x49x40 m. The giant weighed 13,500 tons. The length of the boom was 95 m, at its end there was a on steel cables with a diameter of 127 tons, a huge bucket weighing 230 tons. This huge “mouth” of the machine scooped up to 168 m3 of rock. The titan moved on 20-meter “skis”.
Photo source: techstory.ru The largest walking excavator in the world was created in the 60s.
Homemade puller
Unfortunately, homemade, just like factory-made, is not without its drawbacks. It is moderately reliable, versatile, and cheap, but it is not so convenient to use, and if you do not know how to use it, you can easily break the threads under the bolts of the cooling impeller.
Which puller you will use is up to you to decide. I have described all the pros and cons of both options for you.
For myself, I chose the option with a homemade puller. And the price has nothing to do with it. It's all about experience. Over the years of work, I tried a lot of things and eventually came to the conclusion that there is nothing better than a homemade tool puller.
I made my puller in literally an hour, if not less. I bought the largest washer that was available in the store, welded a smaller washer into its center, and welded a regular nut into the center of the small washer.
I screwed a bolt from a regular car puller into the nut, attached the washer to the cooling impeller, marked points with a pencil through the holes for the bolts, marked and drilled the holes.
If you don’t want to make a puller, buy a factory one at the store or ask your friends. Just before purchasing, just in case, remove the cooling impeller and look at the condition of the thread.
Removing the rotor
Insert the bolts into the required holes. We take the bolts from the cooling impeller - they fit there perfectly. In order not to touch the windings, we screw restrictive nuts onto the bolts - they will not allow the bolts to go deep inside the generator.
We apply the puller to the rotor and screw the bolts into the holes. In order not to break the thread, slightly tighten the central bolt and see if all the bolts are tight. If any bolt is loose, tighten it.
This way we will evenly distribute the load between the bolts. If you neglect this moment, the entire load, unnoticed by you, can rest on only one bolt or two, and then they will break out of the rotor along with the thread. We don't need this, of course.
Now the main thing: what is there, you cannot tighten the central bolt by force. In this case, excessive force will not achieve anything. Everything must be done slowly and competently. Otherwise, you will tear the puller out of the rotor along with the roots, and then your budget will become completely financially insolvent.
You only need to remove the rotor this way: Lightly tighten the central bolt of the puller with a wrench, lightly hit the end of the central bolt with a small hammer - the rotor, usually, after the first blow, flies off the cone without talking, if it doesn’t fly off, pull the bolt again and hit again.
I learned this technique back in 1996, when I had the opportunity to remove the reel drive pulley of the Kolos combine harvester from the shaft. If it weren’t for one smart person who promptly told me how to work with a puller correctly, then I would have smashed both the pulley and the puller and the sledgehammer along with the combine...
The rotor sits on a key. If you do not plan to further disassemble the engine, leave it as is. And if you plan, you better get it, otherwise you’ll lose it.
A broken key can be easily removed with small pliers; if the key fits very tightly, leave it, it won’t get away from you.
So that you don’t have to guess later how your stator was positioned, we put marks with a core or take a photo, remember it, or do something else. This is necessary in order to protect yourself from problems with a lost outline.
HEAVY DISC HARROW BDT-7: DIAGRAM AND ADJUSTMENT
Important mechanisms of tillage machines are harrows; in this article you will learn the principle of the design and operation of the BDT-7 disc harrow, methods for its adjustment; full technical specifications are given at the end of the material.
It is intended for developing layers after plowing virgin lands, processing heavy soils after harvesting row crops and caring for meadows and pastures. It is aggregated with tractors T-150, T-150K and K-701.
DIAGRAM AND PRINCIPLE OF OPERATION OF THE DISC HARROW BDT-7
We present a complete diagram and explain the design of the BDT-7 disc harrow
1 — side left frame; 2 - pin; 3 — disk left front battery; 4 - middle frame; 5 and 13 — hydraulic cylinders for lifting side frames; 6 - pipelines; 7 — disk right front battery; 8 — side right frame; 9 — right disk batteries; 10 - stretching; 11 — hinge; 12 — transport wheel; 14 — cranked axis; 15 — hydraulic cylinder for lifting the middle frame; 16 — rear right disk battery; 17 — left rear disk battery (9 disks); 18 — left disk batteries; 19 — brackets; 20 — bracket with a slot; 21 — scraper beam; 22 - guillemot; 23 - intermediate bobbin
The harrow is a trailed hydraulic harrow, consisting of an articulated three-section frame, eight batteries of cut-out spherical disks installed in two rows, and a hydraulic control mechanism.
Outline
It happens that when installing it back, the stator is installed in reverse, and then depending on your luck: everything may go without consequences, or the spark may disappear or interruptions may appear. To avoid this, any, not just CDI-type scooter generators must be installed exactly as they were originally installed. If you follow this golden rule, you will be happy.
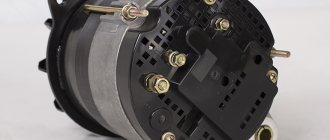
We unscrew the bolts.
We remove the stator. Installation of the generator is carried out in reverse order.
How to make a disc harrow for a mini tractor with your own hands
A disc harrow for a mini tractor is a type of attachment and is designed for soil cultivation. This device loosens the soil, allows you to level the soil surface, destroys the crust, eliminates weeds, and protects the soil from drying out. Soil humidity must be at least 50%, otherwise dust will form, which is unacceptable for agricultural crops.