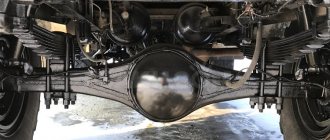
The rear axle housing of the GAZ-53 has the form of a stamped-welded mechanism with a rectangular cross-section. Its middle section is held together at the rear by a welded stamped cap, and at the front there is a reinforcement. The clutch of the spring pads is made with longitudinal seams by welding to the crankcase in a pair, and the wheel axles are welded to the end of the sleeves. In turn, the axles have flanges that serve as a kind of fastening for the brake shields. In addition, the oil seal bushing is placed on the trunnion using a press.
The gearbox in this system has a special meaning.
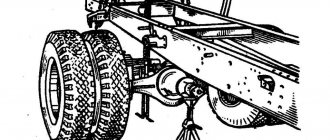
Detailed description of the bridge dismantling stage
Before repairing the gearbox, it is necessary to dismantle the rear axle. Prepare for the process and unscrew the plug responsible for draining the oil.
Then follow these guidelines:
- Unscrew the nuts holding the axle shafts together. After this, the axle shafts are ready to be lifted using the dismantling flanges. Don't forget to remove the axle flange gasket.
- Unscrew the locknut holding the outer hub bearing together and remove the lock washer. At the same time, unscrew the nut holding the hub bearings together. After this, remove the brake drum along with the hub.
- Press out the outer race and remove the inner ring of the outer hub bearing. Here you will need a puller with a grip installed in it. It's simple: the gripper legs are brought to the end of the ring and moved apart until screwing the bolt into the axle reaches the stop.
- Rotate the screw to remove the bearing ring. Remove the oil seal, support washer and inner race of the inner hub bearing. The method for removing the outer ring of the inner bearing is similar to the previous one.
- Undo the cotter pins and unscrew the nuts, then remove the bolts holding the brakes to the axle housing flange. After this, simply remove the entire brake and oil deflector. Then remove the bolts holding the gearbox to the rear axle housing. The bridge gearbox is removed using bolts for dismantling. Don't forget to remove the gasket and unscrew the breather.
Detailed description of the unit disassembly stage
After the previous manipulations, the gearbox itself is disassembled by following the following steps:
- The plug from the neck of the gearbox housing and the plug of the oil receiving tube are turned out. Then the bolt is unscrewed, removing the locking plate. We should not forget about removing the tube, springs and plate from the oil channel.
- The adjusting screw of the driven gear stop, which is responsible for the adjustment, can be unpinned and unscrewed. Do not forget about removing the bushing responsible for adjustment and the spring ring.
- The bolts connecting the locking plates and the differential bearing caps of the rear axle gearbox are unscrewed. After which the locking plates are dismantled. The adjusting nuts are also unscrewed and the bearing caps are removed. It is very important not to forget to mark these components before working with them so that they can be mounted in the same position during subsequent assembly.
- The outer rings of the differential bearings of the rear axle gearbox and their nuts responsible for adjustment are removed.
- The differential of the Gas-53 rear axle gearbox is removed from the crankcase entirely. The bolts connecting the drive gear bearing couplings are unscrewed. The drive gear is also pressed out entirely from the gearbox housing. At the very end, the gaskets responsible for the adjustment are removed from the crankcase neck.
Please note: before the stage of removing the covers, focus on the marks applied to the outer surfaces of the covers and the side surfaces of the GAZ-53 gearbox housing. They are represented by identical digital values, the functional task of which is to avoid dismantling of parts.
Troubleshooting without disassembling the gearbox
Some deviations from the normal operation of the gear module are associated with a lack of oil in its block, its leakage or its poor quality, so the preliminary, simplest action would be to change the oil and provide the structural parts with constant high-quality lubrication.
When replacing, you need to pay attention to the following points:
The condition of the breather, a device that ensures equalization of internal and external pressure, as well as preventing contamination of internal surfaces. Contamination of the breather itself will cause oil leaks caused by excess internal pressure.
Detailed description of the adjustment step
Factory adjustment is provided for the GAZ-53 rear axle bearings, side clearance and contact in the gear mesh. After use, these components do not require adjustment. The exception is the prerequisites for rebuilding the bridge and replacing any parts or significant wear of the bearings. It should be remembered that the lateral clearance of the gear teeth of the GAZ-53 rear axle gearbox, which increases due to wear of the teeth themselves, cannot be adjusted. This manipulation can lead to irreversible deviations in the tooth engagement.
As a result, this will result in increased noise or broken teeth. The backlash of tapered bearings can be eliminated, which has no prerequisites for violating the relative position of the driven and driving gears.
Detailed description of the assembly stage of the unit
After the gearbox has been adjusted and repaired, we begin to reassemble it.
The course of manipulations is presented in the form of the reverse execution of the stages of disassembling the unit, however, it is characterized by the following features:
- The gaskets responsible for the adjustment are installed on the end of the gearbox housing with a total thickness of 1.5 mm.
- The cover and coupling are secured with bolts with a torque of 9-11 daNm (9-11 kgfm).
- At the stage of installing the differential and the outer ring of the differential bearings on the crankcase, it is necessary to ensure that the assembled gears of the main pair are complete.
- Installing and securing the differential bearing cap with bolts implies a torque of 20-23 daNm (20-23 kgfm). Do not forget to compare the numbers of the covers to match the numbers of the side surfaces of the crankcase.
- At the stage of screwing in the threads of the crankcase and covers with the adjusting nuts of the differential bearings, use the 5-U-27286 wrench.
- The differential bearing preload, side clearance and gear mesh contact can be adjusted.
- Maintain clearance between the stop and driven gear of the screw by screwing it in until it stops. After this, you will need to unscrew it 1/6 of a turn and lock it with a nut.
- The forward and reverse gearbox can be run in.
Analogs
In warehouses: 24 pcs.
Characteristics
| Order code | 038778 |
| Articles | |
| Catalog group | Transmission, ..Rear axle |
| Width, m | 0.4 |
| Height, m | 0.493 |
| Length, m | 0.5 |
| Weight, kg | 69.5 |
Options
| Amount in a package | 1 |
| Delivery time upon order | 120 |
| Manufacturer | GAS |
Shipping territory
Other partner warehouses and stores
+7 (ext. 7576 or 7585) [email protected] Shipments only for legal entities by pre-order
Mon-Fri: from 9:00 to 18:00, Sat, Sun: closed
+7 [email protected] Mon-Fri: from 9:00 to 20:00, Sat: from 9:00 to 18:00, Sun: from 9:00 to 16:00
+7 [email protected] OPT: Mon-Fri: from 9:00 to 18:00, Sat-Sun: closed. Retail: Mon-Fri: from 8:30 to 17:30, Sat: from 10:00 to 16:00, Sun: closed
+7 [email protected] Mon: from 8:30 to 18:00, Tue-Thu: from 9:00 to 18:00, Fri: from 9:00 to 17:30, Sat-Sun: closed
Detailed description of the bridge assembly stage
The gearbox is ready for installation in the GAZ-53 rear axle housing, which is assembled as follows:
- A drain plug is screwed into the rear axle housing. Then the gasket is placed on the housing flange of the GAZ-53 rear axle.
- Before mounting the gearbox into the crankcase, check whether the petals of the locking plates protrude beyond the seating surface of the covers, otherwise they must be bent. This condition is relevant for gearboxes with factory-installed bolts holding the differential bearing caps together.
- To install the gearbox directly, you just need to secure it with bolts and washers with a torque of 90 - 110 Nm.
- The left and right brakes are installed in parallel on the flanges of the GAZ-53 axle housing. In this case, the direction of the long friction lining of the brake is observed forward of the vehicle.
- Oil deflectors are installed on both sides with the visor down. The brakes and oil deflectors are secured with bolts, nuts and washers. For nuts, a torque of 50 - 80 Nm is used.
- After this, proceed to the hub socket. The outer rings of the inner and outer bearings are installed here. Then the inner race of the bearing is mounted and the support washer is installed with parallel pressing of the hub seal.
- Place the right and left hubs with brake drum assemblies on the corresponding sides of the GAZ-53 axle housing. Install the inner rings of the outer hub bearings. The hub bearing cavities are filled with hypoid lubricant.
- Nuts are installed on both sides of the hub to secure its bearings. Before installing the wheels, it is necessary to adjust the tightening of these GAZ-53 bearings. To do this, turn the brake drum with the hub by hand, while simultaneously tightening the nuts until the brake unit is completely secured. These manipulations ensure the correct position of the rollers in the bearings. Finally, the nut is loosened 1/8 turn and the lock washer is installed. Be sure to check that the locking pin fits into one of the slots on the nut.
- If the pin does not occupy the desired position, you will need to unscrew the nut so that the pin fits into the nearest opening of the lock washer. The locknut is screwed on and tightened to a torque of 250 - 300 Nm. After these manipulations, a check of the bearing adjustment is required.
- Correct adjustment of the GAZ-53 brake drum implies its free rotation. After successfully completing the previous recommendations, proceed to installing the axle shaft gasket on the hub studs. Then insert the axle shafts and secure them with nuts and spring washers with a torque of 120-140 Nm. The final step will be to install the removal bolts for the axle shaft.
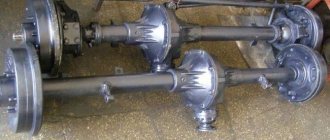
Design and malfunctions of the rear axle GAZ-53, GAZ-66
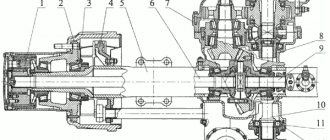
The structure of the rear axle of the GAZ-53A and GAZ-66 cars is shown in Fig. 1 and 2.
To increase durability, axles are equipped with a hypoid type main gear. The drive gear relative to the driven gear is shifted downwards by 32 mm. To prevent large deformations of the driven gear, the main gear is equipped with an adjustable stop. The transmission and differential are mounted in a separate gearbox housing, which is loosely inserted into the hole in the axle housing and secured with bolts.
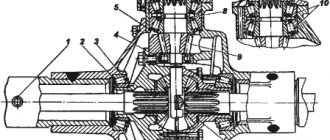
The rear axle gearboxes of the GAZ-53A and GAZ-66 vehicles differ only in the design of the differential. On the GAZ-53A car, a conventional bevel differential with four satellites is used, and on the GAZ-66 car, to increase cross-country ability, a self-locking cam differential is installed, the design of which is shown in Fig. 63.
The separator 28 has 24 radial holes arranged in two rows in a checkerboard pattern, into which the crackers 25 are installed. Between the rows of holes for the crackers on the outer and inner surfaces of the separator, there are locking rings that prevent the crackers from rotating around their axes, and also keep them from falling out from the separator when assembling the differential.
The outer sprocket 27 is freely installed in the hole of the cup 22, and the inner sprocket 30 is installed in the holes of the separator a and the outer sprocket.
The rear axle housing of the GAZ-53A and GAZ-66 cars consists of two stamped halves, welded along the horizontal axis of the bridge. This design ensures ease of installation and dismantling of the unit. The wheel axles at the ends of the crankcase of the GAZ-53 car are butt welded, and on the crankcase of the GAZ-66 car they are attached to the crankcase using studs.
Rear axle maintenance
Caring for the rear axle during operation consists of ensuring timely changes of lubricant, monitoring the lubricant level, checking the degree of tightening of the bolts securing the gearbox to the rear axle housing and the bolts securing the clutch of the drive shaft bearings, checking the tightening condition of the drive gear shaft bearings.
The gearing is adjusted only when installing new gears.
| Rear axle malfunctions and ways to eliminate them | |
| Causes of malfunction | Remedies |
| Increased noise from the rear axle | |
| Incorrect adjustment of the main gear pair by contact | To reduce noise, re-adjust |
| Increased lateral clearance in the engagement of the drive and driven gears as a result of wear of their teeth or bearings | Replace worn gears. It is not necessary to adjust the position of the gears to compensate for wear, since the required contact in the mesh of the drive and driven gears is achieved only in one of their relative positions in which they are processed on machines |
| Loosening of bearings due to wear and tear of the ends of parts that are tightened together with the bearings | Tighten bearings |
| Excessive runout of the drive gear shaft due to bearing wear | Tighten bearings |
| Malfunctions in the differential parts. In this case, noise appears when the car turns (some noise when turning is acceptable) | Replace faulty parts |
| When determining noise in the rear axle, you need to make sure that the noise comes from the axle, since noise of a similar nature can appear if the rear wheel hub bearings are damaged. When the nature of the road changes, the noise from the rear axle does not disappear. The noise of a worn wheel bearing can be clearly heard when the car is moving at low speeds and disappears under light braking. To identify hub bearing noise, jack up each wheel and determine the condition of the bearing while rotating the wheel. | |
| Large radial play of drive gear | |
| Axle spline wear | (When starting the car and when a sudden load is applied while the car is moving, a knock is heard in the rear axle) If the axle shaft is severely worn, replace it |
| Loosening the axle flange nuts | Tighten the nuts |
| Increased lateral clearance in the engagement of the drive and driven gears of the main gear due to tooth wear | Replace worn parts |
| Increased lateral clearance between the gear teeth of the GAZ-53A differential or between the blockers and cams of the GAZ-66 differential due to wear of the teeth and support washers of the satellites and semi-axial gears (or wear of the blockers and sprockets) | Replace worn parts |
| Loosening the bolts securing the driven gear in the GAZ-5ZA gearbox (or to the separator and differential cup of the GAZ-66) | Inspect the condition of the fasteners and, if there is no damage, tighten the bolts; tightening torque is shown below |
| Bearing wear or misalignment | Make the required adjustment |
| Oil leakage through the seals of the drive gear and hubs, as well as along the connector plane of the gearbox housing and axle housing | |
| Wear of seals. Wear of surfaces for oil seals on the drive gear shaft mounting flange and the hub oil seal bushing | Replace worn seals, flange and bushing |
| Loosening the bolts securing the gearbox housings and rear axle | Tighten the bolts (torque 10 - 12 kgm) |
| Wear of the gasket installed between the mating surfaces of the gearbox and rear axle housings | Replace gasket |
| Seizures on the teeth of the main gears | |
| Poor gear lubrication | If the gears are not suitable for further work, they must be replaced. Fill the rear axle with hypoid lubricant of the required quality. |
| Excessive shock loads | Replace gears |
| To eliminate malfunctions, it may be necessary to disassemble the rear axle. Depending on the nature of the malfunction, disassembly may be partial or complete. |