Why we love cars from the Ulyanovsk plant is their unpretentiousness, reliability and simplicity of design. It is this last characteristic of UAZ vehicles that allows their owners, who have at least minimal mechanic skills, to repair their cars themselves.
Today we will discuss replacing the shank bearing of the front axle of the UAZ “Bukhanka”, UAZ-469, for rear action they will differ only in the stage of its removal and disassembly.
Replacing the shank bearing of the front axle UAZ Bukhanka
Posted by admin: at the request of Abdullah
Description: The dimensions are as follows: length - 3811, width - 1100, height - 1369 mm. The wheelbase is 2477 mm. Ground clearance 170 mm. The car is equipped with a hybrid power unit. The 4-cylinder engine is equipped with a system that provides engine power output. There are 4 valves per cylinder. The diameter of one cylinder is 72 mm, the piston stroke is 76 mm. The engine crankshaft accelerates to 4000 rpm. Maximum torque is maintained up to 5000 rpm.
Watch the VIDEO about replacing the UAZ loaf shank bearing.
Answer from a car owner named Carteriy: The price is 309 thousand. A trouble-free ordinary car. Everything can be repaired with a hammer and some kind of mother))) many people complain about the stove, but I have no complaints
Category: Car repair
Release date: 04.10.2022
Laughter in the topic: Rose complains to her friend: “I just can’t teach Moishe to be tidy - every time he hides his wallet in a new place!”
It's no secret that the modern UAZ Patriot SUV has all-wheel drive on all four wheels, which makes it a full-fledged off-road knight. Permanent drive is provided to the rear wheels, which operate via the Spicer rear axle. The design of this SUV unit includes such an integral part as the shank bearing. It is in this material that we will pay attention to the design features of this device and consider how it is replaced.
Replacing the axle shaft seal of a UAZ loaf
Step-by-step instruction:
- Jack up, remove the rear wheel and brake pads.
- Using a 14 mm socket, through the large hole in the axle shaft flange, unscrew the four bolts securing the axle shaft and brake shield plates to the rear axle beam flange. Remove the bolts with spring washers.
- Using a Phillips screwdriver, unscrew the two screws securing the shield to the axle plate. Pass an M8 bolt through its hole and insert it into the hole in the beam flange. The shield is temporarily suspended.
- Rotate the axle plate, screw two M12x1.25 bolts into the wheel mounting holes located diametrically until they stop at the brake shield next to the holes in the beam flange.
- Tightening the bolts one by one, press out and remove the axle shaft.
- Pry the oil seal with a pry bar or a metal screwdriver and remove it from its normal place.
Press in the new oil seal with a piece of pipe of the appropriate diameter, lightly tapping its end with a hammer. Reassemble all parts in reverse order. Check the oil seal for leaks.
Design features
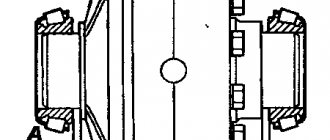
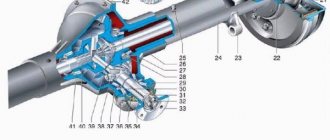
Everyone knows that the main purpose of bearings is to ensure long, easy and smooth rotation of a particular part. In particular, on the UAZ Patriot this part is intended to soften the smooth rotation of the shaft with the drive gear. This shaft is popularly called a piglet or its tail. The photo below shows a view of the drive gear shaft of the rear axle of the UAZ Patriot SUV, as well as the shank bearing.
The design of the drive gear shaft has two such products, one of which is located directly next to the drive shaft gear, and the second in the area of its shank. In the photo below, these bearings are indicated by numbers 1 and 2, respectively.
First. It seems that we have sorted out the differential a little: the main thing that needs to be done with it is to eliminate all the gaps and play, and assemble the housing correctly. On to the second. Select the right set of shims for the differential bearings, but more on that a little later. Third. The shank and its problems. The outer race of the front bearing (large, tapered, double row) is clamped between the crankcase and the cover. Gaskets are installed under the cover; there is more than one gasket, and their purpose is twofold: first, of course, to prevent oil leakage from the crankcase; second, these are adjusting shims between the crankcase and the cover. The quantity is selected as follows:
We measure the protruding part from the axle housing, the outer race.
measure the groove under the holder in the cover, the difference will be the thickness of the gaskets. You can also simply install the cover and use a set of feeler gauges, if you have them, the required thickness will be lost. Don't forget that the gaskets are still shrinking.
This is what happens if the race of this bearing is not pressed, and the bearing “walks”. It produces such “ditches” in the crankcase and cover. But, if the cover is a bad part and can be simply replaced, then the “stocking” of the bridge costs about ten. And the repairs here are complicated. Previously, an adjusting washer was installed in bridges in this place. Now it is gone; the approach or distance of the drive gear to the driven gear is not regulated (and it cannot be installed, since the gear will move towards the driven gear). So, as they say: “Take care of your honor from a young age.”
Here is an example of a normal crankcase.
The second bearing (roller) after installation, the shank must be opened.
We inspect the shank gear - chipping. Here both gears need to be replaced (both gears can only be replaced in pairs!)
The front shank bearing is tightened using a shank nut after pressing on one inner race from the gear side, and picking it up outside the bridge. Bearings, oil ring, flange, washer, nut. Adjustable in the same way as a wheel bearing.
The only difference is that inside the front bearing there is a spacer sleeve and a set of shims. In this case, if the bearing is clamped during broaching, then another gasket is added. And, if there is play after tightening, then one gasket is removed. The adjusting shims are also removed during operation, after play appears (bearing wear is eliminated). Of course, there are many opinions here: some believe that this is unnecessary and remove the bushing. During my military days, when longitudinal play in the shank appeared, this spacer sleeve was simply taken out and ground down to the required size.
But there is a limitation here, until the washer under the nut rests against the shank itself. The photo shows how much it is. Well, it is clear that in both cases the system loses its rigidity. Here everyone already chooses what he wants to receive. Such spacers are also installed in the hubs of individual vehicles. My opinion is that there should be a bushing. Although, there is also a danger here that when the bearing wears out and longitudinal play appears, the inner race of the bearing can rotate from the flange side, and the adjusting shims (they range from 0.1 -0.25) can be squeezed out. I have seen such gaskets in the shank “chewed up” into a lump. It is also possible to adjust the shank installed in the crankcase, clamped by the lid. Preferably without a flange seal installed. What else is useful to know about the shank?
The shank is pressed out of the crankcase using a puller, either with a mounting tool like this, or with a piece of tube. If the bridge is assembled, then the shank cannot be removed; the rear (small bearing) will cling to the driven gear. Only after the halves of the bridge are separated can this be done.
And the last thing on the flange. It operates under rather difficult conditions: dust, dirt, moisture, and of course, wear at the contact point between the oil seal and the flange can be significant. And, with longitudinal play, it’s just a Martian channel. Of course, it is better to change such a flange. And, if the bridge dives into a puddle for about 20 minutes... When completing the final assembly of the bearing shank and the entire bridge, generously lubricate all parts with a brush with transmission oil. In general, this is the minimum for the shank that you need to know when assembling. Of course, there are certain subtleties among the craftsmen, those who dismantle and reassemble bridges all the time. But, if you do at least this, the bridge will work for many years.
Replacing and adjusting the shank on the “Loaf”
How to replace and adjust the shank on the “Loaf”?
—
- First, check the play. Then you can turn the driveshaft clockwise. When you feel the stop, place a mark on the bridge body.
- Turn the driveshaft counterclockwise until you feel the stop again. Now place the second mark on the bridge body
- Maintain the maximum allowable distance between marks, which is eleven millimeters.
- Unscrew the cardan flange and tighten the nuts using a 30mm wrench
- Check the play again
- Remove the front axle
- Unscrew the shank nut
- Drain the oil from the front axle
- Remove the front wheels and steering arms
- Snap out the left axle shaft and unscrew the right one
- Disconnect all front axle connection hoses
- Unscrew the front axle cushion
- Disconnect the differential housing extension with the intermediate axle shaft
- Disconnect the cover from the axle housing
- Unscrew the four bolts securing the bearing caps
- Pull out the differential
- Remove the flange from the drive gear
- Carefully knock out the drive gear
- Lubricate the oil seal and insert the drive gear with bearing, install tightly.
- Insert the flange and tighten the nuts
- Put everything back in reverse order.
Source
Replacing the shank bearing of the front axle UAZ Bukhanka
Posted by admin: at the request of Abdullah
Description: The dimensions are as follows: length - 3811, width - 1100, height - 1369 mm. The wheelbase is 2477 mm. Ground clearance 170 mm. The car is equipped with a hybrid power unit. The 4-cylinder engine is equipped with a system that provides engine power output. There are 4 valves per cylinder. The diameter of one cylinder is 72 mm, the piston stroke is 76 mm. The engine crankshaft accelerates to 4000 rpm. Maximum torque is maintained up to 5000 rpm.
Watch the VIDEO about replacing the UAZ loaf shank bearing.
Answer from a car owner named Carteriy: The price is 309 thousand. A trouble-free ordinary car. Everything can be repaired with a hammer and some kind of mother))) many people complain about the stove, but I have no complaints
Design features
Everyone knows that the main purpose of bearings is to ensure long, easy and smooth rotation of a particular part. In particular, on the UAZ Patriot this part is intended to soften the smooth rotation of the shaft with the drive gear. This shaft is popularly called a piglet or its tail. The photo below shows a view of the drive gear shaft of the rear axle of the UAZ Patriot SUV, as well as the shank bearing.
The design of the drive gear shaft has two such products, one of which is located directly next to the drive shaft gear, and the second in the area of its shank. In the photo below, these bearings are indicated by numbers 1 and 2, respectively.
First. It seems that we have sorted out the differential a little: the main thing that needs to be done with it is to eliminate all the gaps and play, and assemble the housing correctly. On to the second. Select the right set of shims for the differential bearings, but more on that a little later. Third. The shank and its problems. The outer race of the front bearing (large, tapered, double row) is clamped between the crankcase and the cover. Gaskets are installed under the cover; there is more than one gasket, and their purpose is twofold: first, of course, to prevent oil leakage from the crankcase; second, these are adjusting shims between the crankcase and the cover. The quantity is selected as follows:
We measure the protruding part from the axle housing, the outer race.
measure the groove under the holder in the cover, the difference will be the thickness of the gaskets. You can also simply install the cover and use a set of feeler gauges, if you have them, the required thickness will be lost. Don't forget that the gaskets are still shrinking.
This is what happens if the race of this bearing is not pressed, and the bearing “walks”. It produces such “ditches” in the crankcase and cover. But, if the cover is a bad part and can be simply replaced, then the “stocking” of the bridge costs about ten. And the repairs here are complicated. Previously, an adjusting washer was installed in bridges in this place. Now it is gone; the approach or distance of the drive gear to the driven gear is not regulated (and it cannot be installed, since the gear will move towards the driven gear). So, as they say: “Take care of your honor from a young age.”
Here is an example of a normal crankcase.
The second bearing (roller) after installation, the shank must be opened.
We inspect the shank gear - chipping. Here both gears need to be replaced (both gears can only be replaced in pairs!)
The front shank bearing is tightened using a shank nut after pressing on one inner race from the gear side, and picking it up outside the bridge. Bearings, oil ring, flange, washer, nut. Adjustable in the same way as a wheel bearing.
The only difference is that inside the front bearing there is a spacer sleeve and a set of shims. In this case, if the bearing is clamped during broaching, then another gasket is added. And, if there is play after tightening, then one gasket is removed. The adjusting shims are also removed during operation, after play appears (bearing wear is eliminated). Of course, there are many opinions here: some believe that this is unnecessary and remove the bushing. During my military days, when longitudinal play in the shank appeared, this spacer sleeve was simply taken out and ground down to the required size.
But there is a limitation here, until the washer under the nut rests against the shank itself. The photo shows how much it is. Well, it is clear that in both cases the system loses its rigidity. Here everyone already chooses what he wants to receive. Such spacers are also installed in the hubs of individual vehicles. My opinion is that there should be a bushing. Although, there is also a danger here that when the bearing wears out and longitudinal play appears, the inner race of the bearing can rotate from the flange side, and the adjusting shims (they range from 0.1 -0.25) can be squeezed out. I have seen such gaskets in the shank “chewed up” into a lump. It is also possible to adjust the shank installed in the crankcase, clamped by the lid. Preferably without a flange seal installed. What else is useful to know about the shank?
The shank is pressed out of the crankcase using a puller, either with a mounting tool like this, or with a piece of tube. If the bridge is assembled, then the shank cannot be removed; the rear (small bearing) will cling to the driven gear. Only after the halves of the bridge are separated can this be done.
And the last thing on the flange. It operates under rather difficult conditions: dust, dirt, moisture, and of course, wear at the contact point between the oil seal and the flange can be significant. And, with longitudinal play, it’s just a Martian channel. Of course, it is better to change such a flange. And, if the bridge dives into a puddle for about 20 minutes... When completing the final assembly of the bearing shank and the entire bridge, generously lubricate all parts with a brush with transmission oil. In general, this is the minimum for the shank that you need to know when assembling. Of course, there are certain subtleties among the craftsmen, those who dismantle and reassemble bridges all the time. But, if you do at least this, the bridge will work for many years.
How to replace the shank seal of the UAZ Patriot rear gearbox
The sooner you start, the sooner you fail.: D Take a look at the section about discussing cars. This is where the outliers are outliers. I. And here is not an outburst, but a cry from the heart: Good afternoon! So the bridge is assembled... the cause of the breakdown has not been found... everything is as before... The tail of the front axle melts the snow.
We went to Sumburgh. On the highway after km. Is it that shishiga bridges are somehow rare among us? Sell your spicers. Take it from Shishigi and play it if you like. I had 3 new ZAZ M's and drove them for 11 years. I would have looked at someone so calm when the UAZ was given away. The RK jams tightly. The car on a lift even the engine stalls. Not a single trip ended without a breakdown. It only drives on asphalt in good weather. People drive for years Colleague, you are wrong. The device needs to be studied. Your emotional presentation of the problem does not contain information about the nature of the malfunction.
Based on your chaotic presentation, we can assume that you have incurable backlash in the drive gear.
Yours is defective. It must deform elastically and it is precisely due to elastic deformation that it maintains tension in the tapered bearings of the shank and removes play. This is the weakest link in the spacer.
Even the progenitor of the spacer on the knot, the Volgogv spacer, did not have this bushing, and the tension was adjusted by adjusting rings of different thicknesses. Colleague, you are right that the UAZ is not the car you get into and drive away and only change the consumables. And it doesn’t matter at what price it was bought.
Do everything with your own hands and thoughtfully. And then the car will repay you with faithful and trouble-free service.
Rear axle UAZ 3151
POSSIBLE MALFUNCTIONS OF THE REAR AXLE, THEIR CAUSES AND REMEDY METHODS
Maintenance of the rear axle consists of maintaining the oil level in the crankcase and replacing it in a timely manner, checking the seals, and timely detecting and eliminating axial clearances in the final drive gears. Periodically clean the safety valve and tighten all fasteners.
If the oil in the crankcase is heavily contaminated or there are metal particles in it, wash the crankcase with kerosene before adding fresh oil. To flush, pour 1–1.5 liters of kerosene into the crankcase; raise the wheels, start the engine and let it run for 1.0–1.5 minutes, then drain the kerosene and fill with fresh oil.
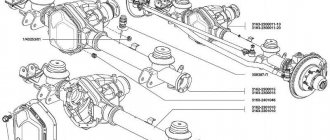
Rice. 3.79. Rear axle: 1 – safety valve; 2 – differential bearing; 3.8 – adjusting shims; 4 – rear bearing of the drive gear; 5* – adjusting ring;
6 – oil removal ring; 7 – nut; 9 – drive gear; 10 – front bearing of the drive gear; 11 – thrust washer of the semi-axial gear; 12 – driven gear. (* Not installed since 1991)
Axial play of the drive gear of the fixed gear is not allowed. Check the clearance by rocking the drive gear by the driveshaft mounting flange. If an axial play of the drive gear of more than 0.05 mm appears during vehicle operation, tighten nut 7 (
Rice. 3.80. Installation of the bridge on the stand
1. Install the bridge on the stand (
Rice. 3.81. Pressing out the drive gear
To remove the drive gear, unscrew and unscrew the nut on the shank, remove the washer and flange, unscrew the bolts and remove the drive gear front bearing cap. Remove the oil removal ring, press out the drive gear with a tool (
Blog about UAZ
Adjustment of the gaps in the meshing of gears and in the bearings of the drive axle of UAZ-3741, UAZ-3962, UAZ-3909, UAZ-2206, UAZ-3303 cars is carried out only when replacing gears or bearings, or when axial clearance appears in the driving or driven gears of the main transfers. Replacement of main gears should only be done as a complete set.
Adjusting the bearing of the drive gear of the main gear of the drive axle UAZ-3741, UAZ-3962, UAZ-3909, UAZ-2206, UAZ-3303.
Adjustment of the bearing of the drive gear of the main drive of the drive axle must be done by selecting the thickness of the shim pack and tightening the flange nut. The bearing must have such a preload that there is no axial movement of the drive gear and the gear can be rotated by hand without much effort.
Check the bearing preload with a dynamometer. At the same time, disconnect the left half of the crankcase. Remove the drive gear bearing cap so that cuff friction does not affect the dynamometer readings. With proper adjustment, at the moment of turning the drive gear by the hole in the flange, the dynamometer should show a force of 1.5-3 kgf for run-in bearings and 2.0-3.5 kgf for new bearings.
When replacing the cover, align the lubrication holes in the crankcase, gasket and cover. The tightening torque of the drive gear flange nut should be 17-21 kgcm. You cannot even unscrew the nut a little in order to ensure that the cotter pin hole matches the slot in the nut. If the nut is not tightened sufficiently, the inner rings of the bearing may rotate and, as a result, wear of the adjusting shims and the appearance of dangerous axial play.
If axial play of the drive gear appears during vehicle operation, tighten the flange nut. If the axial play is not eliminated, then reduce the thickness of the shim pack and adjust the bearing as indicated above.
After adjustment, monitor the heating of the bearings while driving. A slight heating of the bearing is not dangerous, but if the neck of the drive axle crankcase heats up to a temperature of 90 degrees or higher, the water on the crankcase boils, this means that the bearing has been overtightened and the overall thickness of the gaskets should be increased.
Adjusting the differential bearings of the drive axle UAZ-3741, UAZ-3962, UAZ-3909, UAZ-2206, UAZ-3303.
Adjustment of the differential bearings must be done by selecting the thickness of the package of adjusting shims installed between the ends of the inner rings of both bearings and the gearbox. When replacing main gears and differential bearings, make adjustments in the following sequence:
1. Press the inner rings of the differential bearings onto the journals of the assembled differential so that there is a gap of 3-3.5 mm between the ends of the gearbox and the ends of the inner rings of the bearings.
2. Remove the axle shafts and install the differential assembly with the driven gear into the crankcase, install the gasket and cover, tighten the cover mounting bolts and, turning the driven gear with a mounting blade through the neck of the crankcase, roll the bearings so that the rollers take the correct position. Then use fasteners to evenly and completely connect the cover to the crankcase.
3. Unscrew the fasteners again. Carefully remove the cover, remove the differential from the axle housing and use a feeler gauge to measure the gaps A and A1 between the ends of the gearbox and the ends of the inner rings of the bearings.
4. Select a package of gaskets with a thickness equal to the sum of gaps A+A1. To ensure preload in the bearings, add a 0.1 mm thick spacer to this package. The total thickness of the gasket package should be A+A1+0.1 mm.
5. Remove the inner rings of the differential bearings. Divide the selected pack of gaskets in half. Install the gaskets on the journals of the satellite gearbox and press the inner rings of the bearings until they stop. After this, adjust the side clearance by moving the driven gear.
When replacing only the differential bearings, measure and compare the height of the new and old bearing assemblies. If the new bearing is higher or lower than the old one by some amount, then reduce the thickness of the existing gasket package in the first case and increase in the second case by the same amount.
How the UAZ front axle works: detailed instructions for maintenance and repair
UAZ is a legendary SUV, popular both in Russia and beyond its borders. The car has been produced for quite a long time, which has proven the reliability of its design. This machine is actively used in the army. There are minor differences between the civilian and military versions. However, both here and there the UAZ front axle showed its best side. There are several modifications: on-board, regular, “loaf”, etc. Also, one cannot fail to note one of the advantages of the car - maintainability and the ability to restore the functionality of any unit, even in “garage” conditions. The mechanism allows you to activate all-wheel drive, which helps you confidently overcome obstacles.
Description
Shank seal 42x75x10-15.5 UAZ 469 rear REDUCED axle** / 3151-2402052-01
- article number 3151-2402052-01;
- in stock and available for purchase;
- price as of 01/01/20 - 25 rubles;
- Delivery is carried out throughout Russia.
Place an order for this product online or by calling 8 800 700-9-554.
You must be logged in to the site to leave a question about a product.
The popular Russian SUV model UAZ Bukhanka is equipped with rear and front drive axles. Although they perform the same traction functions, they have some design differences.
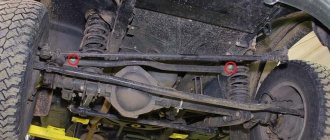
UAZ front axle structure
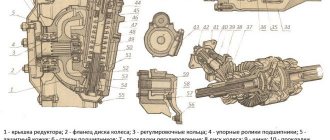
It consists of a crankcase (sometimes called a stocking), a differential and a final drive. The rear and front axles have no fundamental differences. The only difference is in the direction of the thread of the oil rejection ring located in the main gear. The current design of the UAZ front axle is shown in the picture below. The support placed on the casing is fixed with five hardware. Pin bushings are pressed into the support. A pair of pins “engages” in holding the fist. He also holds the housing cover of the wheel gearboxes. A pin is fixed on it along with a shield on which there are parts of the brake system.
The pins do not rotate in the fist thanks to pin-type stoppers. The fist itself is made with preload (0.02-0.1 mm). The UAZ 469 axle is adjusted using spacers. Location: between the turn lever and the trim (left or right). The spacers are located between the pads and the fist.
One of the features of the described mechanism is that, in addition to increasing cross-country ability, it also turns the wheels. For this purpose, Birnfield ball joints are used. Their cavities contain lubricant that does not need to be replenished throughout their entire service life. The cams, as well as the axis of the pins, are inclined, which allows the wheels to be returned to the middle position after making a turn. The main advantages of the beam (Spicer):
- track is 1.6 m, which has a positive effect on the stability of the car;
- the wheels rotate at an angle of up to 32 degrees, which gives the machine improved maneuverability;
- instead of leaf springs, a dependent suspension on springs is mounted;
- no need to replace lubricant in mechanisms (fists);
- removable cover facilitates access to parts in case of repair;
- the differential together with the gearbox are in one housing - this increases rigidity and service life;
- An improved satellite gear has reduced noise.
Particularly worth mentioning are the hinges, or more precisely the stabilization of angular velocity. This is a design that ensures the stability of rotation of two shafts: the drive and the accompanying. The hinge includes two forks: in their sockets there are 4 balls. In the middle sectors of the parts there is a fifth one, needed for installation operations. In particular, centering the fork. To deactivate the front-wheel drive, there is a special device consisting of a clutch, bolts, and balls.
Device and characteristics
The design of the UAZ front axle in older models has few differences from the similar design in new models (Spicer). The main differences lie in the design of the crankcase, the dimensions of the components of the drive gear and differential, and in a number of units used.
The design of the old model is in many ways similar to the rear axle of the UAZ and consists of the following components:
- The key place is occupied by the split crankcase, consisting of 2 separate parts.
- Each half is equipped with press-in housings with internal axle shafts.
- Safety valves on the casings, responsible for controlling the growth of oil volume in the mechanism.
- The differential and main gear of the casing are made according to the standard design: a small-diameter drive gear is located in the horizontal plane, in contact with the cardan.
- The large driven gear in the longitudinal plane is in mesh with the main gear. It has a built-in differential of 4 satellites.
- The edges of the crankcase housing are equipped with pivot joints made of ball joints with a rotating housing.
A design feature of the Spicer bridge is the presence of a contact system between the wheel hub and the axle shaft. It is a coupling responsible for connecting and disconnecting 2 elements. The mechanism ensures the transmission of torque to the wheel from the differential. The disconnected clutch leads to free rotation of the wheel on the axle, and the vehicle receives a 4*2 wheel arrangement. The engaged clutch leads to the connection of the hub, differential and axle shaft, the car turns into a 4*4 all-wheel drive.
Old UAZ car models were distinguished by the presence of hubs with drum brake units.
Their wheel rotation angle is no more than 29°. The knuckle and linkage arms connected to each other are a wheelbase control tool. In new models (Spicer), the angle of rotation reaches 32°. The rest of the bridge structure is similar.
What is the difference between a UAZ military bridge and a civilian one?
The military axle, unlike the civilian Spicer front axle, is equipped with final drives. This design feature caused the following differences between military models:
- Gear axles are located 4 cm above the wheels. This difference helps to increase vehicle clearance - the distance between the supporting surface and the bottom of the bridge.
- The main pair is smaller in size and has a small number of large teeth, which increases the reliability of the design. The unit weighs more.
- The gear ratio is 5.38 (traction, but not speed).
- The length of the rear propeller shaft is 1 cm shorter.
Advantages of military bridge models:
- increased ground clearance by 8 cm;
- high torque, allowing you to transport heavy objects, tow and move at low speeds over difficult terrain;
- load evenly distributed between the main and final drives;
- larger teeth increase reliability;
- limited slip differential for off-road driving.
The military design of the UAZ was thought out to accompany tank colonies, which indicates the power and reliability of the design.
How to turn on the front axle on a UAZ
To transfer torque to the gearbox, a cardan shaft is used, connected to a transfer gearbox that has a pair of stages. Patriot cars use two types of transfer cases: Russian mechanical or Dynamos, which has an electric drive. The latter option has been in use since 2013. In both options, you cannot do without a clutch for engaging the front axle of the UAZ.
The drive is controlled using a lever or washer located on the central tunnel. To turn on or deactivate the UAZ front axle, you need to:
- Fully depress the clutch;
- Move the lever to the desired position (the modes are indicated on the plastic handle). Carry out the operation at a speed of no more than 60 km/h;
- Release the clutch: you can then drive with the axle activated. To disengage it, depress the clutch again and move the control lever to neutral.
Engaging the axle on SUVs with a Dymos gearbox is much simpler: you need to turn the washer to the desired position. The design of the transmission is such that it is not forbidden to connect the axle directly while driving. However, if a reduced speed is required, you will have to stop.
How to check the correct adjustment of the UAZ Patriot axle.
To check the correct adjustment of the UAZ Patriot axle, it is not at all necessary to know how to adjust it.
Before you do anything, check the temperature of the axle after driving fast. If the bridge gets very hot, then we can definitely say that it, at a minimum, needs to be adjusted. If such a bridge is not repaired, then sooner or later it will jam. 1. Unscrew the cardan from the bridge. With the car raised, rotating the axle flange (the universal joint mounting point) by hand in both directions, you can feel the presence of broken teeth, assess the condition of the bearings and other problems. 2. After removing the bridge cover, check the condition of the teeth on the main gear and differential by rotating the bridge. There should be no cracks, wear, roughness in the contact patch, cuts or torn teeth. Assess the location of the contact patch. In the crankcase you can sometimes find the remains of destroyed adjusting rings and broken elements. The problems listed above actually exist. If everything is intact, then the bridge can be adjusted. If there are problems, then... 3. Check for transverse clearances in the bearings. If there are gaps, then the bridge must be adjusted before it jams. 4. Check that the final drive is properly engaged. To do this, paint the teeth of the main gear with paint from an aerosol can and, turning the bridge in both directions, determine the pattern of engagement marks. The following figure shows the correct location of the contact patch on the teeth of the final drive gears of the UAZ Patriot axle. The following photo shows an example of incorrect adjustment of the main pair and the presence of roughness at the contact points:
After adjusting the rear axle, there should be no axial play in the bearings of the main gear drive gear and in the bearings of the final drive differential. The axial clearance in the bearings of the bridge is the main reason for its noise and jamming due to the destruction of the teeth in the main pair. There are very few craftsmen who know how to correctly adjust the main pair of the bridge. Instructions on the Internet are not very helpful, since the process is iterative, requiring not only ability, but also experience. We specialize in drive axle alignment. People come to us from other cities on the recommendations of our clients to rebuild drive axles and gearboxes, including foreign cars. Drive axles, aluminum and UAZ tuning are our competitive advantage.
Change of oil
The UAZ Patriot transmission should be filled with the highest quality oil that you can afford. Too little quality can leak through low-quality seals.
Very often, in the rear axle, over time, due to moisture getting into it, the oil turns into a thick, non-flowing liquid. Simply changing the oil in such a bridge does not have the desired effect. If you are not sure, remove the axle and axle cover and clean the axle. Do not have any illusions - if the breathers are not removed, if you drove on water, if a lot of time has passed, etc., then there is no longer oil in the bridge. Moreover, the slurry is not in the gearbox, but closer to the hubs. Those. The rear axle wheel bearings are practically not lubricated.
Breathers. Exiting breathers into the engine compartment
We recommend that absolutely everyone do this modification, especially since the costs for it are relatively small.
Breathers on bridges must be brought into the engine compartment so that water does not get into the bridge under any circumstances. For this purpose, brake hoses and brake pipes are usually used. It is easier to use oil resistant hoses.
At the end of the tubes under the hood, a plastic fine fuel filter from the classics is installed so that dust does not get into the bridge. In this case, the end of the tube is bent down so that water does not get into the bridge even if the car goes into more water than the location of the end of the tubes.
On cars with a compressor, during extreme operation, they sometimes create excess air pressure in the transmission - as if they inflate the axles, gearbox and transfer case from the inside. This completely prevents water and dirt from getting inside and well lubricates the oil seals in areas of friction.
Sometimes an expansion tank with a balloon is installed at the end of the tube to create volume. In this case, the connection between the internal space of the bridge and the atmosphere is completely closed. As the volume of air in the bridge changes during heating and cooling, the balloon inflates or contracts.
If you have driven through a ford with a depth of more than 30 cm, then you should immediately (on the same day) change the oil in the transmission - these are the manufacturer’s instructions. Draw conclusions.
Maintenance
Maintenance of the UAZ bridge is simple and comes down to monitoring the level of lubricant and topping it up and replacing it. The second point is to check the seals for leaks. It is regularly necessary to check the reliability of the fastenings, especially if the machine is used in difficult road conditions. Eliminate axial play in the differential bearings in a timely manner.
Assembly and connection diagram
When assembling the structure, do not remember several features:
- Press the bushing into the trunnion flush with the end of the washer socket. After completing the procedure, the sleeve must be deployed;
- Place one thrust washer inside the trunnion, the second - in the support. The oil lines in the thrust washers should face the joint. The washer is secured by punching in 3-4 places;
- When installing the hinge, add lubricant to the ball joint;
- Treat the pins and bushings with liquid lubricant.
To obtain the required axial tension, you need to select a certain number of spacers (but not less than five). They are installed on the ends of the knuckle body at the top and bottom. Their number should be the same. Soak the felt ring of the ball joint oil seal with engine oil. If possible, check the bridge on a bench after assembly. If the assembly is done correctly, the axle shafts should not heat up or make excessive noise when braking. Leaks through seals, cuffs, and bolted connections are not allowed.
How to disassemble a bridge
The first step is to remove the brake drum. Next, the hubs and hubs are dismantled. Along the way, inspect the bearings, which may have worn out and will have to buy new ones.
- Unscrew the brake system hose, it will get in the way, and remove the brake shield;
- Pull out the CV joint;
- Remove the rotating mechanism and shank;
- Divide the stocking into two parts;
- Remove the pair from one part of the bridge and the other.
Repair
Rear axle disassembly
Disassemble the bridge in the following order:
Rice. 3.80. Installation of the bridge on the stand
1. Place the bridge on the stand (Fig. 3.80), unscrew the oil filler and oil drain plugs and drain the oil.
2. Unscrew the bolts securing the axle shafts and, using them, remove the axle shafts.
3. Unscrew the nuts and bolts securing the cover and crankcase, and carefully separate the bridge into two parts. Remove the gasket.
Repair of the most common faults
Restoring the bridge to operability is not very difficult: but it is required to be careful when performing operations. What “diseases” are most common?
Leak formation
Where the steering knuckle connects to the bridge, there is an oil seal - one of the weak points of the design in terms of lubricant leakage. The oil seal can leak oil not only due to wear, but also when the breather is clogged. If you add more lubricant than required, the result will be the same: a leak. There are two types of oil seals:
- rubber: inexpensive, but also short-lived;
- polyurethane: more expensive, have a long service life.
To replace a part, place the car on a level place and jack up the problem side, loosening the wheel nuts in advance. Further:
- remove the steering knuckle;
- clamp the part in a vice;
- pull out the oil seal by prying it with a flat screwdriver or other suitable tool;
- pull the oil seal out of the support cavity;
- Lubricate the seal before installation;
- press in the oil seal using a tube of the appropriate diameter.
- Installation is in the reverse order.
The mechanism began to hum
First of all, check the oil level. If it is normal, the bridge will have to be removed and disassembled. If the bridge hums constantly in any driving mode, the reasons may be as follows:
- incorrect setting or limiting service life of differential bearings;
- breakage (wear) of the axle shaft (its bearing);
- wear, damage, incorrect gear adjustment.
These bearings simply need to be replaced with new ones. If a humming noise appears during a sudden stop or acceleration, the reasons are as follows:
- incorrect clearance between the final drive gears;
- The final drive gear teeth do not mesh correctly.
In this case, you need to correctly adjust the gearing or replace defective parts. If the bridge hums when the UAZ enters a turn and moves in a straight line, the reasons may be the following:
- satellites rotate with great effort;
- abnormal operation of the axle gears in the differential;
- destruction, severe wear of the axle bearing;
- incorrect clearance between gears located in the differential.
To restore the functionality of the mechanism, adjust the clearances correctly and replace damaged, worn bearings. It is worth noting that the desired result when adjusting the gaps can only be achieved on a bench.
Wheel axial play
It occurs when the wheel bearings are incorrectly adjusted or when they completely fail, which is caused by over-tightening. As a result, the bearings become very hot, the smear liquefies and flows out. Algorithm of actions when performing the correct adjustment:
- Jack up the wheel on the desired side;
- Use a puller to remove the axle shaft;
- Move the lock washer to the side and unscrew the lock nut;
- Spin the wheel: if it rotates tightly, the reason may lie in jamming of the cuffs, contact of the drum and pads, etc.;
- Tighten the adjusting nut. Do this gradually while spinning the wheel. Use the WRENCH;
- Unscrew the nut about a third of a turn and install the lock washer. Tighten the nut and lock it;
- Check how the wheel rotates: it should spin freely without sticking;
- Replace the axle shaft, replace the bolts and tighten them.
You can finally check while moving. If the hub gets very hot, loosen the hub nut about 1/6 of a turn.
Malfunctions and repair work
Common malfunctions of the UAZ front axle and possible repairs:
- Leakage of lubricating fluids. Check the tubes and connecting elements for mechanical damage - the cuffs and flange for functionality, the oil container for the optimal fluid level.
- High wear of fasteners.
- Bearing defects caused by the use of poor quality material by the car plant.
- Broken axle teeth. Adjustment will not help; parts need to be replaced.
- Mechanical defects of the beam.
- Wear of elements. The situation is resolved by replacing it with new spare parts.
- Poor grip of the bearings and main gears indicates the need for tension adjustment.
Bridge repairs begin after diagnosing and searching for the cause of problems in the functioning of the mechanism, which are diverse:
- transmission components of a rear-wheel drive vehicle are faulty due to regular movement over difficult terrain;
- use of consumables and lubricants of unsuitable quality;
- Failure to monitor tire pressure can lead to shaft and bearing failures.
Most often, car owners are faced with a violation of the axial space of the kingpins and are knocked out of the required position. To diagnose, you need to jack up the front of the vehicle and move the wheel in a vertical plane. The presence of axial play indicates the need to adjust the clearance of the pins.
How to adjust bridges
You can adjust the UAZ axles yourself. This will require a number of tools and good knowledge of the mechanism. Access to the necessary parts and assemblies is possible after dismantling the structure and separating the crankcase parts. The first sign of the need to adjust the gearbox is loud noise and malfunctions of the part. Such work is required after diagnosing the condition of bridges. Adjustment includes a number of activities.
At the first stages of repair work, ensure that the nuts of the brake elements can be loosened freely. The tools you will need are a split wrench, brake fluid and a mixture of WD-40. The bridge is dismantled as follows:
- remove the fasteners between the drive gear flange and the propeller shaft;
- secure the shaft to the side;
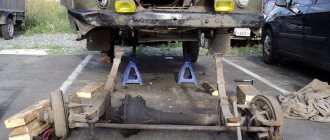
- place the front part of the vehicle on jacks, raising the wheels above the surface;
- additionally install safety supports;
- remove the nut between the brake pipe and hose and close the hole with a plug to avoid large losses of fluid;
- after removing the lower fasteners and moving the shock absorbers from the axle, the bridge will lower;
- remove the stepladder nuts and roll out the bridge (without wheels it weighs more than 100 kg).
For adjustment and repair work, you will again need a split wrench, a metal corner with pins, a universal puller, a container with brake fluid, transmission oil (if you don’t want to fill in the old one), a set of bearing spacers for adjusting the driven gear and a micrometer. Preparatory work:
- remove 10 bolts connecting the axle shafts to the hubs;
- remove the axle shaft from the crankcase;
- Unscrew the fasteners of the brake pipes;
- remove the tee from the bracket;
- remove the connecting elements between the crankcase parts, keeping the gasket;
- Remove the differential housing and driven gear, outer rings.
Disassembling the steering knuckle without dismantling the bridge
To perform this operation, first disconnect the hub by unscrewing the 6 bolts. Then bend back the lock washer, unscrew the hub nuts and remove it with the wheel and drum. Further:
- disconnect the oil deflector by unscrewing 6 bolts;
- remove a couple of bolts on the steering knuckle, hang the brake shield on the spring;
- remove 6 bolts to disconnect the cover and the knuckle body;
- to remove it, unscrew the bolts and remove the o-rings;
- Unscrew the knuckle linings, remove the kingpins and remove the steering knuckle housing.
As you can see, it is quite possible to repair the front axle of a UAZ with your own hands. However, you need to have experience in carrying out such work and a good set of tools.
Replacing the axle shaft seal of a UAZ loaf
Step-by-step instruction:
- Jack up, remove the rear wheel and brake pads.
- Using a 14 mm socket, through the large hole in the axle shaft flange, unscrew the four bolts securing the axle shaft and brake shield plates to the rear axle beam flange. Remove the bolts with spring washers.
- Using a Phillips screwdriver, unscrew the two screws securing the shield to the axle plate. Pass an M8 bolt through its hole and insert it into the hole in the beam flange. The shield is temporarily suspended.
- Rotate the axle plate, screw two M12x1.25 bolts into the wheel mounting holes located diametrically until they stop at the brake shield next to the holes in the beam flange.
- Tightening the bolts one by one, press out and remove the axle shaft.
- Pry the oil seal with a pry bar or a metal screwdriver and remove it from its normal place.
Press in the new oil seal with a piece of pipe of the appropriate diameter, lightly tapping its end with a hammer. Reassemble all parts in reverse order. Check the oil seal for leaks.