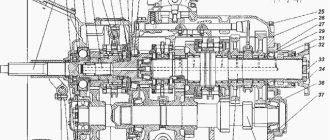
Rear axles of the same design were installed on passenger-and-freight vehicles of the UAZ-452 family and their modifications. The rear axle structure can be divided into crankcase, final drive, differential and axle shafts.
Main characteristics of the rear axle of the UAZ-452.
— Number of teeth of the main gears: drive — 8 driven — 41 — Roller bearing dimensions, mm: front double bevel, drive gear — 80x35x57 bevel, differential — 90x50x25 rear roller bearing with cylindrical rollers, drive gear shank — 52x20x15 — Main gear drive gear oil seal size , mm: 68x42X15 — Thickness of the shims included in the package installed between the end of the crankcase and the cover of the double tapered bearing, mm: 0.3, 0.5 — Thickness of the adjusting shims in the package installed between the inner rings of the double tapered bearing, mm: 0.1, 0.15, 0.25 — Thickness of the gasket installed in the crankcase connector with the cover, mm: 0.12 - Volume of oil poured into the crankcase to the level of the lower edge of the oil filler hole, l: 0.75 - Weight of the rear axle without wheels, kg: 98
Carter and axle housings for the rear axle of the UAZ-452.
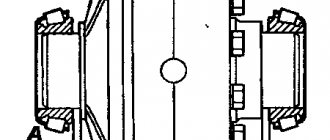
The rear axle housing is split in the vertical plane. It consists of two parts connected by bolts and nuts with spring washers. A gasket is installed in the connector of both parts. An axle shaft casing is pressed into each half of the crankcase and additionally secured with electric rivets.
Flanges are butt welded to the casings, onto the ground necks of which oil seal rings are pressed and wheel hub bearings are installed. The bearings are secured with nuts and locknuts. The threaded ends of the flanges have rectangular grooves for locking the washer and lock washer of the wheel bearing nuts.
Both flanges have six threaded holes for the brake shield bolts. To prevent the pressure of the rear axle from increasing when it heats up during operation, a breather is installed on the left axle housing, connecting the internal cavity of the crankcase to the atmosphere.
Main gear of the rear axle of UAZ-452.
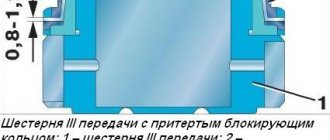
The final drive of the rear axle consists of one pair of bevel gears with a spiral tooth. The drive gear ring gear is manufactured as one piece with the shaft, which is placed between the front double bevel bearing and the rear cylindrical roller bearing. The rear bearing is pressed onto the end of the drive gear, the end of which is pierced in four places.
In this regard, when disassembling the rear axle, you must first separate the halves of the crankcase and remove the differential with the driven gear assembly. Then remove the drive gear and bearing assembly. When assembling bridges, all operations must be done in reverse order. If this order is not followed, failure of the rear bearing with cylindrical rollers is inevitable.
The outer ring of the rear roller bearing is installed in the holes of the axle housing support seat. The front dual bevel bearing is mounted on the front end of the pinion gear. The inner ring of the bearing, located at the ring gear, is pressed onto the smooth journal of the gear. The inner ring of the other bearing is mounted on the gear journal with a guaranteed small gap, which makes it possible to easily remove the bearing during adjustment, and also allows for reliable tightening of the inner rings.
The outer ring of the double tapered bearing, which has two raceways, is pressed into the front of the crankcase until it stops. A ring is installed between the end of the outer ring of the double tapered bearing and the crankcase to regulate the correct position of the drive gear. The thickness of the adjusting ring can be 1.28; 1.33; 1.38; 1.43; 1.48; 1.53 mm.
On the outside, this ring is secured with a cover, which is secured to the crankcase with six bolts and spring washers. A drive gear oil seal is installed in this cover to prevent transmission oil from leaking out of the axle housing.
Between the ends of the crankcase and the bearing cap there is a package of cardboard sealing gaskets, the thickness of which is selected 1.3 times greater than the actual distance between these ends. Between the inner ring of the double tapered bearing and the propeller shaft mounting flange on the drive gear there is an oil sump ring having a helical groove with a left-hand thread.
The parts installed on the drive gear are tightened with a nut. The tightened nut is secured with a cotter pin. A flange connects the drive gear to the rear end of the rear driveshaft. A stamped reflector is spot welded to this flange, which protects the oil seal from dirt and damage. Between the inner rings of the double tapered bearing there is a spacer ring and shims that regulate the tightening of this bearing.
The driven gear of the main gear is attached to the gearbox with ten bolts using a flange with a centering hole, ensuring its reliable and correct fit on the gearbox. There are ten evenly spaced bolt holes in the driven gear flange.
Each hole is provided with an eccentrically located cylindrical recess to accommodate the bolt head and prevent it from turning when the nut is tightened. The driven gear mounting bolt is cold-formed from chromium steel and heat-treated. A nut with slots is screwed onto the threaded part of the bolt and secured with a cotter pin.
To ensure lubrication of the double tapered bearing, an upper oil inlet hole and a lower oil outlet hole are drilled in the crankcase neck. The oil supply hole is located opposite the driven gear.
When the gear rotates, the oil entrained by it is pumped into the oil supply hole, through which it is supplied to the groove on the outer ring of the bearing, and then through the holes located between the raceways of this ring, it enters the cavity between the inner rings of the bearing and fills it, thereby ensuring its normal operation. work. Oil flows into the crankcase through the grooves in the gasket pack and in the bearing cap, and then through the oil drain hole.
Rear axle differential of UAZ-452.
The differential consists of four satellites, two semi-axial gears, a gear box, two thrust washers of semi-axial gears and two axles of the satellites. On the axes of the satellites in their middle part there are grooves with which the axes fit into one another, thus forming a detachable cross. The ends of the axles are rigidly fixed in the holes of the satellite box.
The satellite teeth are in constant mesh with both semi-axial gears, which are installed freely in the holes of the satellite box. The axle shaft gears are connected to the axle shafts using splines. To ensure better running-in, the satellite axes and satellites are phosphated. For the same purpose, the support washers of the semi-axial gears are coated with a thin layer of copper.
The satellite box is detachable and consists of two halves cast from malleable cast iron and connected with studs and nuts. From turning, the nuts are secured in pairs with lock washers whose tendrils are bent at the edge of the nuts. There are grooves on both halves of the gearbox for oil to enter the internal cavity to lubricate all rubbing surfaces of the differential parts. The gearbox rotates on two tapered roller bearings installed in the crankcase and crankcase cover.
The holes for the satellite axes in both halves of the satellite box are processed as an assembly. Therefore, a serial number is placed on both halves. When assembling the differential, the serial number of both halves must be the same.
The preload of the differential roller bearings is adjusted by spacers located between the ends of the gearbox and the inner rings of the differential bearings. The same gaskets regulate the position of the driven gear of the main gear, that is, the amount of lateral clearance, as well as the size and location of the contact patch.
Axle shafts of the rear axle of UAZ-452.
The rear axle axle shafts are of a fully unloaded type; they transmit only torque. One splined end of the axle shaft is connected to the side gear; at the other end there is a flange, which is rigidly connected to the rear wheel hub with six studs and nuts with spring washers. The axle shaft flange is centered relative to the hub using a collar.
Maintenance of the rear axle of UAZ-452.
Maintenance of the UAZ-452 rear axle during operation consists of maintaining the required level and timely changing of transmission oil, checking seals, timely detection of axial clearances in the final drive gears, periodically cleaning the breather, as well as tightening all fasteners.
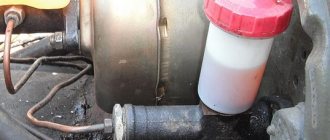
The oil level in the axle housing must be no lower than the lower edge of the oil filler hole. When replacing, the oil is drained through the oil drain hole located at the bottom of the crankcase. If the oil is heavily contaminated or metal particles are found in it, the crankcase should be flushed with kerosene before adding fresh oil.
To flush the rear axle, you need to pour 1-1.5 liters of kerosene into the crankcase, lift the wheels, start the engine, engage the gear and let the engine run for 2-3 minutes, then immediately drain the kerosene and add fresh oil. With timely and proper care, the service life of the rear axle increases.
This is interesting: Extending the life of wipers
Installation and repair of the UAZ rear axle
- Installation and repair of the UAZ rear axle
- UAZ rear axle structure
- Rear axle adjustment
- Possible causes of malfunctions and their elimination
- Increased noise when driving
- Knocking sound when pressing the throttle pedal
- Oil leaks
- How to remove the rear axle of a UAZ
- Assembly and disassembly of the rear axle on a UAZ
The rear axle is a machine mechanism that connects the wheels of the rear axle and serves as its support. The bridge is attached to the machine frame or to its body using a suspension.
UAZ rear axle structure
The UAZ rear axle structure includes many elements. Main parts of the structure: differential, axle shafts, gearbox.
The differential design can be with a single main gear and with an additional wheel drive. Wheel adjusters transmit torque to the hubs and are located at the ends of the shaft. The wheel bearings are supported by the regulator housing.
Gearboxes are designed to provide ground clearance and look like meshed gears. The final drive consists of a bevel tooth, a bearing assembly, a pinion and a drive with four pinions
. The satellites provide smooth gear shifting.
The crankcase is a container for lubricating fluid and has two holes. The wheel adjuster needs lubrication. The rear converter support includes a cover, dirt protection, and axle shaft covers. The driven rear gearbox is located on the shaft. The gearbox is fixed in the grooves of the shaft, its ends are equipped with couplings.
Rear axle adjustment
Adjustment of rear drive parts is carried out in case of their breakdown and replacement. In this case, the rear axle gearbox , its inspection and adjustment are especially important.
When adjusting, the following actions are performed: the end play of the differential between the gearbox and the rings is checked ( the required value is 3.5 - 4 mm ), after which the differential is covered with a gasket and a reservoir cover. The bearings roll into the correct position.
The gear bearings of the rear gearbox are inspected: the guide parts on the driven gear are fixed, the tail ends are ground in, the roller assemblies and gaskets between the rings are checked. The fastening of the main gear is checked.
When checking and debugging the gear head wheel, longitudinal play is not appropriate. To reduce tension, spacers can be added between the bearings. All spare parts are pinned after adjustment and installation. To adjust the backlash and location of the main gear, a structure with adjusted bearings and a gasket at the junction with the cover are installed in the heat exchanger. The distance between the gear teeth is set from 2 to 6 mm.
A set of shims is placed between the bearing assembly valve, the wheel and the support. The gap (thickness of the set) should not exceed the value of 1.3. The bearing assembly with the cuff is secured with bolts. The differential is installed in the oil pan, then the oil seals. Inspect the cardan flange and oil drains. Replace all worn parts with new ones.
Possible causes of malfunctions and their elimination
Increased noise when driving
There may be several reasons for hearing noise when driving or turning a car. Carefully inspect the rear axle of the UAZ and all parts of the device.
The teeth of the main gear gears are worn. In this case, it is not recommended to adjust the position of the parts: the transmission may jam. Defective parts must be replaced. The problem is in the bearings of the drive gear or differential. In both cases the details change.
The fastening of the drive gear to the differential has become loose. Tighten the mounting bolts.
Drive gear bearings are not tightened properly . Tighten the nut until it stops.
Poor meshing of the main gears . If there is no wear on the teeth, adjust according to the contact mark.
Lack of oil in the crankcase. Add the required amount.
Knocking sound when pressing the throttle pedal
If there is creaking and noise when cornering or when slipping, inspect all differential parts and replace unsuitable ones with new ones. A strong knocking sound when you press the pedal that controls the throttle valve indicates wear of the main gear or differential parts and they need to be replaced.
If the axle shaft splines are unusable , replace the axle shafts.
Oil leaks
Oil leakage is due to several reasons.
Parts of the propeller shaft are worn: cuff or flange . Details change.
Excessive oil level in the crankcase. Check the lubricant level and drain excess.
If the safety valve is dirty , it must be cleaned.
Deformed gasket and weak crankcase cover . The gasket needs to be replaced and the fastener tightened.
How to remove the rear axle of a UAZ
The work of removing the UAZ rear axle for repair is carried out on a lift, preferably with two people. The sequence of actions is as follows:
- Loosen the rear wheels, install a frame support under the rear axle so that the rear of the car hangs.
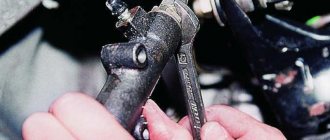
- Drain the oil and remove the driveshaft, then the shock absorbers.
- Place a jack under the beam.
- Remove the spring along with its parts.
- Next is dismantling the wheels. Roll the cart under the bridge and roll it out from under the car.
After inspection and repair, the unit is assembled. The fastening of the stepladders is tightened after the wheels are installed.
Assembly and disassembly of the rear axle on a UAZ
To assemble the rear axle, you must carefully perform the following sequence of actions:
- Install a set of gaskets between the front main gear bearing cap and the crankcase.
- Install the cover assembly with the cuff and tighten with bolts.
- Place the flange and washer, tighten the nut until its holes coincide with the slots in the gear shank, then secure it with a cotter pin.
- Install the differential with all its parts into the axle housing; a gasket is needed between the housing and the cover. The cover must be in such a position that the spring pads are in the upper position relative to the axle.
- Tighten the fasteners.
- Turn the drive gear to see if it is sticking in the already assembled axle.
Adjustment and inspection must be carried out regularly, without leading to repairs. Check the seals, oil level, valve cleanliness, and the fastening of all parts.
Eliminate backlash in gears in a timely manner. The good condition of your car is your safety.
Subscribe to our feeds on Facebook, Vkontakte and Instagram: all the most interesting automotive events in one place.
Removing a faulty unit
Since the UAZ 3741 has a frame structure, the front axle can be removed quite easily. To do this, you need to stock up on a powerful jack, stops that can support 1.5 tons of the front of the car, and WD-40 - a liquid for loosening nuts.
The procedure is as follows:
- First you need to install chocks under the rear wheels of the car.
- After this, you should disconnect the left and right brake pipes from the hoses going to the front wheel drums.
- Then you need to unscrew the nuts securing the brake hoses and remove the hoses themselves.
- Next, unscrew the nuts securing the lower ends of the shock absorbers.
- Remove the bolts connecting the drive gear flange to. front driveshaft.
- Then you should undo the cotter pin and unscrew the bipod ball pin nut.
- Disconnect the rod from the bipod.
- Unscrew the nuts that secure the front spring stepladders and remove the stepladders with pads and pads.
- At the end, you need to lift the front of the car by the frame and pull the bridge out from under the car.
When the old bridge is removed, you can proceed to installing a new part by performing the reverse procedure. If necessary, the removed unit is disassembled, troubleshooting is carried out, damaged parts are replaced, and then the bridge is returned to its place.
About UAZ
The device of this node
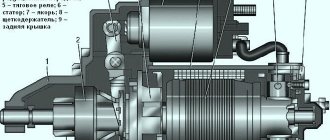
The Soviet SUV UAZ 469, produced by the Ulyanovsk Automobile Plant, is unique in its own way. The diagram of the rear axle of the machine is shown in Fig. 1. The design includes the following key components and assemblies:
- 1 — protective overlap;
- 2 — roller bearing of the differential device;
- 3, 8 — corrective auto-linings;
- 4 — tail part of the drive gear support;
- 5 — adjustment ring;
- 6 - oil removal holder;
- 7 - nut;
- 9 — front gear of the rear axle;
- 10 — head bearing support;
- 11 — hydraulic washer of the gear wheel axle shaft;
- 12 - gear element.
Arrangement and elimination of rear axle breakdowns
The rear axle is a support; inside it is the main transmission of the axle shaft, the differential. It can be of two categories: with a single main gear or an additional wheel drive. Wheel regulators, which increase torque and transmit it to the hubs of the conductive wheels, are located at the ends of the beam.
Wheel roller bearings rest on the regulator housings. Wheel gearboxes provide enormous ground clearance and are gears meshed internally. The main gear is bevel, with a spiral tooth, a bearing unit, which has a main gear and a bevel drive with 4 satellites. A satellite is a gear, compact, simple, rarely fails, and facilitates quick, easy gear changes.
The crankcase has a drain and fill hole and contains a certain amount of oil to lubricate the wheel hydraulic adjuster.
The rear converter support is detachable and consists of elements such as a cover, contamination protection, and pressed-in axle shaft housings. Its dimensions have been reduced, the gear ratio has been reduced to 2.77.
The driven rear axle gearbox is mounted on the shaft. It is installed in a roller bearing and bushing, tightened with a nut, and secured into the groove of the shaft. The ends of the gearbox shafts have movable couplings that help group and separate the shafts from the wheel hubs if necessary.
When the clutches are disconnected, the UAZ 469 becomes rear-wheel drive. This is useful on good paved roads. When driving in impassable terrain, turning off is not advisable. You can disconnect and connect the hubs from the start of operation of the quick response clutch or the hub cam. In this case, you do not need to crawl under the bottom of the car.
Correcting wheel axial play
Most often, the reason for the car’s inappropriate behavior on the road is a violation of the axial clearance of the king pins. It is very easy to check if it is broken - just lift the front end with a jack and rock the wheel up and down. When axial play is detected, the kingpin clearance needs to be adjusted.
Adjustment steps:
- We raise the front of the car, having previously placed the car on the handbrake.
- We dismantle the wheel.
- Unscrew the ball bolts securing the oil seal.
- We check the axial play by rocking the structure up and down.
- Unscrew several bolts of the upper king pin cover and remove the cover.
- We take out the thinnest gasket and put the lining back.
- We perform the same actions with the lower lining of the king pin.
- Tighten the bolts and check the result. When the play is eliminated, screw the wheel and seal back on and off we go. If the play remains, we adjust it again, removing thicker gaskets.
Many Internet users enter a similar request in Yandex or Google - “repair of the front axle of UAZ 469”. This means that they are interested in how to repair the front or rear axle on a UAZ themselves. Of course, the procedure for dismantling and repairing the bridge is described in special books on repair and operation, which are now not a problem to obtain. However, disassembling with your own hands both the front and rear axles down to the last screw is, to put it mildly, not an easy task. It may turn out that you just need to replace some small part, to access which you don’t have to disassemble everything.
Front axle UAZ 469
Here are just some possible options for bridge failures on the UAZ 469 (Hunter, Patriot, “loaf”):
- The differential is worn out, the gear housing is bent
- Critical wear of the main gear in the gearbox
- Wear of the steering knuckle (ball joint, axle) on the front axle
- The appearance of large gaps in the pivot joints
- Bearing wear, resulting in the need for adjustment or replacement
- Injection of elements requiring lubrication
It can be difficult to understand which of the above happened to your car, however, it is often possible to roughly localize the problem even by ear. If you hear increased noise or a hum from the front or rear axle (even in neutral gear), the gearbox is most likely worn out (needs repair), or the bearings require lubrication. If your car “yaws” from side to side and the steering is fine, the problem may be stuck in the axle, CV joint, or incorrect installation of the pins that secure the ball joint, as a result of which play appears and the wheel begins to “walk.”
What does a CV joint consist of?
A very common malfunction is the flyout of the ball bearings that are located in the CV joint. They fly out precisely because of incorrect adjustment of the pins, as a result of which the geometric center of the CV joint and the axle do not coincide. As a result, the axle shaft “walks” in the seat and gradually breaks down. The CV joint itself is also damaged. And when turning, you can hear a crunching sound from the side of the wheel and the wheel may jam. During the repair process, some craftsmen simply throw out all the balls, except for the centering one (additionally welding it) - in order to get rid of the problem of their constant flying out.
Steering knuckle of the front axle UAZ 469 assembled
But this does not save for long; there are even cases when the welded ball breaks off while driving, the loads there are so high. It is much more effective to adjust the king pins. It is necessary to achieve a condition in which the line passing through the king pins and the center of the axle shaft intersect at one point. And it is at this point that the center of the CV joint should be located. The displacement of the axle shaft from left to right, as shown in the figure, is unacceptable; it must be rigidly fixed; for this purpose, thrust rings and bushings are provided in the design.
Features of unit dismantling
When removing the rear axle, you need to unscrew the tail unit nut, remove the washer, mating flange, cover of the front gear roller assembly, and press the assembled gear with bearings out of the oil cooler at the rear of the car.
This circuit is excellent for disassembling a differential device. The next step is to unscrew the splines connecting the driven gear to the gearbox and reset it. Divide both parts of the box, pull out the gears, planetary gear rods, and support nuts. When assessing disassembly, pay attention to the integrity of the gear wheel teeth. If they are damaged, the part must be replaced. To remove rollers, outer and inner rings, special tools are required. Strictly study and understand the disassembly sequence so that you can accurately perform all steps in reverse order when reassembling.
This is interesting: Tips that can help you charge your battery properly
When inspecting the oil stripper ring, check for surface irregularities. If yes, process to a thickness of 5 mm. The same goes for the cardan flange. Grinding height up to 53 mm. Wash the protective surfaces. Blow out the oil outlets. Drive design parts and axle shafts should be replaced if there are scuff marks or severe wear.
everything useful is here
Replacing the axle shaft with a hinge SEQUENCE OF ACTIONS Remove the front wheel hub with bearings
Using a 14mm socket, unscrew the six bolts securing the brake shield and axle to the steering knuckle.
Remove the brake shield carefully so as not to damage the brake hose.
We hang the shield on the steering rod pin.
Remove the trunnion with the cardboard gasket.
By pulling towards yourself, we take out the axle shaft with the hinge.
We clean the internal cavity of the ball joint from old grease. We install a new axle shaft with a hinge, having first filled it and the cavity of the ball joint with Litol-24 or CV joint lubricant in the amount of 0.5 kg. We install the removed parts in the reverse order, lubricating the bronze trunnion bushing with the same grease. Adjusting the hub bearings
The UAZ loaf car is widely used not only in the Russian Federation, but also abroad. The design of the front axle of the UAZ loaf allows you to connect all-wheel drive to overcome off-road conditions. Thanks to this, the vehicle is distinguished by high cross-country ability in difficult areas of rough terrain.
Nuances of installation and adjustment
The assembly (diagram) of the differential drive structure is carried out as follows.
- Connection of both satellite boxes depending on the case serial number.
- A crosspiece is inserted into the left satellite box.
- Place the assembled gear in the left box.
- Lubricate the differential units (axle gears, satellites, axles, thrust washers) with transmission oil.
- Secure the necks of the gear rings of the axle shafts with support washers.
- The satellites must be secured to the axis of the disconnected cross.
- Carry out the same actions with the right box.
- Tighten the parts of the boxes, insert the driven wheel of the base gear.
The foreman goes through the unit
Turn the six axle shafts of the mounted differential using splines with a force of no more than 59 N. Adjustment of the drive structural elements is carried out when replacing them.
- Secure the inner rings of the differential bearing units to the journals; the end play between the box and the rings should approach 3.5-4.0 mm.
- The installed differential differential is closed with an auto-gasket and a reservoir cap. Roll the bearings to establish the correct position. Secure the heat exchanger lock.
Installation and adjustment of ball bearings of the conductive gear of the rear converter.
- Fixing the guide elements to the main gear.
- Grinding in the tail end with the guide element.
- Location of the spacer and spacers for the roller assembly between the inner rings.
- The main fastener for the main gear adjusting ring.
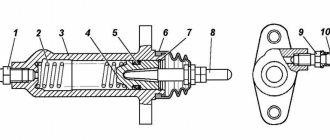
All intermediate actions, punching, are shown in the diagram in Fig. 2. This diagram describes all the nuances in more detail.
- When adjusting the head gear assembly, there should be no longitudinal play; the spring dynamometer will show the force. Indicators for new parts are 15-30 N, for run-in parts - 20-35 N. To reduce the tension when installing bearings, you can add spacers. To increase - remove.
- The adjustment has come to an end, we fix all the parts in their places and secure them with high-quality cotter pins.
The backlash adjustment and the location of the central gear gear are carried out as follows.
- A potential with adjusted prefabricated roller bearings is installed in the heat exchanger, their separation gasket is installed with a cover secured with a bolt.
- The distance between both teeth is set: 0.2-0.6 mm. The backlash is adjusted taking into account the number of driven gear oil seals: when their number decreases, the backlash must increase, and vice versa. When rearranging the gaskets, the tension of the potential elements will not be disrupted only when the number of gaskets does not change.
- The meshing diagram of gear wheels along the contact patch is shown in Fig. 3.
Return to contents
Forward and reverse torques
- Precise engagement in engagement with low load.
- Microcontact on top of the tooth (when debugging, move the head part towards the driven part).
- Contacting at the root of the clove (correction: the conductive one should move away from the driven one).
- Block contact is the narrow end of a tooth (deviation of elements from each other).
- Contact on the volumetric side of the tooth (deviation of the driven to the leading).
The gasket set is installed between the valve end of the front bearing assembly, the wheel and the axle support. The thickness of the package is a gap not exceeding 1.3.
Important parts of the unit
Secure the outer bearing lock assembly with the cuff with bolts, install the flange, and secure the washer with a cotter pin. A prefabricated differential is installed in the unit pan, then oil seals between the crankcase and the damper. The top of the pallet is mounted taking into account the spring pads located in the outer portion of the bridge.
The mounted bridge should not heat up while the machine is moving. Correctly adjusted parts will not cause heating. Of course, you just need to check that the driven gears are not jammed or caught, if the device has any.
Installation, adjustment, and repairs must be carried out on time. Safety when driving in a car depends on this. Maintenance of the UAZ bridge part is as follows.
- Constantly maintain the technical level, timely change the oil, check the seals, detect and eliminate axial gear play in the head drive of the unit. Systematically monitor the adhesion of fastening parts of components and assemblies.
- Pay great attention to cleaning the safety valve. If the oil is dirty or contains iron impurities, the heat exchanger should be flushed with kerosene before replacing it.
Experienced drivers recommend pouring 1 liter of gasoline into the pan, raising the wheels, connecting the engine, letting it run for 1-2 minutes, then draining the remaining gasoline, draining it, and pouring clean motor oil into the tank.
What is a hub expander
UAZ Patriot is a modern, reliable SUV designed for driving on city streets and off-road. To make the car more stable, expanders are installed on the hub.
The hub expander is an aluminum device with five holes for mounting on the hub, as well as with the same number of studs for mounting on the wheel. These wideners are necessary to increase the wheel track, stability, and reduce the risk of overturning. To install the expander, you can contact a service center or do the work yourself.
Place the UAZ Patriot on a flat road surface, use the parking brake, and do not completely unscrew the wheel nuts. Use a jack to suspend the wheel. Do not forget to place a roller under the opposite wheel for safety during work and when the car comes off the jack.
Place the trestle under the vehicle axle and lower the vehicle onto it. Remove the wheel and screw the expander in its place, which must be pulled through with force. Next, the wheel is put in place. Do the same with the other wheels. These extensions can improve driving safety and are important for a car, especially in winter.
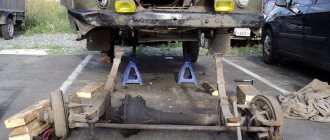
UAZ 452 Bukhanka › Logbook › Preparing the car. Part 6 — Rear axle.
There are definitely problems with the rear axle. It remains to find out how bad everything is; to do this, you need to remove and wash the rear axle.
I put it on the wheel, halved it and took out the differential.
The outer races of the differential bearing cannot be pulled out so easily.
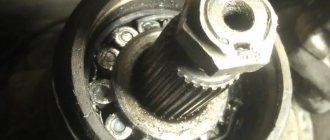
After everything was removed, I disassembled and washed the differential and hubs.
The bearings were completely damaged; pieces even broke off from the rear bearing of the drive gear.
The main couple also had a good time.
The thrust washers of the axle gears are heavily worn and have worn out grooves in the housing.
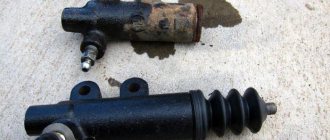
The outer ring of the bearing in the right hub rotated and broke the seat. Brake drums and pads are in good condition. The brake cylinders, like the front ones, are new, you just need to replace the boots.
As a result, it is necessary to change all the differential bearings, the main pair, half-axle gear washers and the right hub assembly. The UAZ spare parts store already knows me, they even gave me a discount card.
After purchasing the necessary spare parts, I began assembly. By selecting the thickness of the washer, I eliminated the gap between the semi-axial gears and satellites.
The seats for the front and rear bearings of the drive gear were slightly broken, so I had to resort to tinning again. After which the bearings were pressed into place with good tension.
Then there was magic with the differential setting, which released a lot of hatred and obscenities. It seems like nothing complicated, but when you start doing it yourself and for the first time, it becomes “fun.” But everything worked out, and the bridge was assembled.
All you have to do is push it back and you're done.
During disassembly I purchased front springs in good condition, which I will replace in the next part.
Why change the main pairs of UAZ Patriot
UAZ Patriot is a car that requires modifications, especially if it is planned to be used in off-road conditions and on rough terrain. In particular, work is required to increase ground clearance, which is an important point. After all, the higher the ground clearance of a car, the correspondingly it has better cross-country ability. Read about how to increase ground clearance or make a body lift on a UAZ Patriot SUV in the relevant articles. Today we will pay attention to the issue of the main pairs, why they are needed, what they are, how and why they need to be replaced and, of course, adjustment. Therefore, let's start with the most important thing: what is the relationship between cross-country ability and the main characteristics of an SUV?