| 4 | 5 | > | Last » |
Installation of the box. Best Practices, Successes and Failures…
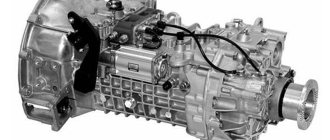
So, let’s move on to, perhaps, the most unpleasant procedure for every UAZ owner - installing a transfer case. The gearbox has to be removed and installed frequently: engine repair, clutch replacement, clutch release, bearing in the flywheel. And it’s not that the box is heavy... It’s just that when installing, you need to lift the box while under the car and “shoot”, trying to hit the target - the clutch disc. The procedure is still the same... It is also complicated by the fact that there is not enough space under the side of the UAZ, and the second person there is only in the way. I’m not talking about “loaves” at all, there’s simply no room there.
The easiest way out is to put a “trapezoid” in the body and lift the box through a hole in the floor of the body. The “trapeze” is a good thing, but you shouldn’t “sit down” on it. There was a case: in winter, on the road, the clutch disc fell apart. I had to drop the box right on the road at -20. At the same time, there were no drawers to lift the box...
I propose a version of the device (unfinished, although tried). Maybe someone will improve it or make their own contribution.
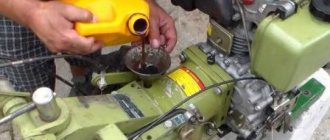
Appearance of the device
It took: 1. metal plate 8mm 50x90 2. rod 12mm 90mm 3. water pipe 12 35 mm 4. half electrode. and the ubiquitous Bulgarian.
Installation takes a couple of minutes
The holes are drilled according to the holes in the beam, or at random. The same ones are drilled into the beam. Later a slot was made to insert the winch cable. The rigidity of the structure is given by the rod and small dimensions.
Next, we bring the input shaft to the seat in the clutch housing.
We hook the winch to the rear axle, or perhaps to the tow bar, on “loaves”.
The winch cable is hooked onto the transfer case, in the area of the hand brake.
And go ahead! The box is lifted and at the same time pulled forward. Make sure that the input shaft does not rest anywhere.
The box fits the studs. Slightly lift the front part of the box so that the input shaft enters the clutch disc. We turn on the direct transmission, and while rocking, we engage the splined connection. All that remains is to shake the box so that it sits on the heels.
So, what happened: Not hard. The “adjustment” is tiny; you don’t have to remove it from the beam at all. What did not work: the tube on the device did not rotate (you need to install a bearing). The cable from the tube could come off and get damaged (you need to install limiters).
The idea of lifting it with a shovel, using it as a winch, did not work out. Although the box rises easily. It is securely secured against lowering by a lying bayonet of the shovel. But the rope stretches. But on the road, when it presses and there is a suitable cable, it will work.
Gearbox repair: is it easy to do on a UAZ?
If you are the owner of a UAZ and there are suspicions that the gearbox has failed, then you should definitely undertake repairs. The unit fails when the driver has to hold the gearshift lever while driving when they begin to shift on their own (to prevent this, drivers tie them with ropes). Sometimes squeaks are heard. To get acquainted with the repair technology, read about repairing the UAZ 452 gearbox yourself. First you need to determine the type of UAZ gearbox that is on the car. Despite the differences between car models, they are equipped with the same transfer cases. Therefore, we can assume that the repairs are carried out almost identically. To do this, you will need a set of keys, some tools and auxiliary aids (their list is given below).
Start of repair of the UAZ 452 gearbox on your own: gearbox, transfer case
On most car models of this type, both parts are one piece. The weight of such a unit reaches 75-82 kg, so you will need an assistant. If the vehicle being repaired has a safety cage, then you can use a hand winch to remove the UAZ 452 gearbox for repair.
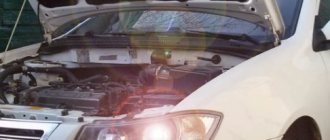
The machine must be placed on level ground, since subsequently it will have to be moved 0.5 m forward or backward. First drain the oil. Both boxes have a common volume, but the plugs for draining the liquid are separate. While the oil is pouring out, you need to remove the front seats and unscrew them, and then put the hatch halves on the floor of the car. Next comes the turn of removing the speedometer rods.
When the oil has drained, screw the drain plugs into place. There is a frame cross member under the handbrake drum; it must be removed. Disconnect the front axle clutches and unscrew the front driveshaft. If you find that the nuts on it are weak, then you need to remove this part.
If a UAZ 3303 gearbox is being repaired, you need to be careful with the clutches. The car is moved 0.5 m (in any direction) and the rear cardan is removed through the hatch. Disconnect the muffler from the transfer box and loosen the clamp on it. Then the following parts are removed one by one:
- clutch pan;
- fastening the oiler from the input shaft (it is located on the right, on the bell);
- 4 bolts that hold the clutch fork housing;
- adjusting the cylinder rod and fork.
The transfer case is wrapped with rope and suspended. The following parts are removed:
- pillow bolts;
- nuts holding the bell box fastening.
During these actions, the engine, when repairing the UAZ 452 gearbox on its own, must be supported with a jack. When the box is free, it is lowered and removed from under the car. The levers must first be removed. The bell pins need to be replaced with new ones.
If you need to repair the UAZ Patriot gearbox, then you need to take into account that the location of the box and bell is reversed. This also applies to the location of the rods. But in general, the technology for repairing the UAZ 452 gearbox on your own is suitable for use.
Unscrew the bolts and nuts, disconnect the gearbox and its transfer case. There is a gasket between them, reinforced with sealant, so you will have to hit the bracket securing the unit to the frame several times.
UAZ Patriot checkpoint diagram
Do-it-yourself disassembly and assembly
First, you need to remove the input shaft cover and unscrew the left nut that is located on it (see figure). Now you need to remove its bearing. If it fails, it must be replaced. Its roller “brother” is installed inside the shaft; it also needs to be replaced. Then the retaining ring is removed from the secondary roll. Unscrew the double row bearing stopper. The shaft needs to be knocked out and the part replaced.
Next comes the third gear clutch assembly. Copper synchronizers are replaced along with crackers. Then comes the turn of the reverse gear. Unscrew the front intermediate shaft bearing box. Do not hit it with a hammer or core: it is made of silumin and may crack.
Be careful not to damage the rubber gasket because it is difficult to get out. On the removed shaft, the gears and all bearings are replaced. After this, reassemble the box in reverse order. When installing the roller on the input shaft, it is generously lubricated with Litol. All components and parts are put in place one by one so as not to make a mistake.
Transfer case, complete assembly of the gear unit and its installation
Loosen the nuts of the flanges and shafts and remove them. The handbrake must be checked for functionality and, if necessary, it must be replaced. Remove all covers and replace seals. Unscrew the speedometer linkage drive and the breather (it needs to be replaced). Check the bearings and replace if necessary.
Reassembling the transfer case is done in the reverse order. These steps are repeated when working with other types of this car brand (including when repairing the UAZ Hunter gearbox). Install the fastening bracket to the frame. Place the transfer case on the handbrake drum and, holding it by the gear, lower it into place through the power take-off hatch.
Before this, install the lock washer from the intermediate shaft. Tighten the bolts and nuts, put on the cover with levers and check the operation of all gears. They change the release bearing, remove the levers, drag the entire assembly under the car and hang it on a rope. Place the release bearing assembly on the box and strengthen the spring. Then the input shaft and clutch are inserted. This is done as follows:
- move the box down and up;
- turn the engine by the flywheel;
- put the knot in place;
- attach pillows.
The oiler for the input shaft splines and the fork are attached in place, and the speedometer drive, cardans, handbrake, and covers are put in place. You need to return the frame cross member to its place and secure the muffler bracket to the transfer case.
The handbrake is adjusted and adjusted, and the oil is changed. If the UAZ Hunter gearbox is being repaired, you may need not only these steps, but also adjusting the rods. They screw up the hatch on the floor and install the seats. At this point, the repair of the UAZ 452 gearbox on our own is completed.
Tools and materials
To work you will need:
- open-end wrenches from 10 to 22;
- bearing puller;
- screwdrivers (phillips and flat);
- platypuses (with curved noses and straight ones);
- copper pin;
- a piece of pipe as a handle for keys;
- chisel and core;
- hammer and mounting blade;
- small jars for collecting nuts and screws;
- socket wrenches from 10 to 36;
- lithol;
- red sealant;
- a set of gaskets and retaining rings for a car.
In order to properly repair the UAZ 452 gearbox on your own, you must strictly adhere to the sequence of actions described above. Difficulties in repairing other models of this brand can be caused by a different arrangement of the main parts of the machine, for example, rods. The oil change must be carried out in accordance with the technical requirements for this type of vehicle.
Repairing a UAZ 469 gearbox with your own hands is a feasible task for a person who wants to save money. Other owners of UAZ vehicles (for example, UAZ loaf) can take note of all of the above and repair the UAZ gearbox, taking into account some differences in the parts and arrangement of the rods.
- about the project
- Directory
- Library
- Directory of companies
- Reviews
- Consultations
- Ask a Question
Share photos and rate photos of other users
We have compiled a selection of videos about the repair and maintenance of UAZ vehicles
Communities › UAZ drivers › Forum › removing the box on Bukhanka
In general, share your experience, I plan to remove the transfer case and transfer case separately, but I think I heard that it’s hard to install them later, they say you need to do it together, how hard is the work and what pitfalls are there?
full of crap. worked on a loaf for 1.5 years, the car is great if not in repair. if you remove it separately, you will have more problems for two hours. but in one place it’s a hard ass.
Yes, and it’s a little difficult to climb under it to separate the transfer case from the box. Words can’t describe it; you have to try it. Just mats.
I cut a special hatch in the floor, now I can remove it and install it normally using a hand winch.
can you post pictures of what kind of hatch I didn’t see in your BZ or describe the process
I didn’t take a photo, and even now there’s a seat above it. Briefly about the process. I found a hatch, well, which we have above the tanks. I removed the gearbox from the RK, and there you will see on the cross member, well, where the airbags are still attached, there is a square hole in the middle. I drilled 4 holes from the bottom with a screwdriver so that I could see the boundaries. I measured the dimensions of the hatch, drew a square on the floor, leaving drilled holes inside the square, and cut it out with a grinder. All. I fasten the hatch with screws for metal, and I attach the winch to the roof of the car through a corner, there is just a fastener for a stretcher, and I screw the corner into its place while I’m working.
I understand, I think I’ll also think about something
I’ve been driving my UAZ since 1996. When I was younger, I took off the box with the drawer from the bottom one and put one on. But now I’m almost 57 years old, I took it off from the bottom, but I can’t put it on anymore, I groaned, groaned, spat on everything , not sparing the floor, I carefully made a window in the floor, having first removed the Lenolium and plywood on the floor. I cut out the window with a grinder. I made a small winch and installed it easily with the winch.
I recently removed and installed it, it’s completely more convenient. You remove all the rods, unscrew the bolts, put the Zhiguli tank on it and drop it on it. It’s also better to install everything together, drill a 12 mm hole in the floor, there is a square technological hole in the center between the frames below, it exactly coincides with the center of the box and transfer case. In the cabin, you place a pipe on the bars, mine is 32 mm, and weld a handle to it so that you can turn it just so it doesn’t touch the floor. You tighten the cable with a noose between the box and the transfer case, thread it through the hole, wind it around the pipe and calmly swan. The child doesn’t have to put any effort into lifting it up, but you calmly stick the slots in from below, catch it by turning on the gear, and that’s all. Installed in a couple of hours.
I want to completely seal the floor, maybe I can make some kind of lift to lift the entire box
You can build something like a small car from an old jack, weld a fork and a frame on wheels like a rolling jack. There are plenty of options.
Yes yes I was thinking about something like that
I filmed almost the same way only without the block - it’s just that in the cross member on which the gearbox hangs, apparently the previous owner cut a window into it and let an old rag tow halyard through.
I've already seen this somewhere, BUT if necessary, everything goes haywire, you're not going to shoot every day, so I think there's no point in fussing
Read here how a person installed the gearbox and the gearbox assembly - uaz-glafira.indeep.ru/node/1013, you can remove it using the same principle. You can also remove it separately, but it will take longer; you can also install it separately, but again it will take longer and the gasket at the joints of the gearbox, control gear and “helicopter” may not fit well (after all, it is quite problematic to control how well it fits) and for this reason oil will drip at the joint (this happened to me when I installed it separately). Using the method described above, I recently removed the gearbox and control gear assembly alone, with minimal effort. Or as an option - www.drive2.ru/cars/uaz/33…/288230376152090269/#post
I liked the option with rollers, now I’ve just removed the floor, it’s time to weld the rollers
I took it off in the fall: I unscrewed the transfer case from the box and removed it; there was no need to work with the cardans and the navel for an hour. Look carefully at where in the plate there is a window for the transfer case levers (one lever (which is closer to the box, you need to move forward, and the second one should be pushed into the transfer case so that the levers are inline!). Everything goes in and out great, without outside help. In the future, you can have a bigger window do.
This is all good, but when I pulled out the engine with the gearbox, they dropped down in the transfer case, is that very bad?
How it went down in more detail.
This is my first time removing an engine. and decided to remove it with the box because it’s hard to unscrew the box from the bell in 3151... well, I separated the transfer case from the box while they were also pulling and unscrewed the transfer case support from the steering wheel... when they pulled out the box with the engine. I looked into the transfer case and there the gears in it were lowered below the center and fell through to the bottom... I’m thinking maybe they broke something while they were pulling the engine... for example, with the shank of the box they tore off a thread in the transfer case, and now I’m going through this for the second day.
No, I don’t think it dropped, probably because the shaft went away, I’m not an expert on boxes, create a separate topic on your issue with photos, maybe someone more experienced can tell you.
Well, yes. In principle, I looked at the photos, there’s nothing to worry about... the gear selection paw and the cardan at the back are on a bearing... as if the bearing would not be torn out. Although the cardan is straight
What are the features of the gearbox on a UAZ car?
The UAZ car is common on Russian roads, is distinguished by its reliability and the ability to move on asphalt areas and off-road. The UAZ gearbox is a mechanical type with 4 steps. The mechanism is distinguished by the presence of synchronizers, the function of which is to equalize the speed. This is one of the key elements of any transport. The functionality of other systems and the quality of driving a car depend on its operation.
Design and principle of operation
The gearbox diagram contains information about the main and additional elements of the system. The UAZ gearbox structure includes the following units and parts:
- Fully synchronized installation, ensuring speed equalization and smooth switching.
- Primary shaft on 2 supports.
- Helical intermediate gears for shaft drive.
- An angular contact ball bearing, consisting of 2 rows and located on the rear of the shaft, is necessary to perceive and respond in a timely manner to loads arising during driving in the radial and axial planes.
- A transfer case consisting of a main axle shaft and a gear with a large working life.
Such design features make it possible to move in reverse. The mechanical type of gearbox has the main advantage of a long service life. A car with such a device copes well with difficulties while driving over rough terrain.
Malfunctions and repairs
The first signs indicating a malfunction of the automotive system should force the car owner to carry out diagnostics. In some cases, this can be done on your own. Simple breakdowns can be repaired with your own hands. It is better to entrust more complex faults to a service center.
Signs indicating the need to repair the UAZ gearbox:
- deterioration of management;
- squeaks and extraneous noises when changing speeds;
- independent activation of transmission.
In most cases, when uncharacteristic noise is observed, the cause lies in wear or defect of the bearings and gears. Stiff gear shifting indicates a malfunction of the synchronizers.
The main reason for the problems that arise is the natural wear and tear of parts.
The need to check the transfer case is indicated by deterioration in wheel adhesion to the road surface and increased noise levels from the area where the unit is located. Damage is caused by: careless operation of vehicles, untimely maintenance, use of low-quality consumables, fuel and gear oil, lack of control over the volume of working fluids.
Another group of problems is related to the leakage of the oil mixture from the gearbox. Possible reasons:
- exceeding the maximum oil volume in the box;
- water entering the system when refueling;
- a crack on the unit cover or on the crankcase.
The UAZ high-speed gearbox consists of a large number of working elements and components. Their normal functioning and interaction ensure reliable use of vehicles. Gearbox repairs will not be required if you regularly inspect your vehicle.
Mechanism adjustment
After assembling and installing the new switching mechanism, it is necessary to adjust the rods and the entire system. The goal is achieved by changing the length of the vertical and horizontal rods. Do-it-yourself setup sequence:
- Move the gear shift lever to the neutral position, and move the element responsible for selecting the gear all the way.
- Move lever 1 to positions corresponding to speeds 1 and 2. While checking that the elements are not pulled up, connect and secure the selection rod.
- Similar actions must be carried out for other gear stages.
After work, you should check that the gears are fully engaged by starting first gear and reverse. The lever must not come into contact with other parts or controls. The optimal gap size is up to 3 mm.
How to disassemble
Before repairing a 5- or 4-speed gearbox (new model), you must carefully study the device diagram, prepare material and tools. To dismantle the unit yourself you will need:
- wrenches: open-end and socket;
- screwdrivers;
- hammer;
- assembly shovel.
The large weight of the product due to contact with the dispensing system requires an assistant during operation and removal of the box.
Disassembling the gearbox occurs in the following sequence:
- Fixing the machine above the inspection hole.
- Removing transmission oil to reduce unit weight.
- Removing the seats in the cabin.
- Dismantling the speed release fork, clutch pan near the muffler, frame, speedometer shaft and cardan.
- Disconnecting the dispensing system from the main structure, securing it to the side with a rope.
- Removing fasteners.
After this, you can remove the body from the car. The next step is to disassemble the gearbox stages, check all elements of the mechanism for wear, and replace non-functional parts with new ones.
How to assemble
Assembly and installation of the automatic transmission is carried out in the following order:
- Placing the box in place, tightening the bolts and other fasteners.
- Attachment to the main structure of the transfer case.
- Installation of the speed release fork, clutch pan near the muffler, frame, speedometer shaft and cardan. At this stage you can assemble the lever.
- Installation of seats in the interior.
- Filling the container with new transmission oil.
After this, you can remove the car from the inspection hole. To install a new gearbox on a UAZ and replace other parts, first carefully read the mechanism diagram.
Replacing the transfer case
When installing new components, you should use only high-quality parts that are suitable for the vehicle model. This is the key to a comfortable ride and reliable functioning of all elements of the system.
Replacing the transfer case is complicated by its connection to the gearbox, which increases the weight of the structure.
The process includes the following steps:
- Removal and disassembly of the unit.
- Fault diagnosis.
- Replacement of worn elements or installation of a new transfer case.
To dismantle the device you will need:
- secure the vehicle in the inspection hole;
- lower the parking brake lever;
- move the remaining elements for selecting and changing speeds to the neutral position;
- remove the casing, handles, all connecting wire elements, covers and lining.
The new unit must be installed in the reverse order.
Timely maintenance, diagnostics of main and auxiliary components, regular replacement of worn parts, use of high-quality fuel and oil mixtures, consumables, careful operation of vehicles and following the manufacturer’s recommendations will help to extend the service life of the mechanism.
Disassembling the gear shift control mechanism of cars of the UAZ-3741 family
Disassemble in the following order:
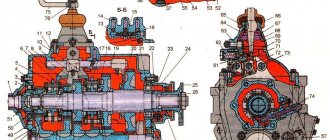
Rice. 3.24. Gear shift control mechanism for vehicles of the UAZ-3741 family:
Gear shift control mechanism for vehicles of the UAZ-3741 family: 1 – gear shift lever; 2 – mechanism seal; 3 – selecting lever of the mechanism; 4 – switching lever of the mechanism; 5 – vertical shift rod; 6 – intermediate shift lever; 7 – intermediate selection lever; 8 – horizontal selection rod; 9 – gear shift lever; 10 – gear selection lever; 11 – horizontal shift rod; 12 – intermediate bracket for levers; 13 – intermediate selection lever; 14 – vertical selection rod; 15 – grease nipples
1. Disconnect rods 8 and 11 (Fig. 3.24) from levers 9 and 10. 2. Unscrew rods 5 and 14 from levers 6 and 13. 3. Disconnect bracket 12 of intermediate levers. 4. Remove the mechanism bracket together with gear shift lever 1. 5. Wash the control mechanism parts. 6. By external inspection, identify wear in the levers and rods. 7. Replace worn parts.
Diagram of the transfer case "loaf"
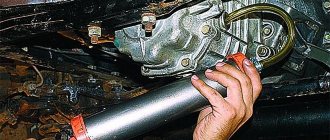
Removing the UAZ gearbox
Removing the gearbox
We work together on the inspection ditch.
SEQUENCE OF ACTIONS Drain the oil from the transfer case and gearbox.
We remove the transfer case and install a jack under the clutch housing. Disconnect the wire ends from the reverse light switch. We recommend removing the reverse light switch so as not to damage its terminals. Unscrew the nuts and remove the bolts of the rear supports of the power unit
Using a 12mm wrench, unscrew the four bolts securing the gearshift lever support.
Remove the lever with the spring.
Using a 10mm wrench, unscrew the four bolts securing the clutch cover cover lining.
Using a 19mm wrench, we unscrew the three nuts securing the gearbox (two on the right and the lower left), while the lower left nut rests against the gearbox housing and is not removed from the stud.
Use a jack to slightly lift the power unit (by the clutch housing).
Remove the support plate.
Using a 19mm wrench, unscrew the upper left nut securing the box.
Having moved the gearbox back, we finally unscrew the mounting nuts on the left side.
We remove the gearbox.
Install the gearbox in reverse order. Fill the gearbox and transfer case with oil
Communities › UAZ drivers › Forum › removing the box on Bukhanka Link to main publication
- The suspension on the Lada Grant is knocking; ball joint replacement
Disassembling the gear shift control mechanism
Rice. 3.21. Removing the rod hole plugs
Disassemble in the following order: 1. Remove the three plugs for the rod holes in one of the ends of the cover (see Fig. 3.21). 2. Undo the cotter pins and remove the fork locking screws. 3. Unscrew the plug of the rod lock socket for 1st and 2nd gears and remove the spring and lock ball. 4. Press the rods (see Fig. 3.22) through the holes in the cover where the plugs are removed and remove the forks. When pressing out the rods of III and GU gears and reverse gear, do not lose the retainer ball, ejected by the spring.
Rice. 3.22. Pressing out the shift fork rods
5. Remove the springs and balls of the rod clamps; remove the two lock plungers through the hole in the 1st and 2nd gear lock. 6. Unscrew the nut and remove lever 22 from the slots (see Fig. 3.23),
Rice. 3.23. Gear shift mechanism for cars of the UAZ-3741 family
7. Knock down the pin 24 securing the lever axis 23 and remove the axis together with the selection lever. 8. Unscrew the nut and remove lever 16. 9. Unscrew the three bolts, remove the oil seal cover 15 and remove the spring. Having lowered shaft 10 with coupling 12 and two washers, remove the shaft through the side cavity of the cover. Note Before removing levers 22 and 16, note the relative position of the levers on the rollers in order to return the levers to their previous position.