I decided to somehow update the panel on my gazelle.
From the day of purchase, the car's interior was in terrible condition.
First of all, I washed and cleaned the interior, but I couldn’t do anything with the panel. I painted the torpedo without disassembling it. After that, she began to look even more terrible, since it was all done in a hurry.
I have owned a Gazelle for ten years. During this time, the appearance of the salon became even worse.
This year, due to unplanned days off, I had a lot of time. So I decided to disassemble the panel and paint everything properly.
Fortunately, it comes apart very easily, but inside everything turned out to be much worse than I expected:
- Centimeter dust.
- Half the parts are missing. It turned out that someone had climbed there before me.
- Absolutely everything was based on “snot”.
- Much was “knocked down”. I'm still surprised how the car didn't catch fire.
This whole mess needed to be done right. I remembered that the heater was not working well and was blowing weakly through the windshield towards the driver, so I decided to disassemble it too.
As a result, I dismantled the entire cabin:
- I washed all hard-to-reach places.
- I restored all the wiring.
- I had to tinker with the stove. When I installed it back, I couldn’t adjust the dampers correctly (there is no specific information about this on the Internet).
Restored the panel. I cleaned it properly, degreased it, primed it and painted it in three passes. I bought paint and primer specifically for the plastic panels. Followed all instructions.
Assembly and disassembly were not difficult. It turns out that it’s not complicated like in other machines.
I was very pleased with the result of the work done. The car became more comfortable, the smell of the interior became more pleasant, and the heater worked well.
Source
External tuning
Most often, external tuning is aimed at increasing the efficiency of the car. Thus, installing a fairing, the price of which starts from 5 thousand rubles, allows you to reduce consumption by 10-20%.
Another popular tuning option is to install old-style elements from restyled cars on the Gazelle. This tuning allows you to refresh the appearance of the car. The cost of alteration starts from 2 thousand rubles.
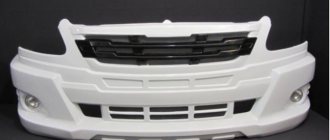
The stock bumper on the Gazelle is popular among drivers. The car is starting to look more like a foreign car. The cost of modernization is from 8 thousand rubles.
In addition to the fairing, the Gazelle also uses another aerodynamic body kit. When installed correctly, it not only allows you to aesthetically improve the car, but also increases the comfort and efficiency of the car. The cost of the body kit starts from 3 thousand rubles.
In addition to the aerodynamic body kit, airbrushing can significantly change the appearance of the car. The cost of applying a design varies depending on its complexity and size. The price starts from 1 thousand rubles.
A possible radical tuning option is to cover the car with fur. Typically, such a car is used in advertising campaigns. The cost of such tuning is from 50 thousand rubles.
A more radical way of tuning is to convert the Gazelle into a convertible. The cost of such work reaches 100 thousand rubles. The appearance of the Gazelle convertible can be seen in the photo below.
A more practical radical tuning is to lengthen the Gazelle. Usually, for these purposes, two machines are combined into one. This modernization allows increasing capacity, for example, in order to carry more passengers. The cost of tuning starts from 80 thousand rubles. The disadvantage of the alteration is a decrease in the strength of the body and the risk of cracks even with low mileage.
Panel "Euro-1"
This tidy was installed on both “Sable” and “Gazelle” of all modifications. The reader can see what its design is in the photo below.
From a distance, this shield resembles the panel of the Zhiguli-seven. But still, this is an original development. There are no electronic signs here. Only available:
- Speedometer.
- Tachometer.
- Oil pressure (not level) sensor.
- Network voltage indicator.
- Fuel level and antifreeze temperature sensor.
The shield was produced in this form for about eight years. No changes were made during this period.
Panel purpose
The instrument panel performs one function - informational. In a small area in the dashboard of the car, all the instruments with indicators about the car’s performance are located, this is both good and not very good. While the driver is looking for the indicator, the speed indicator, he is distracted from the road, creating conditions for an emergency situation. However, most Gazelle users eventually get used to the appearance of the panel and intuitively examine one or another section of it to obtain information.
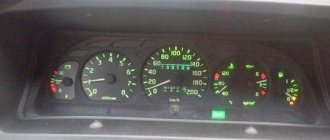
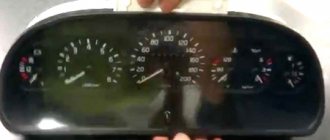
The standard panel on most modifications of the Gazelle looks like 3-5 round dials surrounded by several signaling devices. The main gauges—the speedometer and tachometer—are large.
The speedometer is always located in the center, since it is the main device that the driver focuses on.
The three largest devices most often include the coolant temperature sensor. The remaining dials indicate either the amount of gasoline, or the battery charge, and less often, the amount of oil. All the indicators that the driver needs can also look like warning lights.
Their indicators light up from time to time. The devices are placed compactly and do not interfere with each other. Read more: How often to change the oil in the variator
Updated look
Drivers are replacing their old dashboard with a business panel because of its attractive appearance. The second reason for the replacement is that the Gazelle Business dashboard has expanded functionality and more options for providing information about the operation of the car.
The Euro panel is equipped with two large dials for the speedometer and tachometer and two small ones, informing about the amount of gasoline and coolant temperature. The remaining indicators are located in the center.
The simplicity of the euro panel makes it easier for the driver to perceive information. The disadvantage of the new panel is the complexity of installation. True, the pinout is contained in the instructions. If a car enthusiast has experience in such work, then it will not be difficult for him to install a new device.
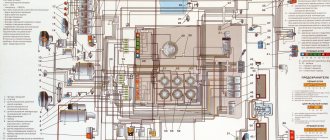
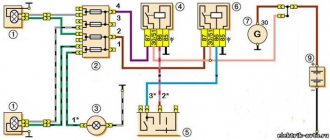
Pinout of the Gazelle instrument cluster
Power plant modernization
In order to reduce fuel costs, many drivers switch their cars to gas. Installing HBO on a Gazelle will cost from 30 thousand rubles.
Many drivers experience the engine overheating. This happens especially often in the summer heat when driving slowly around the city or while stuck in a traffic jam. To solve the problem of overheating of the power plant, owners install an additional fan on the radiator.
One of the cardinal options for tuning a power unit is installing a motor from another car. The most popular engines for these purposes are from Japanese minibuses and SUVs. The cost of the alteration is from 150 thousand rubles. At the same time, it is also possible to improve the original engine by replacing the air filter with a zero filter or installing a turbine.
Possible problems
Even if you change the panel to a Gazelle, you won’t be able to get rid of all the problems. Quite often problems occur after replacement. Here are the most common ones:
- individual sensors or the entire panel stops working;
- instrument readings “freeze”;
- The sensors lie, the indicators are incorrect.
Most drivers panic and then take the panel apart, which only makes things worse. Here are some solutions for most panels:
Read more: How many kg of coal are in a 10 liter bucket
- The first thing you should always do if such devices malfunction is to check the wire contacts. A break or breakdown can cause a malfunction. You should also inspect the food.
Pinout and instrument cluster on the Gazelle panel
Since the electronic system is not improved by replacing the panel, and the devices are more demanding, problems occur with the electronics. Replacing the wiring and fuses most often solves the problem. Generally, reviews about the operation of the instrument panel are favorable, but on some older car models there are a number of problems that can only be solved by installing original instruments.
Appearance of the update
The reason why many drivers install a Gazelle business dashboard is simple - it looks better. The second reason why you should buy this particular panel option is the functionality and increased number of opportunities to monitor the performance of the car.
Gazelle business dashboard design
The disadvantage of such a panel is that on most Gazelles you will have to sweat a little when connecting. The device's pinout diagram is included in the kit, so there will be problems with the connection if you have not encountered such work before. You will also have to add several terminals and change several contacts so that all devices and sensors work correctly.
Roof spoiler
There are car enthusiasts who believe that the fairing on the roof of the GAZ 3302 is installed for beauty. The spoiler may be a decoration, but first of all it is intended to improve the technical characteristics of the car. With the fairing, 5-10% of fuel is saved, and the car becomes more stable on the highway. And this is not an advertisement for a product at all - the spoiler is actually a useful improvement for the Gazelle.
It is especially effective on vans or tall Gazelles, where the resistance to oncoming air flow is quite high. It is the fairing that reduces resistance to headwinds.
Guide to removing the instrument panel on GAZelle Business and description of icons
The GAZelle Business instrument panel is the main component of the car interior, located in the front part and designed to provide information about the current state of the car, the performance of mechanisms and systems. The installed special shield of a new type has been improved, modernized and belongs to the Euro-3 class.
Compared to older models, it is more convenient, informative, practical and has a modern design. Details about instrument combinations, decoding of symbols and pictograms are described in the GAZelle operating instructions.
The panel is a combination of instruments with sound and signal indication.
The main meters that the driver focuses on are the speedometer and tachometer, located on either side of the signal sensors.
The speedometer indicates the speed of the vehicle.
Interior tuning
Basically, the Gazelle is needed not for beauty, but for business. Therefore, car owners strive to improve their cars to their advantage. A useful addition is the installation of a security alarm. For a workhorse, an anti-theft system with auto start would be a good idea. Drivers of commercial vehicles need their car to start in the morning without problems in any frost. Autostart will come in handy here.
For the convenience of driving in the cabin, drivers change the steering wheel - with a sports steering wheel, it becomes more convenient for some to control the car. But the convenience is debatable - most likely, many people like the appearance of such a steering wheel.
Original tuning of the Gazelle interior
The interior of the Gazelle Farmer is often subject to tuning. For example, an additional table is installed in front of the rear row of seats. Of course, they don’t forget about installing an audio system with good speakers - it’s bad without music on a long journey. Tuning also includes installing wood-look inserts on the instrument panel, illuminating the instrument cluster with LED lamps, and installing a steering wheel braid. Motorists do a lot with their own hands.
To prevent road noise from entering the cabin, sound insulation is installed.
To apply soundproofing material, the entire interior is dismantled; the most popular “noises” are “Splen” and “Vibroplast”. Another type of tuning is the installation of an additional stove in the cabin. Additional heating is especially necessary on cars with an all-metal body GAZ 2705 and minibuses GAZ 3321.
Roof hatches are installed on Gazelle vehicles. The hatch can be either with a mechanical opening drive or with an electric one. Even if the car has air conditioning, a sunroof will not be superfluous - it can be installed on the roof of a cab or an all-metal body. The only negative is that the hatch can leak. But it has many advantages:
- Significantly brighter interior;
- In hot weather, the car is comfortable, and the wind does not blow from the road;
- There is virtually no road noise, much less with the side windows down;
- There is visually more space in the cabin.
An example of installing a hatch in a Gazelle cabin
"Euro-3"
For the first time, such a tidy appeared on Gazelle Business cars. The old-style Gazelle instrument panel went out of fashion, and all Gazelle drivers began installing the updated panel in their car. The Volga owners also made the same modifications. Indeed, the new dashboard has become much more informative, convenient and practical. What can I say, its design is much more modern. As reviews say, it makes the interior look fresher and less dull. The reader can see what the updated tidy looks like in practice in the photo below.
But it is worth noting that this shield has slight differences in design. So, on some models the instrument scales had a darker shade. But this did not affect the information content in any way - the reviews say. Another feature of the new shield is the presence of sound indication. Now the driver can hear a characteristic signal if:
- The fuel level has dropped to the minimum level.
- The engine temperature increased to 105 degrees Celsius or more.
- The handbrake was not released. What is noteworthy is that the signal is triggered only when the car starts moving at a speed of 2 kilometers per hour or more.
The new tidy has large modern dials. Now the speedometer and tachometer scales are in opposite places (compared to the “Rizhskaya”), and their diameter has become the same. On the left is the fuel level indicator, and on the right is the coolant temperature sensor. But where did the mains voltage and oil pressure indications go? The answer is simple - this data is in the on-board computer. It is located in the tachometer “well”. By default, only time is shown here. But if you click on the button on the right, you can switch the mode. So, the driver can find out data from the voltmeter and oil pressure in real time.
Replacing an old-style instrument panel with a new one
A very common question from owners of a GAZ Chrysler car is how to replace the old control unit with a new model panel. This will give the car’s interior a little more individuality, especially since the price of the restyled torpedo is not so high. Well, you can do the installation yourself.
When connected through the standard available connectors, only the low brake fluid level, oil level and parking brake lights are lit.
When the headlights are turned on, the LCD display goes dark. To solve the problem, a wiring diagram is required, but there is a catch - the manufacturer has changed the numbering of some contacts. Therefore, the new panel is connected as follows:
- the connector marked XP4 remains unchanged;
- connector marked XP3 - a jumper is thrown from it to minus from the first contact, thus turning off the ABS indicator;
- connector marked XP2 – the permanent positive from the battery is connected, but it is better to run an additional wire to the fuse panel;
- a jumper is made from pin No. 10 to pin No. 12, now the display backlight will not go out when the lights are turned on;
- The connector marked XP1 remains unchanged.
Many car owners of a gazelle or Volga car with an old-style instrument panel strive to replace it with a new-style instrument panel, in which most of the indicators have been replaced with modern LED ones, and such an instrument panel looks much more attractive and brighter. But there’s just one problem: you won’t be able to change the instrument panel one-on-one. Either half of the indicators will not light up, or, on the contrary, extra indicators will light up. Let's figure out how to install a new type of instrument cluster (panel) 385.3801-10 instead of the old panel with light bulbs 384.3801-10, which has served for many years. To begin with, let us present to your attention a combination of instruments of the old and new models.
In our case, we changed the instrument cluster on a Gazelle car with a ZMZ 405 Euro-2 engine and a Mikas 11 control unit. If you just take and install the instrument cluster without modifying the wiring, then our combination will work halfway. What will not work or work incorrectly:
– The CHECK ENGINE indicator will not work (the indicator does not light up when the ignition is turned on) – The instrument cluster backlight does not work – The LCD indicators do not function – The EBD indicator is on – The ABS indicator is on – The low beam indicator is not on when it is turned on
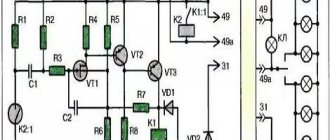
Why is this so, you ask. It’s just that the wiring connectors do not have the necessary contacts for the combination to work properly. Let's look in more detail at what contacts we need are missing, but first, let's give an example of the pinout of the old-style instrument cluster 384.3801-10
GAZ Gazelle 3.4L Nimble worker › Logbook › Remaking the instrument cluster
Greetings to all! I haven’t written anything for a long time, and I didn’t have time, because... a lot of work. Of course, there were some surprises for the New Year from my swallow. It all started with the fact that two weeks before the new year, the backlight bulbs on my instrument cluster gradually began to burn out. The last straw of my patience was when on December 30, 2014. After ordering, I arrived home and at the entrance to the house, the backlight of the odometer LCD display burned out. I parked the car and went to get ready for the holidays. After the New Year, I don’t remember if it was the second or third of January, I went into the car, took off the instrument cluster and returned home. Without hesitation, I dismembered it into everything possible =)) I removed the dials
To watch online, click on the video ⤵
Do-it-yourself instrument lighting. More details
LED RGB backlighting of the dashboard Gas 3110 More details
Changing the backlight of Gazelle GAZ instrument panel ATPP Read more
Tuning Gazelle Business (installation of LED strip on the door NEW). More details
Interior lighting in a gazelle like a foreign car Read more
Gazelle dashboard Read more
Molding of glass headlights GAZ 3110 part 1 Read more
Gazelle 3302 - restoration of the dashboard Read more
Dashboard Gazelle, Volga. We remove, disassemble, repair. More details
FIERCE HEADLIGHTS for Gazelle for Kopeks Read more
Tuning the instrument panel - part 5 (bright lighting and changing the color of the arrows) More details
Gas 3110. New sample tidy. Joy and bummer Read more
The backlight of the Sable, Gazelle instrument panel does not light up reasons Read more
Installation
To install the panel, you must remove the old shield. To do this, you need to dismantle the steering wheel using a special puller and unscrew a couple of screws of the decorative lining of the dashboard. You should also unscrew the bolts securing the tidy itself.
To do this you will need a 8" head. After this, you can remove the old panel and put a new one in its place. But as we said earlier, simply switching the connectors will not work. You need a pinout for the Gazelle Business instrument panel. There are four pads in total - XP1, 2, 3 and 4. Let's look at how to connect each:
- XP1. The first, fifth, sixth, seventh contacts are connected to ground. As for the rest, they connect to the sensor signals. The first contact is the air damper closing relay, the third is the DTOZH, the ninth and eleventh are the oil pressure and fuel level sensors in the tank, respectively. The remaining contacts are “Reserve”. We do not touch them and do not connect anything to them.
- XP2. Contacts number two, four, nine are connected to ground. The “plus” terminals are all from the fifth to the thirteenth.
- HRZ. Terminals two and thirteen are connected to the +12V positive contact. The first, eighth and twelfth terminals are connected to ground. The sixth connector is the speedometer speed sensor, the ninth is the ignition coil, the eleventh goes to the engine control unit.
- XP4. Here, almost all contacts need to be connected to ground. This applies to connectors from the first to the seventh inclusive. Only the sensor for the presence of water in the fuel filter (if there is one) and the glow plug switch are positive. These are connectors number eight and nine respectively.
By the way, if the car does not have an ABS and EBD system, the outputs to these sensors must be plugged. How? It is enough to connect them to ground.
So, we found out what the Gazelle instrument panel is, what types it comes in and how it is connected.
Tuning
Many car enthusiasts install panel , which has an even larger number of indicators and looks more interesting than its predecessor. The second option for improving the interior space of a car is to independently tune the old one.
Tuning gas 31105 can be divided into two classes:
- Functional. In this case, it means replacing devices or adding a new one that was not installed by the manufacturer. The entire instrument cluster or one or two additional sensors, for example, a clock or thermometer, may be replaced.
- Aesthetic. Such tuning involves changing or improving the car's control unit, as well as creating a more recent look for the panel.
An example of tuning the GAZ 31105 dashboard
Some of the most common options for changing the design without large financial costs are the following:
- Replacement of instrument scales. In this case, not only the backlight changes, but also the scale of all instruments. In specialized stores you can find a ready-made instrument scale for a given car model. Before installing it in place, it is recommended to check the quality of the painted surface. To do this, you need to hold it at some distance from the light bulb, and only the corresponding marks and inscriptions should be visible;
- Installation of LED strip. In this case, you can buy a printed circuit board and install the LEDs yourself. The second tuning option is to insert a piece of tape of the required length under the scale;
- You can add individuality by painting the arrows and rings that are located along the edge of the instruments. It is recommended to use glossy paint in cans for this.
Advice! Do not use nail polish for this purpose. The varnish layer will not lie evenly and will be noticeable.
Purpose
The function of any “tidy” is informational. This also applies to the Gazelle Business instrument panel. In a small area of the dashboard there are all the necessary indicators, lights and scales. Usually the shield is located behind the steering wheel, in front of the driver’s eyes. But there are also exceptions. For example, in the UAZ Hunter the panel is located in the center. But we won’t consider the tidy of this car for now. Let's return to our Gazelles. Externally, their panels consist of three to five round dials with several alarm sensors. In any shield, the main dials are:
They are the largest in size and located in the center. In addition, on the instrument panel (Gazelle old and new) there are a lot of auxiliary elements. These scales inform the driver about:
- The current engine temperature (namely the coolant in the engine jacket).
- Oil pressure in the system.
- Fuel level in the tank.
- Voltage in the on-board network.
If we consider more modern devices, information about the current time will also be shown here.
Tuning Gazelle
How to tune a Gazelle with your own hands. What exactly can be changed in this car without resorting to the expensive services of specialists. Options for interior lighting, changing the hood, headlights, engine chip tuning, etc.
Gazelle is a real miracle of the Russian automobile industry. And this is without exaggeration, because with the advent of this low-maintenance commercial vehicle, the passenger and cargo transportation market stirred up a real commercial boom. Many drivers spend more time in the cab of their gazelle than at home, so each of them tries to make their place of work as cozy and comfortable as possible. Every driver strives to at least somehow uniqueize the Gazelle itself, which, of course, does not differ in external aesthetic merits with the help of tuning. And despite its utilitarianism and clearly “Soviet” appearance, the Gazelle can be tuned quite easily.
Cabin and interior tuning
The interior and cabin of a car is probably one of the greatest spaces for the flight of creative imagination. When tuning the interior and cabin, the following upgrades are usually carried out:
- Replacement of internal panels made of low-quality plastic with more comfortable materials;
- Replacing seats with more comfortable ones when transporting passengers over long distances;
- Replacement of steering wheel, instrument panel, driver's seats.
In the passenger version of the gazelle, you can also tune the passenger compartment using LED strips. Their installation is very simple, and they are powered by a 12-volt battery. In this case, you can choose absolutely any range of backlight colors.
LED strips can be used to illuminate not only the interior itself, but also the passage between the seats.
They have a long service life and consume very little electricity.
Most often, the exit steps, passenger seats and the passage itself are equipped with lighting. The backlight control system can be displayed on the dashboard or, which is cheaper, connected directly to the car's ignition system. All these operations can be easily done without resorting to the services of specialists. Do-it-yourself Gazelle tuning videos can be found on the Internet quite easily.
GAZ Gazelle business 4x4 Titan - pinout
1 - not connected 2 - 382.3801 has an open door alarm (may not be present). You can run a wire to the limit switch on the driver's door. 3 - 382.3801 has an oil overheating indicator (may not be present). You can run a wire to the TM-108 overheating sensor, and put the sensor itself into the crankcase. 4 - 385.3801 has an open door alarm (may not have one). You can run a wire to the limit switch on the driver's door. 5 - 382.3801 has a test. If ground is applied to this contact, the indicators for brake fluid level, oil overheating, open doors and coolant overheating light up. Can be connected to a button or relay. In the second case, the relay winding is connected to ground and the wire from the lock to the starter (i.e., when the starter is turned on, the lamps will be tested). 6 - 382.3801 has a seat belt warning indicator (may not be present). 7 - 382.3801 has a fuel reserve indicator. Connect the blue wire with the red stripe. 8 — fuel level indicator. Connect to the pink wire with the red stripe. 9 — oil pressure indicator. At 382.3801, run a wire to the sensor (you need a VAZ-2106 tee) from GAZ under the ZMZ-406 engine. With 385.3801, if you install a sensor, it will squeak about low pressure at idle, so a sensor is not needed, you need to connect the wire from the device to ground through a resistor, select it experimentally. 10 — emergency oil pressure indicator. Connect to the gray wire with a blue stripe. 11 — engine overheat indicator. Can be connected to overheat sensor TM-111-02. The sensor itself must be in contact with the coolant. 12 — coolant temperature indicator. Connect to the green wire with a white stripe. The pointer will exaggerate the readings; you can connect a resistor to the wire gap and select it experimentally. 13 - indicator for closing the carburetor air damper. Connect to the gray wire with an orange stripe if the car is a carb. 14 - for 382.3801 the indicator may be on and will light up when the mass is supplied. 15 - downshift indicator (may not be present), will light up when the mass is supplied. 16 - differential lock indicator (may not be present), will light up when the mass is supplied. 17 - for 382.3801, the seat heating indicator will light up when positive is applied. 18 - rear PTF indicator (may not be present), lights up when positive is applied. 19 — side light indicator. Connect to the yellow wire. 20 — instrument lighting lamps. Connect to the white wire. 21 - 385.3801 has power supply to the meter. Connect to constant power (red-white wire of stop switch). 22 and 23 - right and left turn signal indicators, respectively. You can connect them together and connect to a blue wire with a white stripe (the arrows will light up when the left or right turn signal is turned on), or to the hazard warning switch: blue - right, blue-black - left, insulate the blue wire with a white stripe (each arrow will correspond to the activation of its turn signal). 24 - parking brake indicator. Connect to the brown wire. 25 - high beam headlight indicator. Connect to the green wire with a black stripe. 26 - front PTF indicator (may not be present), lights up when positive is applied. 27 - ABS indicator. When the mass is supplied it will light up. 28 - 385.3801 has a rear window heating indicator. Lights up when positive is applied. 29 — speed signal output to the on-board computer. If it is, then take the speed signal from this contact. 30 - to the vehicle speed sensor. 31 - low brake fluid level indicator. Connect to the pink wire with a blue stripe that goes to the lamp above the cigarette lighter. 32 - power supply for lamps and devices. Connect to the orange wire with the blue stripe. 33 - battery charge indicator. Connect to the brown wire with a white stripe. 34 - mass. Connect to the black wire. Wow, I wrote a lot... 35 — speedometer power supply. Connect to the orange wire. 36 — speedometer mass. Connect to the white wire with a black stripe. 37 - tachometer. Connect to the brown wire with a blue stripe, but if the readings drop, connect to pin 38. 39 - 385.3801 has a low beam indicator (it may not be present), it will light up when positive is applied. 40 - low oil level indicator (may not be present), will light up when the mass is supplied. 41 - if the car is injection, connect to the orange wire too. 42 - if the car is injection, connect to the remaining wire (I don’t know the color) it went to the 8-terminal block on the old device. 43 - brake pad wear indicator (may not be present), will light up when the mass is supplied. 44 - glow plug indicator. 45 and 46 - does not connect. 47 - low coolant level indicator (may not be present), will light up when the mass is supplied. 48 - low washer fluid level indicator (may not be present), will light up when mass is supplied. 49 - low power steering oil level indicator (may not be present), will light up when the mass is supplied. 50 - the indicator for burnt out lamps on 382.3801 or the presence of water in the fuel filter on 385.3801 (may not be present) will light up when the mass is supplied. 51 and 52 - 382.3801 has indicators (may not be present) that will light up when the mass is supplied.
Replacing Light Bulbs in the Gazelle Business Dashboard
It is likely that drivers, following this fashion, will want to replace the old Gazelle device panel with a new standard. Article about the “Neat Gazelle”: purpose, possible malfunctions. Annotation on the removal and installation of a torpedo.
The main purpose of the instrument panel. inform the driver about the current condition of the vehicle. In Gazelle, our client is left with devices and indicators located on a small area of the torpedo. Drivers get used to this arrangement of devices.
The dashboard of the old standard Gazelle has 3 to 5 round dials, which are surrounded by different indicators. The biggest ones. tachometer and speedometer. The speedometer is considered the main instrument because it is always located in the center.
The third largest device. antifreeze thermometer. In addition, there are dials for charging the battery and the amount of gasoline. The oil dial is used less frequently.
Drivers are replacing their old custom business dash because of its good looks. The second condition for the change is that the Gazelle dashboard has expanded functionality and many functions to provide information about the operation of the car.
The Euro panel has two large dials for the speedometer and tachometer and two small buttons for indicating the amount of gasoline and the coolant temperature. Other indicators are concentrated.
The simplicity of the Euro panel makes it easy to keep the driver informed. The disadvantage of the latter panel is the complexity of installation. However, the acknowledgment is contained in a note. If the car owner has experience in such work, then installing the latest trim is quite simple for him.
READ Renault Cabin Filter Replacement Symbol
Structure of the gazelle structure
If the installation is completed correctly, the new device layout works correctly. The only downside is the dim lighting, which is almost invisible at night. It is recommended to install LED instrument lighting around the perimeter of the panel (video creator: Vodya, Chelyabinsk).
There are 20 indicators installed on the Gazelle, indicating that in fact some components or sensors of the car are not working.
If the Stop indicator lights up with one of the icons, it is better to correct the problem before driving.
Information about the status of the vehicle's major components and components is displayed on the dashboard using indicators. A detailed description of the purpose of each can be found in the installation and operating notes.
The following malfunctions may occur after a change in physical form:
- Neither part of the device nor the entire panel works;
- the arrows on the devices stop;
- incorrect sensor readings.
You can resolve the issue by following these steps:
- First you need to check the power: the integrity of the wires, the quality of the contacts.
- If wiring is all that's left for our client to do, break the controller. It is better to completely replace the panel than to repair the controller.
- Sensor options do not work if the contact is poor or the fuse is blown.
- To return the sensors, you can check by pressing the "Mode" button.
When the composition of devices changes, this does not affect the electronics, and this is where problems arise. The problem is solved by replacing the fuses and updating the wiring.
READ Ford Focus Timing Belt Replacement Tool
The dashboard comes in euros on the gazelle. In the latest versions it is installed at the factory. Drivers of older models also want to upgrade their dashboard. Changing the device does not create obstacles: the design of the fastenings remains virtually unchanged, and the seat panel is the same size.
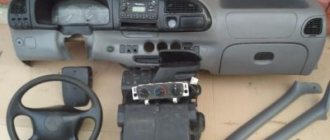
Replacing the torpedo brings significant changes, since it differs in shape and mounting design. What configurations need to be made, you need to think about the owner of the car. Sometimes when repairing a stove it is necessary to completely disassemble the torpedo. You need to know how to remove and reinstall the dash. A set of keys and screwdrivers must be prepared for this procedure. An assistant will be needed.
Dismantling a Gazelle torpedo
The removal procedure consists of the following steps:
- Before operating, turn off the vehicle for safety reasons. To do this, remove the negative terminal from the battery.
- Our client's remains were immediately removed. Use a Phillips screwdriver to loosen the screws that secure the workpiece.
- Then, by unscrewing the two screws, remove the housing from the control column.
- Then we remove the trim from the device panel, remove it, completely pulling only the steering wheel towards you.
- We disconnect the fixtures and carefully disassemble, disconnecting what is left to make our customer's wire.
- Then delete the control column along with the full joins.
- Then turn off the lights: rear fog lights, interior lights. You also need to turn off the headlight range control.
- Then unscrew the bolt securing the air damper.
- We disconnect the cable from the carburetor by unscrewing the screw that secures the cable sheath.
- Then turn off the lighter and emergency lights.
- Use a screwdriver to remove the two screws that control the cooker.
- Remove the 10 panel mounting bolts by carefully lifting them out of their mounting location.
- Now disconnect the air ducts from the partitions.
- Remove the carburetor damper.
- Remove the panel by disconnecting the air duct hoses.
- You can now shoot the torpedo. It's better to do this with an assistant because she is very lethargic.
- Installation of the torpedo is carried out in the reverse order.
READ Replacing the Door Lock Cylinder for VAZ 2109
Replacing instrument panel bulbs Gazelle Restyling after 2003
After installing the last torpedo, of course, some indicators do not work due to incompatibility between the system and the latest torpedo.
Purpose of elements on the GAZ instrument panel
1 — the voltmeter indicates the voltage in the on-board network of the GAZ car; 2 — warning lamp of the engine management system; 3 - reserve (or abs malfunction warning lamp on a Volga GAZ car equipped with an anti-lock brake system); 4 — “STOP” light display. Lights up simultaneously with one of the malfunction indicator lamps, if further movement with this malfunction is prohibited; 5 - indicator lamp for turning on the left turn signal. The lamp lights up simultaneously with the left turn indicators. If one of the indicator lamps malfunctions, the control lamp blinks at double frequency; 6 - warning lamp for emergency drop in brake fluid level. The lamp lights up when the fluid level drops (below the minimum allowable) in the brake master cylinder reservoir. As the brake pad linings wear, it is necessary to add brake fluid; 7 — odometer (total mileage counter); 8 — the speedometer indicates the speed of the car; 9 - indicator lamp for turning on the parking brake. The lamp lights up when the parking brake lever is raised and the ignition is on. 10 — control lamp for turning on the right turn signal. The lamp lights up simultaneously with the right turn indicators. If one of the indicator lamps malfunctions, the control lamp blinks at double frequency; 11 - reserve; 12— warning lamp for unfastened seat belts (installed on some Volga GAZ 31105 cars); 13 or 18 - warning lamp for emergency drop in oil pressure in the engine lubrication system. The lamp should light up when the ignition is turned on and go out after starting the engine. If the light remains on after the engine has started, or comes on while the engine is running, stop the engine immediately and check the oil level. The level is normal - the engine is faulty. For a car with high mileage, the lamp may come on when the warm engine is idling; 14 — reserve (for installing additional warning lamps); 15 — fuel level indicator. The device shows the approximate amount of fuel in the tank. The scale has divisions: 0 - empty tank; 1/2 - half a tank; 1 - full tank: 16 - fuel reserve warning lamp. The lamp turns on when the remaining fuel in the tank is less than 8 liters; 17 — oil pressure indicator in the engine lubrication system allows you to assess the technical condition of the engine; 19 — control lamp for turning on heated seats (for GAZ 31105 vehicles with heated seats); 20 — coolant temperature gauge allows you to control the engine temperature; 21 — control lamp for turning on external lighting (side light); 22 - the coolant overheating warning lamp turns on when the coolant temperature rises above the permissible value; 23 - control lamp for turning on the high beam headlights. The lamp turns on when the high beam headlights are turned on; 24 — button for setting the daily mileage counter to zero. In order to reset the counter readings, you must press the button; 25 — car daily mileage counter. To reset the counter readings, you must press the zero setting button (pos. 24); 26 - tachometer. The device shows the engine speed; 27 - battery discharge warning lamp. The lamp should light up when the ignition is on, and go out after starting the engine. Illumination of the lamp while the engine is running may indicate a malfunction of the generator or its circuits.
Plastic hood
Replacing a standard gazelle hood is not just a design whim. The stamped metal hood, which is inclined to the ground at an angle of almost 45 degrees, is often subject to various mechanical stress. Insects, crushed stone, etc. - all this can damage the coating, or even deform the hood itself. In this regard, plastic is a more elastic and durable material.
Gazelle tuning photo hood can be found in several versions:
- With a more muscular midsection, the so-called restyled version. These hoods are more suitable for external tuning and are produced in various colors at the plant in Nizhny Novgorod;
- The hood is equipped with an air intake and additional slots on the sides. The slots and air intake will help cool the internal combustion engine and increase their service life. True, foreign debris and dirt can get clogged into these slots;
- In principle, the hood is installed in its original color and covered with a protective film on top. In this form, it can serve the owner for more than one year. Among the disadvantages of such tuning, we can note possible gaps between the side parts of the body and the hood, but a good fit will allow you to avoid this.
To remove the instrument cluster of a vehicle manufactured since 2003, do the following.
1. Disconnect the wire from the negative terminal of the battery.
2. Pry up the edge of the right plug at the bottom of the instrument cluster trim
4. Also remove the plug on the left side of the cladding.
5. Remove the lower right screw
6. Turn out the lower left screw
7. Unscrew the two upper screws securing the instrument cluster trim
8. Remove the trim of the instrument cluster
9. Remove the four bolts securing the instrument cluster
10. Remove the instrument cluster from the socket in the instrument panel, disconnect the wiring harness blocks from it and remove the combination
Install in reverse order.
Replacing lamps in the instrument cluster
The figure shows the location of the lamps in the instrument cluster of a car manufactured since 2003.
Installing and removing the torpedo
The instrument panel is only part of the euro kit for the Gazelle business.
Gazelle instrument panel lighting
In some cases, for example, to repair the heating system, it is necessary to completely dismantle the torpedo. This process is not the easiest, since you need to know from which side to approach such an issue.
In fact, the panel can be removed in just half an hour. To do this you need the following:
- Use a Phillips screwdriver to unscrew the 3 upholstery fasteners.
- Carefully remove all upholstery pads so as not to damage anything.
- We dismantle the steering column with all connections to it.
- We remove the instrument panel by disconnecting all wires.
- Next you will need to turn off the interior lighting and rear fog lights. Then we turn off the electric headlight adjustment.
- We arm ourselves with keys 7 and 8, get to the bolted fastening of the choke cable. Hold it with one key and unscrew it with the other.
- We unscrew the screw of the cable sheath and disconnect the cable from the Gazelle carburetor.
- We turn off the hazard warning lights and cigarette lighter plugs.
- Again, take a screwdriver and tighten 2 screws near the stove control.
- We unscrew all the screw fastenings of the panel, there are 10 of them in total. Lightly pull the panel towards you so that it comes off the installation site. Now you can disconnect the air duct hoses from the deflectors.
- We take out the damper from the carburetor. We remove the panel. We turn off the right and left air ducts of the stove.
- We remove the torpedo. You will need an assistant here, since the torpedo is very heavy.
- We twist the fastenings of the torpedo lining and remove the lining itself.
- Installation is carried out in reverse order.
Bumper tuning
Tuning the bumper is the simplest option for modifying the Gazelle. At the same time, bumper tuning provides the following additional benefits: Reduced aerodynamic drag and fuel consumption.
- Possibility of “beautiful” installation of fog lights;
- Improved airflow of the water cooling radiator;
- Changing the car's exterior design.
A new bumper costs very little - about 3 thousand rubles. For this money you can get a model made of high-quality plastic, painted to suit every taste. Tuning the Gazelle Next can also be done with an unpainted original bumper, which already has places for mounting fog lights.
As we can see, tuning the Gazelle is more of a necessity than a simple whim of its owner. Properly carried out modernization can not only increase comfort for passengers and the driver, raise the aesthetics of appearance to a new level, but also significantly improve the driving characteristics of the car. Gazelle is the brainchild of the domestic automobile industry, but with properly selected operating conditions and skillful tuning, this car will be able to “compete” with its more famous foreign competitors. Despite the fact that the operation of the Gazelle is several times cheaper.
Whether to install a new dashboard on a gazelle or not - that is the question
Orange 5 Red To turn signal switch (right side) plus 6 7 Yellow To turn signal switch (left) plus 8 White To rear fog lamp switch plus 9 Pink To parking brake switch minus 10 Black To light switch plus 11 Purple To high beam switch plus 12 Blue To switch the light switch plus 13 XP3 connector XP3 connector Black 1 2 3 Black Housing 4 5 Yellow Clamp 15 Ignition switch 6 Green, purple To speedometer speed sensor 7 Black Housing 8 Blue To low brake fluid level sensor 9 10 Yellow Starter switch clamp 15 11 Orange To engine control unit (low voltage tachometer input) 12 Pink To battery discharge relay 13 XP4 connector XP4 connector 1 2 3 Black Check diagnostic lamp 4 5 White Power supply to diagnostic lamp 6 7 8 9 10 11 12 .
We read the indicators and repair the dashboard on the Volga - GAZ 3110
Please note that there are two options for panels for GAZ 3110 . The first option turned out to be not very successful: the indicators are hard to see in the dark and they are not as informative as the dashboards of modern cars. But the new instrument panel fully meets the requirements of an ordinary driver and allows you to keep the status of all major systems under control. It is on the icons located on it that the main attention will be focused, because it only makes sense to change your panel to a modern one. Main indicators Below are the main indicators that you can find on the GAZ 31105 instrument panel model and other representatives of this model range.
You will find the indicators listed above on the panel of almost any model from the 31 series of Volga cars.
Possible malfunctions and ways to eliminate them
View from the driver's seat Incorrect operation of the indicators on the instrument panel is usually associated with violations in the system sensors. It is with him that the system receives all the information. Before you begin repairing the panel, you should check whether the sensors themselves are operational. If everything is in order with them, but the data is not displayed or is displayed with distortions, the problem may also be hidden in the wiring. Also a common problem is the burnout of individual dash lights. They are quite easy to replace at home. True, you may have problems finding new parts, since car production has long been discontinued. But you can find suitable ones in any good electronics store or auto shop. From the video below you can learn how to replace light bulbs (the author of the video is NONAvto).
Installation instructions
Dashboard during installation For installation, in addition to the GAZ Volga dashboard itself, you will also need car wires and heat shrink. And several terminals for pins XP 1, XP 2, XP 3, XP 4. You can find everything you need at an auto parts store. The part itself should be accompanied by instructions for its assembly. To replace the old shield with a new one, you should follow these steps.
First, remove the 4 screws that secure the panel. Also, 6 screws of the column casing, remove it. Now unscrew the 4 screws that secure the shield itself. Having disconnected the 5 XP connectors, remove the part. Now you need to connect the wiring using the instructions for your specific model of the shield and the XP terminals. Disconnect the ABS and EBD, if your car does not have such devices. Install in the reverse order of dismantling.
Photo gallery “Panel and shield”
1. Removed part2. New part3. New shield Loading...
Functional
If the installation is done correctly, the new instrument cluster works properly. The only drawback is the weak backlight, which is almost invisible at night. It is recommended to install LED instrument lighting along the entire perimeter of the panel (the author of the video is Vodila Chelyabinsk).
The Gazelle is equipped with 20 indicators that indicate that one of the vehicle’s components or sensors is not working.
If the “Stop” light comes on along with one of the icons, it is advisable to eliminate the problem before starting to drive.
Using indicators, the dashboard displays information about the status of the main components and assemblies of the vehicle. A detailed description of the purpose of each of them can be found in the installation and operating instructions.