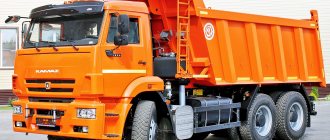
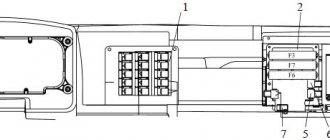
Middle axle gearbox KamAZ 6520 diagram
Middle axle gearbox KamAZ 6520 diagram
Middle axle gearbox KamAZ 6520 diagram
Quick links (click): PRICES FOR KAMAZ GEAR DRIVERS DELIVERY IN THE RF WARRANTY 6 MONTHS
WATCH A VIDEO!!!
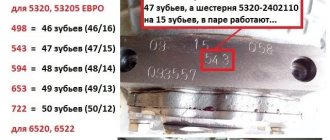
The KamAZ middle axle gearbox has two transmission stages. Stage 1: - this is the interaction of the driving cone-shaped gear 2402017 with fifteen teeth with the driven cone-shaped gear 5320-2402060 with twenty-six teeth; they are located at right angles to each other, so the engine's traction force rotates 90 degrees on the axle shafts. Stage 2 is the interaction of the drive gear 5320-2402110 and the driven gear 120 of different diameters, a cylindrical type with helical teeth. Depending on the conditions under which the truck is used (lack of roads, asphalt roads, quarry, mountain road, plain), the KamAZ main gear mechanism distinguishes the following types of gear ratios: 1) 7.22: gears with twelve, five-ten teeth 2) 6.53: gears with 13, 49 teeth 3) 5.94: gears with 14, 48 teeth. 4) 5.43: gears with fifteen, forty-seven teeth. The most popular gear ratio among dump truck specialists is 6.53; since it is optimal in the ratio of speed and power of the truck.
We organize shipment to all regions of the Russian Federation: KamAZ 6520 middle axle gearbox scheme Ukhta Verkhnyaya Salda Temryuk Klin Rudny Sochi Salekhard Chernovtsy Nyagan Poltava Yuzhno-Sakhalinsk Kogalym. Nizhnevartovsk Rossosh Vinnitsa Mineralnye Vody Yakutsk Naryan-Mar Kirensk Lesosibirsk Kirov Yelets Volkhov. Orenburg Kramatorsk Murmansk Olenegorsk Ussuriysk Grodno Liski. Troitsk Ekaterinburg Naberezhnye Chelny Sumy Khabarovsk. Kaliningrad Penza Oktyabrsky Kharkov Novorossiysk Smolensk Tomsk Achinsk. Grozny Ulyanovsk Glazov Domodedovo Ufa. Moscow Pskov Zhirnovsk Labinsk Belorechensk. Orsk Serpukhov St. Petersburg Georgievsk Kropotkin Armavir Syktyvkar Norilsk Tuapse Biysk Astrakhan Uman Salavat Nizhnyaya Tura Kherson. Tuymazy Vladivostok Krasnoyarsk Taishet Berdyansk Krasnoturinsk Barnaul Langepas Magadan Orel Nevinnomyssk Murom Novosibirsk Simferopol Cherkassy Brovary Blagoveshchensk Ivanovo. Chekhov Stary Oskol Ust-Ilimsk Mirny Petropavlovsk Lyubertsy Kazan Atyrau. Belgorod Taganrog Nizhny Novgorod Krasnodar Sovetsky Buzuluk Mines. Volzhsky Saratov Mytishchi Segezha Bryansk Kandalaksha Khimki Bratsk. Elista Abakan Magnitogorsk Vsevolozhsk Kokshetau Velikiye Luki Tyumen Voronezh Vidnoye Arkhangelsk. Inta Ryazan Petrozavodsk Krivoy Rog Podolsk Khanty-Mansiysk Lobnya Lukhovitsy Kumertau Nikolaev Kimry Cherepovets Kostanay Malin Novy Urengoy Astana Uralsk Lipetsk Voznesensk Saransk Gatchina Sergiev Posad Surgut Karaganda Verkhnyaya Pyshma Almaty Lisichansk Iskitim Stavropol Vologda Kemerovo Dmitrov Sovetsk Shebekino Miass Co. stroma Rostov-on-Don Aldan Noyabrsk Yaroslavl Lomonosov Dimitrovgrad Solnechnogorsk Kurgan Berdsk Nadym Yoshkar-Ola Prokopyevsk Novokuznetsk Orekhovo-Zuevo Chisinau Voskresensk Komsomolsk-on-Amur Satka. Arzamas Omsk Mikhailovka Zaporozhye Kaluga Reutov Ulan-Ude Sestroretsk Neftekamsk Severodonetsk Makhachkala Kursk Tambov Chita. Yeniseisk Volgograd. Volgodonsk Izhevsk Cheboksary. Gomel Dedovsk Zelenograd Irkutsk Nalchik. Angarsk Zlatoust Syzran. Alexandrov Aktobe. Kropivnitsky Samara Togliatti Perm Gelendzhik Tver Melitopol Minsk Lakes Zhukovsky Slavyansk Nizhny Tagil Semikarakorsk Tula Veliky Novgorod Chelyabinsk Dzerzhinsk Chernigov Balashikha Kotlas Vladikavkaz Ust-Kut Sterlitamak Usinsk Nefteyugansk Dnepr Vladimir Kyzyl, etc.
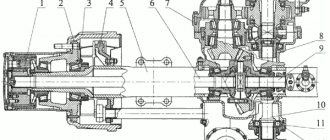
Installation and adjustment of gearbox bearings and gears
When installing and adjusting the bearings and gears of the gearbox, install the tapered roller bearings of the drive bevel gear shaft with preload.
The torque required to rotate the drive gear shaft in the bearings should be 0.78... 1.57 N.m (0.08... 0.16 kgf.m). Measure the torque while rotating the flange continuously in one direction after at least five full rotations of the shaft. The bearings must be lubricated. When checking the rotation torque of the rear axle drive gear, the bearing housing cover must be moved towards the flange so that the centering protrusion of the cover comes out of the bearing housing seat and the oil seal does not resist the rotation of the gear. Adjust the bearings of the drive bevel gear by selecting shims from the kit supplied as spare parts.
Install two washers between the inner ring of the front bearing and the spacer sleeve. After the final adjustment of the bearings, tighten the nut securing the bearings of the drive gear of the rear axle (tightening torque 235... 353 N.m (24... 36 kgf.m) and pin it. At the intermediate axle gearbox, tighten the nut securing the bearings with a torque of 235 N.m (24 kgf. m), place the bearing washer and tighten the nut until the hole in the bearing washer aligns with the locking pin of the nut. Then place the lock washer, aligning its protrusion with one of the holes in the bearing washer, and tighten the lock nut with a torque of 235... 353 N.m (24... 36 kgf .m), bend the edge of the lock washer onto the edge of the lock nut. When tightening the nuts, turn the drive gear so that the bearing rollers take the correct position between the conical surfaces.
After assembling the drive gear, measure dimension E (see Fig. 188, 192), since it will be necessary when adjusting the engagement of the bevel gears.
The drive and driven bevel gears of the gearbox are selected at the factory into sets according to the contact patch and the lateral clearance in the mesh, ground in and branded with the serial number of the set. In addition, at the rear end of the drive bevel gear, the deviation value (correction in hundredths of mm) from the theoretical installation size of 81 mm is applied with an electrograph (Fig. 194). The “+” sign corresponds to the distance of the drive gear from the driven axis, the “-” sign to its approach.
When the car is running, the gears are worn in one another. Therefore, if it is necessary to replace gears, replace both gears as a set. Newly installed bevel gears must have the same set serial number.
Rice. 194. Zero position and shift direction of the drive bevel gear
When installing new bevel gears of the gearbox, adjust them according to the contact patch and the lateral clearance in the mesh (Table 33), which should be 0.20... 0.35 mm.
Table 33. Adjusting the gearing of the gearbox bevel gears
The contact patch on both sides of the driven bevel gear tooth should have a length equal to approximately 1/2 ... 2/3 of the tooth length on the forward side, 1/2 ... 3/4 of the tooth length on the reverse side. The minimum width of the contact patch in the middle part should be equal to 1/2 of the active tooth height. The contact should be located closer to the inside of the tooth, but should not extend to its edge. The contact patch extending to the edge of the outer (wide) part is also unacceptable. On the drive gear teeth, the contact patch may reach the top edge. The contact patch is obtained by rotating the drive gear in both directions while simultaneously manually braking the driven gear.
When installing new bevel gears into the gearbox, determine the thickness of the shim pack installed between the drive bevel gear bearing housing flange and the gearbox housing. The thickness of the shim package is determined by the formula:
S = (81 ± correction) + E - B,
where E is the actual size from the end of the drive gear to the flange of the cup (see Fig. 188, 192); B is the actual size of the gearbox from the front end to the axis of the driven bevel gear (see Fig. 186, 190). Assemble the adjusting gasket package from the number of gaskets indicated in the table. 34.
Table 34. Thickness of shims
| Designation | Thickness, mm |
| 5320-2402100 5320-2402099 5320-2402098 5320-2402097 5320-2402096 | 0,05 0,1 0,2 0,5 1,0 |
Be sure to install at least 2 gaskets with a thickness of 0.05 mm under the flange of the glass. and 0.1 mm thick, at least 2 pcs. Select the rest as needed. Thin shims should be placed on both sides of the shim set to obtain a sealed joint.
Tighten the fastening bolts of the intermediate axle drive bevel gear cup to a torque of 98.1... 122.6 N.m (10... 12.5 kgf.m), the rear axle - to a torque of 58.9... 88.3 N.m (6... 9 kgf.m). When finally installed in the crankcase, the drive gear should rotate smoothly, without jamming.
The spur gear shaft rotates in one roller and two tapered bearings, which are mounted with preload.
Adjust the bearings by selecting shims from the kit supplied as spare parts. Install two washers between the inner rings of tapered roller bearings. The torque required to rotate the driven bevel gear after adjustment should be 0.98 ... 3.43 N.m (0.1 ... 0.35 kgf.m). Measure the torque during continuous rotation in one direction after at least five full revolutions of the shaft. The bearings must be lubricated.
Install the driven bevel gear after installing the drive bevel gear. Fully tighten the bolts securing the covers and cup, bearings of the drive bevel gear.
Before installing the driven bevel gear assembly, remove the outer bearing cup. Then install the driven bevel gear assembled with the drive cylindrical gear into the gearbox housing and press it with a glass to a position that ensures backlash-free engagement of the bevel gear pair. When pressed, measure dimension F (see Fig. 186, 190) between the crankcase and the cup flange. After this, determine the thickness of the required shim package using the formula:
S = F + D,
where D = 0.317... 0.555 mm is the thickness of the shim package, equal to the axial displacement of the driven bevel gear to compensate for the lateral clearance in the gear mesh. After installing the driven bevel gear, tighten the bearing nuts of the drive cylindrical gear with a torque of 343 ... 392 N.m (35 ... 40 kgf.m), and the bolts securing the cover and cup with a torque of 58.9 ... 88.3 N.m (6 ... 9 kgf.m). After this, check the lateral clearance in the teeth of the conical pair, which should be 0.2 ... 0.35 mm. Measure the gap with an indicator mounted on the wide part of the tooth, and for at least three teeth of the driven gear, located at approximately equal angles around the circumference.
How to choose and buy a wheel rim for KamAZ 65115, 6520, 43118, 4310, 5320 and other models
The model range of KamAZ vehicles, depending on the area of use, consists of more than a dozen vehicles. These unpretentious trucks have found their application in almost any sector of the national economy.
The specifics of working on trucks involve continuous operation of the vehicle with a minimum amount of downtime. The result is an ever-increasing need for quality spare parts.
The HARTUNG company is specialized in the production of wheel rims for a wide range of trucks, in particular for KamAZ vehicles. Using the example of several popular models of this automaker, we will consider the question of how to choose the right rims.
KAMAZ 65115
The most common and most popular model of this brand. A very powerful dump truck designed for transporting bulk materials weighing more than 11 tons. The manufacturer recommends using 22.5 or 20 inch KamAZ 65115 wheel rims on your vehicle. 20/22.5 is the diameter of the rim, and the rim width can be either 10 or 11 inches. This value directly depends on the size of the tire that will be installed on the wheel rim. Wheels of this size are widespread; many trucks of other brands are equipped with them. For example, 22.5-inch KamAZ wheel rims can be installed on some models of trucks from the brands VOLVO, MAZ, etc.
KAMAZ 6520
Another worthy representative of the flagship family. Increased maneuverability, ease of repair and maintenance, as well as the ability to transport cargo weighing 20 tons have brought this dump truck model to a leading position in the field of cargo transportation.
The wheel disk for KAMAZ 6520 is 20 inches in diameter and 8.5 inches wide. This size for wheel rims is also quite common; for example, the KamAZ 6520 wheel rim can be installed on TATRA brand trucks.
KAMAZ 4318
In terms of carrying capacity, the car is somewhat inferior to its “brothers”, but the same cannot be said about its cross-country ability. The truck behaves well on dirt roads dug up by special equipment. In its class, in terms of technical indicators, it surpasses many foreign analogues. The manufacturer recommends installing a wheel rim on KAMAZ 43118 size 10.0-20 or 12.2-20.9.
KamAZ 5320 - 54115, repair of drive axles instructions online
Payment for goods and downloading of the book in electronic form (PDF format) is made on the website.
To do this, you need to find the book you are interested in and click on the “Buy” button. The price of the book is indicated on the button.
For convenience, the price on the website for residents of Russia, Belarus and Kazakhstan is presented in rubles.
For residents of Ukraine in hryvnias, and for all other countries - dollars.
https://www.youtube.com/watch?v=lHv8n_xjYS8
After clicking on the “BUY” button, a payment window will open where you can select a payment system with which you can pay for the selected book using any bank card (Visa, MasterCard, MIR, etc.)
When you click on the “Pay by bank card” button, the Portmone payment system will open, which is the easiest way to make a payment.
In addition, the website offers four payment systems for payment:
- Yandex (payment from any bank cards, Yandex Money account, QIWI Wallet, terminals, etc.);
- Portmone (payment from any bank cards, Portmone account);
- PayPal (payment from any bank cards, PayPal account);
- WebMoney (payment from any bank cards, payment from WebMoney wallets).
Payment via Yandex Cashier
After selecting payment via Yandex, the Yandex Cashier payment system will launch, where you need to select a convenient payment method (bank card, QIWI, Yandex Money account, etc.)
After specifying payment details and confirming payment, payment for the goods will occur.
If you have a bank card in a currency other than the ruble, then the money will be debited from the card at the rate of the Central Bank of Russia at the time of the purchase.
This payment method is optimal for residents of Russia, Kazakhstan and Belarus.
Official website of the Yandex Kassa payment system https://kassa.yandex.ru
Payment via Portmone
After selecting payment through Portmone, the payment system will launch, where you need to select the payment method: bank card or Portmone account.
The price in the Portmone payment system is converted into dollars at the exchange rate of the Central Bank of the country where you are located.
If you have a bank card in a currency other than the dollar, then the money will be debited from the card at the rate of the Central Bank of your country at the time of the purchase.
After specifying payment details and confirming payment, payment for the goods will occur.
Official website of the Portmone payment system https://www.portmone.com
Payment via PayPal
After selecting payment via PayPal, the PayPal payment system will launch, where you need to select the payment method: bank card or PayPal account.
If you already have a PayPal account, then you need to log into it and make a payment.
If you do not have a PayPal account and you want to pay using a bank card via PayPal, you need to click on the “Create an Account” button - shown with an arrow in the picture.
PayPal will then prompt you to select your country and provide your credit card information.
After specifying the information required to make the payment, you must click on the “Pay Now” button.
Official website of the PayPal payment system https://www.paypal.com
Payment via WebMoney
After selecting payment via WebMoney, the payment system will launch, where you need to select the payment method: bank card or WebMoney wallet.
If you already have a WebMoney wallet, then you need to log into it and make a payment.
If you do not have a WebMoney wallet and you want to pay in another way, you need to select any of the methods that WebMoney offers and make the payment
After specifying payment details and confirming payment, payment for the goods will occur.
Official website of the WebMoney payment system https://www.webmoney.ru/
Downloading a book
After successfully completing the payment (by any method) and returning to the KrutilVertel store from the payment system website, you will be taken to the successful payment page:
On this page you need to indicate your e-mail, where access to download the book will be sent.
If you are already registered on our website, then simply follow the link to your personal account.
The book you purchased will be in your personal account, from where you can always download it.
Please note that after making the payment, you need to return back from the payment system website to the KrutilVertel website.
If for some reason you did not return back to the site and closed the payment system tab with a message about the successful completion of the payment, please let us know - we will send you a letter indicating access to download the book.
Problems when paying with bank cards
Sometimes difficulties may arise when paying with Visa/MasterCard bank cards. The most common of them:
- There is a restriction on the card for paying for online purchases
- A plastic card is not intended for making payments online.
- The plastic card is not activated for making payments online.
- There are not enough funds on the plastic card.
In order to solve these problems, you need to call or write to the technical support of the bank where you are served. Bank specialists will help you resolve them and make payments.
That's basically it. The entire process of paying for a book in PDF format on car repair on our website takes 1-2 minutes.
https://www.youtube.com/watch?v=IH1tdc69M7I
If you still have any questions, you can ask them using the feedback form, or write us an email at [email protected]
Source: https://krutilvertel.com/kamaz-5320-glava8-remont-vedushih-mostov
Bearing installation
First you need to install the outer races. Each clip is installed in its seat and evenly hammered down along the edges. In order to avoid chipping, it is necessary to place an old clip on the clips to be driven in. And strike her.
When the edge of the race is level with the edge of the hub surface. So that the old clip does not become fixed in the seat. It needs to be cut with a grinder. It will clog together with the installed clip. But the cut does not allow it to fit tightly. After the new clip reaches its place, the old one can be easily removed. Thanks to the cut.
Reverse gearbox or gearbox?
By the way, the gearbox will also need a clutch with a separate drive lever.
Z.Y. On Moskvich cars (except for the 400th) the gearboxes are helical, they do not howl.
#52 VladPK
- From: Transbaikalia
- Vessel:
Motor sail - Name:
Deshulan
They don’t howl only on the last – direct transmission.
By the way, the gearbox will also need a clutch with a separate drive lever.
Z.Y. On Moskvich cars (except for the 400th) the gearboxes are helical, they do not howl.
A. that’s probably why. Well, damn it, it broke off (. On the mentioned Muscovite there was just a Gazanov one, it still stuck out below the engine and caught on the bumps). The clutch is already overkill. Maybe it makes sense if the diesel starts with a crowbar and sucks, like one of my guys once did in Vladik). And with a starter, it’s easier to turn on the rear, start, drive away, turn off, and turn on forward.
#53 Ilyaf Iller
An impudent red face.
- From: Valdai
- Vessel:
Sailing yachts J17 - Title:
Yosh.
Reverse gear is often needed when mooring to slow down. What if it doesn’t start?
#54 Lotus
- From: Astrakhan
The clutch is already overkill. Maybe it makes sense if the diesel starts with a crowbar and sucks, like one of my guys once did in Vladik). And with a starter, it’s easier to turn on the rear, start, drive away, turn off, and turn on forward.
In addition to the clutch, you also need a brake to slow down the gr.shaft, otherwise you won’t be able to turn on the gearbox.
#55 boatman
- From: Rostov on Don
- Vessel:
boat
So I mean, with both hands. Although it is not fatal of course. On Zhigulis from a penny to seven, you also had to press down to turn on the rear.
- 1
#56 SanychSan
Helmsman 1st class
- From: St. Petersburg
- Vessel:
Punt - Title:
"Dream"
There was a nine, I remember that to turn on the rear you need to tilt the lever to the left and then forward. If you use cables from the cockpit, you will have to turn it on with both hands using two handles, which is inconvenient.
There is a cable control of the gearbox from foreign cars = the same handle as in a car - just in any place.
- 1
#57 Sergey Basargin
- From: Arkhangelsk
- Vessel:
boat
I had a D-37 with urrp-25-1.5 running at 1100 rpm. The boat was around 6 tons.
D-21 is half of it, with IF 2k1 it should be quite normal to have vibration. You need to select the right supports. From the GAZelle I think it will be the same.
Vibration in all modes? Cardan with splines?
I don't agree. It is impossible to select supports for this engine for my boat, because... it's too light. The engine is two-cylinder, which is why the vibrations occur, the D37 runs much smoother. And I have a cardan, but with splines. Vibration becomes acceptable after 1400-1500 engine rpm. At these speeds the boat drives a wave, and the consumption increases.
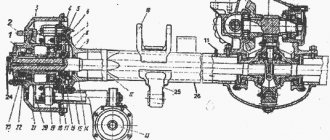
Gearbox diagram KamAZ 5320 4310 6520 65115
65115-2402011-60 - the last digit “60” means that gears with 46 and 16 teeth are installed - 498
5320-2402010-10 - the last digit “10” means that gears with 49 and 13 teeth are installed - 653
5320-2402010-20 - the last digit “20” means that gears with 50 and 12 teeth are installed - 722
5320-2402010-30 - the last digit “30” means that gears with 48 and 14 teeth are installed - 594
5320-2402010-40 - the last digit “40” means that gears with 47 and 15 teeth are installed - 543
Weight of KamAZ gearboxes 5320 4310 6520 65115 KamAZ diagram
Taking into account the transport container, the weight of the gearbox is:
— on the front axle – 132 kg; - medium - 186 kg;
— rear – 145 kg.
Choosing a KamAZ gearbox: what you need to know (Diagram of KamAZ gearboxes 5320 4310 6520 65115)
Interwheel locking
The device is mounted on the cross-axle differential. When it is turned on, the torque is divided into equal parts - between the two wheels. When the MBC is turned on, the KamAZ's cross-country ability increases. This is important when driving in difficult road conditions, for example, in icy conditions. The inter-wheel lock must be turned off in time - this will prevent gearbox damage