The GAZ 53 valves are adjusted when engine speed decreases and fuel consumption increases. Another reason for this procedure is the appearance of characteristic noise in the area of the exhaust pipe and carburetor Gas 53. As a result of operating loads, the valve clearance increases. From a practical point of view, the problem does not allow starting the “iron horse” the first time. If this succeeds, the engine makes rhythmic knocking noises.
TDC setting
The marks on the pulley and flywheel correspond to the position of the piston of the first cylinder at TDC. But this does not mean that the piston stopped precisely at the moment of compression of the fuel mixture. It is in this position that the valves need to be adjusted. So the intake and exhaust valves are closed and stationary. You need to know that in the second position, when the piston becomes TDC. The valves are also closed. But for a very short time. When the exhaust valve closes, the intake valve immediately opens. After the piston passes TDC, this is not a very convenient position for adjustment. It is almost impossible to catch the position of both valves closed. In the case of a compression moment, the valves are closed for a long time. And there is a large interval for adjustment.
It is very important to set the marks of the first cylinder. Because then the cylinders will be brought in approximately, the design of the camshaft cams allows this. Although it is possible. and I am a supporter of this. Unscrew all spark plugs. And move each next cylinder, feeling its position. For example, a screwdriver. The piston approached TDC. The valves in this cylinder can be adjusted.
After the piston of the first cylinder has reached TDC at the moment of compression. The valves of the first cylinder are adjusted.
Cylinder operating order
The shaft will rotate 90 degrees clockwise. The valves of cylinder 5 will be adjusted. Then another 90 degree rotation of the crankshaft is adjusted by the valves of cylinder 4 and so on until cylinder 8.
So as not to make a mistake in degrees. Symmetrical marks are placed on the crankshaft pulley. And when turning, they are simply brought under the arrow.
Great precision is not needed here. Because the cams face the shaft in a similar way. They will stand like this
Or so.
This will not affect valve clearances.
I still do. To avoid confusion, I prefer to catch each piston through the hole of an inverted spark plug. I feel calmer this way.
It takes a little more time. But there is confidence that the gaps are exactly right.
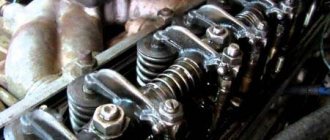
Valve clearances
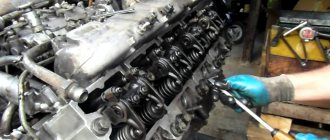
The gaps are adjusted using a feeler gauge. On the intake valves the gap should be 0.3 mm and on the exhaust valves 0.4 mm. There is no point in catching hundredths of a millimeter. When tightening the adjusting bolt with a locknut, these hundredths will still be lost. It is enough for the feeler gauge to move between the valves and the rocker arm with little force when compressing the adjusting bolt. But it was not clamped. Such thermal clearances are used on almost all engines. To begin the adjustment, you need to unscrew the lock nut on the adjusting screws. You need to unscrew it a few turns. So that it does not interfere with reducing the gaps later. The feeler gauge is inserted between the valve and the rocker arm. The adjusting screw is tightened with a screwdriver. And it is brought to the optimal clamping of the probe. Then the locknut is tightened. The screw must be secured with a screwdriver. If it doesn't work out. Then you can insert the key 11 into the edges of the screw. And hold the screw with a wrench. And so on for each next cylinder in order.
Sequence of adjustment of engine valves ZMZ 53
Hello dear friends! Today we will learn how to adjust valves. It would be more accurate to say that correctly .
I will describe how I myself adjust the valves on ZMZ 511 engines. Actually, adjusting the valves: where they are adjusted in the usual way (by the term “usual method” I mean a wrench, a screwdriver and a feeler gauge) be it a Gazonchik, be it a Zil or an L engine /ah, yes, at least a diesel engine. The valves are regulated approximately the same way, you just need to observe how many degrees to turn the crankshaft or camshaft. And necessarily the size of the gap; each engine has its own parameters. (There is even a difference between the intake and exhaust valves, but this is not so critical). I can’t help but say that there are still engines where the valve clearances are adjusted not with a feeler gauge, but with so-called nickels:
that is, the size of the required gap size is adjusted by the thickness of a suitable nickel. Nickels, as I think you guessed, come in different thicknesses and their thickness is measured using a micrometer - microns. So the dimensions are burned out with a laser on them, but it happens that the size is not visible, it is rubbed off, and this is where the micrometer comes to the rescue. This method of adjustment is not yet found on our domestic trucks (I can’t say anything about foreign cars, I don’t know). But on vehicles this method has been used for a long time since the first front-wheel drive VAZs began to be produced since then and is still used today. There is also one type of engine where our intervention is not required, that is, the valves do not need to be adjusted. The valve clearances are regulated by a special hydraulic compensator; or rather, there is no gap; it is compensated by a special hydraulic compensator.
The correct operation of hydraulic compensators depends directly on the oil pressure in the engine. But this is a separate topic, I’ll write about it someday, but not today, and I haven’t digressed much from the topic.
Adjusting valves on the ZMZ 511 engine!
First way!
And since I already said, I will describe how I regulate it myself. So far there have been no problems or complaints.
Why take it off, you ask, then to check if there is wear on the rocker arms. If the engine already has a lot of operating hours, then wear out on the rocker arms cannot be avoided. I indicated where the workings appear with an arrow in the picture.
The plane indicated in the picture should be exactly like this. If there is a waste, then you need to get rid of it. You need to clamp the rocker arms in a vice and use a flat file (rasp) to bring them to such a state that there are no developments. Otherwise you won't have any luck :). And so with each rocker. In this case, it is not necessary to remove the rocker arms from the rocker arm axis, as shown in the picture, you can align it, that is, get rid of the wear and tear in assembled form.
Adjusting valves GAZ 53
GAZ-53 is, without any exaggeration, a legend of our automobile industry. Having replaced the no less legendary GAZ-51 in 1961, the car stood on the assembly line for more than 30 years and was discontinued in 1993. During this time, it managed to become the most popular truck in the USSR (in total, more than 4 million Lawns were produced).
Many people think that the GAZ-51 replaced the GAZ-52, but this is not so, the 53rd and 52nd Lawn are different models, which were produced in parallel.
Despite the abundance of modifications, as well as the long production period, for the entire time under the hood of the GAZ-53 there was only one power unit - the ZMZ-53 gasoline engine. And naturally, the question of how to adjust the valves of this engine will be of interest to the widest range of motorists. It will be discussed in detail below.
Soviet truck suspension
The GAZ-53 medium-duty truck was equipped with a spring-dependent suspension system. At the front, the car is equipped with telescopic shock absorbers. It is difficult to drive the car because there is no hydraulic booster.
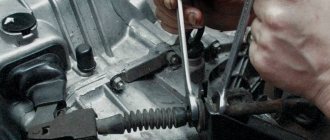
In order to change gear, it was necessary to double-depress the clutch. The cardan transmission consisted of two shafts. Despite many design flaws, repairing the GAZ-53 was not too difficult, and spare parts were quite accessible. Among other problems with the car, there were problems with the valves. We will tell you about them right now.
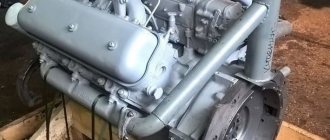
About the ZMZ-53 engine
Like the car itself, its engine is no less legendary. This engine is made according to the V8 scheme. Its working volume is 4.25 liters and its maximum power is 115 hp. With. Of course, by modern standards the power-volume ratio is far from outstanding, however, for the early 60s, as well as for a carburetor power unit, it is quite decent.
Much more of these engines were produced than GAZ-53 trucks; in addition to Lawns, they were also installed on GAZ-3307, GAZ-3308 and PAZ-3205. And the ZMZ-66, which was equipped with the legendary “Shishigs” - GAZ-66, is still the same ZMZ-53, adapted for an all-wheel drive army truck.
The origins of this power unit go back to the 50s, when the ZMZ-13 engine was developed in Zavolzhsk for the first Volga GAZ-21 and for the Chaika. At one time, the engine made a splash in the world due to the widespread use of aluminum in its design. At that time it was considered the most modern.
Using developments on ZMZ-13, by reducing the volume, ZMZ-53 was obtained. In other words, the ZMZ-53 was exactly the same in design as the ZMZ-13, only smaller in volume. And many parts of both engines are absolutely identical and interchangeable. The ZMZ-53 engine has smaller pistons, their diameter was reduced from 100 to 92 mm, and the piston stroke also became shorter - from 88 to 80 mm.
Throughout its history, the ZMZ-53 engine was modernized, aimed at increasing reliability and reducing fuel consumption. And motorists appreciated it. Despite the fact that diesel engines are considered the standard for trucks, Lawns with these power units are still popular. And the increased operating costs were offset by the installation of gas equipment.
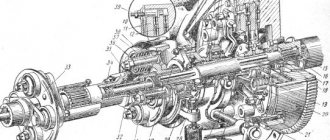
Transmission
The engines were paired with a four-speed manual transmission. It had four forward gears, as well as one reverse gear. These boxes have also survived to this day, although in some places they were used in rather difficult conditions.
As for other elements in the transmission system of this car, it is built on the basis of a standard scheme. The car is rear-wheel drive, and the clutch is the most classic. Engineers have provided for the possibility of installing a transfer case that could provide power take-off from the engine.
Why do you need to adjust the valves of the GAZ-53?
On all internal combustion engines there is a certain gap between the tip of the valve and the part that pushes it. This gap is necessary to compensate for the thermal expansion of the gas distribution mechanism parts that occurs during engine operation.
However, over time, due to friction, this distance increases, and this leads to the fact that the motor power decreases and extraneous noise occurs.
To eliminate this problem, adjust the thermal gap.
Do-it-yourself adjustment of GAZ-53 valves:
First way
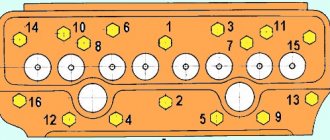
This method can be considered basic when adjusting valves on ZMZ-53 power units. The engines have 2 valves per cylinder and 8 cylinders, so 16 parts need to be adjusted. The normal thermal gap for the ZMZ-53 engine is considered to be 0.25–0.3 mm. To adjust, you need to do the following:
According to factory recommendations, valve adjustment is recommended at least once every 700-900 km. If there are no symptoms that the gap is increased, then it can be checked at least once every 1000 kilometers.
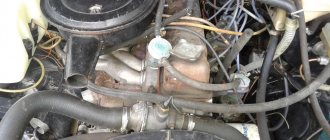
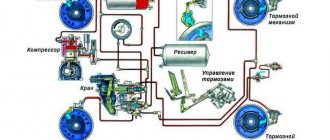
Carburetor
Now a little about the power system. The carburetor on the GAZ-53 is a two-chamber, emulsion carburetor. Its peculiarity is the simultaneous opening of both dampers, while the float chamber is quite balanced. This carburetor has the index K-135. It, if you compare it with other models, is distinguished by the presence of some adjustments. If configured incorrectly or not configured at all, then it will not be possible to operate it on engines equipped with standard cylinder heads. The GAZ-53 carburetor works as follows - the first chamber is responsible for supplying the fuel mixture to cylinders 5, 6, 7, 8. And the second one is at 1, 2, 3, 4.
Technical nuances during repairs
The valves of the ZMZ-53 engine are made of wear-resistant steel with a high sodium content. This steel is quite difficult to produce and it was not always possible to achieve the desired composition. In addition, controlling sodium levels was also difficult. This led to the fact that defective parts were often installed in Lawn engines. And this led to rapid erasure of the valve end and an increase in the gap.
It is to track this childhood disease of the ZMZ-53 motor that it is recommended to check the gap at least once every 1000 km.
In cases where a valve is found whose thermal gap increases faster than that of its counterparts, the worn body of the part is fused to its end. Surfacing is made from steel grade XH-60ВУ. In these cases, the service life of the part can be significantly extended.
However, today, it seems, it will be much easier to simply replace the defective part. But such repairs require much more costs than those described above.
Source
Second way
- intake valves for cylinders 1, 3, 7 and 8;
- exhaust valves of cylinders 1, 2, 4 and 5.
Simple and clear.
Thank you Thank you, I’ll try and write again later
But how exactly can you turn it to 90 degrees, you can’t guess?!
everything worked out, thank you
What is the reason: GAZ 53 burns out two cylinders at idle?
Most likely, we need to make the valves, that is, grind them
Is it possible to adjust the valves by aligning the crankshaft marks with the mark on the GPM gear?
Everything is wonderful, only something is said about the sixth cylinder (when adjusting the valves in two steps) for some reason.
You can also do this: cut the old distributor cap in half and look along the slider where the TDC is located
Namesake, it is not said about the sixth, because its valves are included in the “others”, which are regulated in the second set.
simple and clear
thanks for the advice
I also heard about the distributor cap method, I need to try it
Why are my 1st and 8th spark plugs dry, while the others are in gasoline? After the repair I can’t start it, I combined the risk with the risk on my knee, but it sneezes either in the carb or in the middle of nowhere.
in one exhaust valve the gap is greater than permissible, as a result of car operation
I adjust the valves to hot on all Motoraxes and advise you to do so. Warm up the engine to a coolant temperature of 90-95 degrees. Important - the valve covers must be on. And set the minimum gap at which the valves are not yet clamped. When cooling, the necessary gaps will appear on their own - check. And often they become smaller than recommended by the instructions. This method requires skill, and it’s inconvenient to adjust on a hot engine (it’s easy to get burned), but the adjustment turns out to be perfect.
We can’t find the reason why the valve muffler shoots? The gaps were set to normal, the marks matched, the spark plugs were changed, the contacts were new, it was shooting like a cannon
Hello, good people. After adjusting the valve for the second time, the engine began to run rough and was draining from the manifold. When you drive in first gear and shift to second speed, the car just jerks jerkily and wants to stall. Before this, the sound of the engine was not sound, but music. After the second adjustment everything became worse.
Maksimka correctly said - on a hot engine, but preferably in a running form, so that the dipstick passes between the valve stem and the rocker shaft, if on gasoline 03, ec Whether on gas 04, almost any normal engine starts on 2 cylinders and gains speed.
I did it according to this scheme, and everything worked out! Who can tell whether the valve clearance will increase or become smaller when fully heated. It’s just that one really good master proves to me that he will shrink. At first I tried to argue with him, and then on my MT 10 36 motor I became convinced that when the engine was fully heated, my clearances at both the intake and exhaust became 2 or even 3 times larger more! Thank you, I'm waiting for your answer.
Guys, I assembled the engine liners, new piston, valves, seats - everything is new. I turned on the spark plugs, started cranking the engine crookedly and didn’t understand: why is it so easy for the shaft to turn? Could it be because of the valves?
After adjustment, you need to drive for two or three days and adjust again
Why did the cylinders of the intake valves 5 and 8 sag in the cups?
Andrey, look at the tips of the spark plugs, there is a noise reduction resistor there. Try to change it.
You need to adjust on a warm engine, if you don’t have experience by hand, then the ideal gap is 0.15 (feel), the main thing is that the rod rotates freely
Max, I adjusted it like that once, I burned all the exhaust
A ring from the suction cup of the K-700 booster shaft is placed under the forehead.
This article explains what problems you may encounter and how to fix them, how to change the oil in the garage. In addition, you will receive advice on which checkpoint to give preference.
Only a blind person does not criticize VAZ products. However, cars of this brand are the most popular. Sometimes a person buys them with the idea that he will save money and do tuning.
This article is intended for owners who have problems with hydraulic compensators. From it you will learn what they are intended for, why they knock, and how to eliminate the knock. You will also receive recommendations for replacing them.
Adjusting the Gas 3307 and Gas 53 valves
Hello dear friends! Today we will learn how to adjust valves. It would be more accurate to say that correctly . I will describe how I myself adjust the valves on ZMZ 511 engines. Actually, adjusting the valves: where they are adjusted in the usual way (by the term “usual method” I mean a wrench, a screwdriver and a feeler gauge) be it a Gazonchik, be it a Zil or an L engine /ah, yes, at least a diesel engine.
The valves are regulated approximately the same way, you just need to observe how many degrees to turn the crankshaft or camshaft. And necessarily the size of the gap; each engine has its own parameters. (There is even a difference between the intake and exhaust valves, but this is not so critical). I can’t help but say that there are still engines where the valve clearances are adjusted not with a feeler gauge, but with so-called nickels:
that is, the size of the required gap size is adjusted by the thickness of a suitable nickel. Nickels, as I think you guessed, come in different thicknesses and their thickness is measured using a micrometer - microns. So the dimensions are burned out with a laser on them, but it happens that the size is not visible, it is rubbed off, and this is where the micrometer comes to the rescue. This method of adjustment is not yet found on our domestic trucks (I can’t say anything about foreign cars, I don’t know).
But on vehicles this method has been used for a long time since the first front-wheel drive VAZs began to be produced since then and is still used today. There is also one type of engine where our intervention is not required, that is, the valves do not need to be adjusted. The valve clearances are regulated by a special hydraulic compensator; or rather, there is no gap; it is compensated by a special hydraulic compensator.
The correct operation of hydraulic compensators depends directly on the oil pressure in the engine.
But this is a separate topic, I’ll write about it someday, but not today, and I haven’t digressed much from the topic.
First way!
And since I already said, I will describe how I regulate it myself. So far there have been no problems or complaints.
Why take it off, you ask, then to check if there is wear on the rocker arms. If the engine already has a lot of operating hours, then wear out on the rocker arms cannot be avoided. I indicated where the workings appear with an arrow in the picture.
The plane indicated in the picture should be exactly like this. If there is a waste, then you need to get rid of it. You need to clamp the rocker arms in a vice and use a flat file (rasp) to bring them to such a state that there are no developments. Otherwise you won't have any luck :). And so with each rocker. In this case, it is not necessary to remove the rocker arms from the rocker arm axis, as shown in the picture, you can align it, that is, get rid of the wear and tear in assembled form.
And so we aligned the rocker arms, got rid of the wear, now put the rocker arms in place and continue.
Now remove the ignition distributor (distributor) cover. In general, you can move the distributor cover with the spark plug wires to the side so that they don’t get in the way :). If you are suddenly afraid of getting confused with the order of connecting the high voltage wires from the distributor to the spark plugs, then you can read it, it’s all there. So put the wires with the distributor cap aside, they will only get in the way.
Installing the piston of the first cylinder at TDC
A is a mark on the front cover of the engine, B is a mark on the crankshaft pulley. Thus, we set the piston of the first cylinder to TDC.
And so, when these marks coincide, this does not mean that we can start adjusting; we still need to make sure that the compression stroke is exactly in the first cylinder. There are two simple ways:
Second way!
I still can’t tell you that there is another way to adjust the valves . This is a “two-turn adjustment”, how do you understand this? Yes, very simple:
1. First, still set the piston of the first cylinder to TDC and precisely in the compression stroke. Then adjust the following valves:
2. Adjust the remaining valves after turning the crankshaft 360 degrees, that is, one revolution. And that is all.
The main thing to remember is that the valves must be adjusted when the engine is cold or no earlier than three hours after it has been turned off. And on summer and hot days even more. But if your car is parked on the street and you are adjusting it in winter, you need to start the engine and let it run for a while, 4-5 minutes will be enough, but no more.
adjust the valves on a completely cold engine, especially in winter.
Adjusting the Gas-66 valves on the ZMZ 511 engine!
When adjusting the valves of a Gas-66 with a ZMZ-511 engine, there is no difference, everything is the same as when adjusting the valves of a Gas-3307 and a Gas-53 with a ZMZ 511 engine.
But there is one point. There is simply a difference in the location of the marks on the pulley and the front engine cover. On the Gas-66, the marks are located not on the pulley and cover, but on the back of the flywheel and the casing (rear beam) of the engine. Everything else is exactly the same as on Gaz-3307 and Gaz-53. Here I took some pictures, in case anyone doesn’t know. Open the corresponding hatch on the rear beam of the engine, and you will see a mark and an arrow; everything is visible in the picture.
You can look at the order of operation of the cylinders here suddenly if you are afraid of making a mistake.
Well, let me finish here, today we adjusted the valves on the ZMZ 511.
If suddenly you haven’t found something, or you simply don’t have time to search, then I recommend reading the articles in the categories “ GAS Repair”
Options for repairing a car engine with significant mileage
Trucks have been in use for a long time, but do not always undergo regular technical inspection on time. The natural result is problems with engine operation, increased fuel consumption and starting problems. The cause of the malfunction is wear of parts and increased play. The consequence is the need to repair the GAZ-53.
To prevent problems for cars with impressive mileage, it is recommended to use the second method of valve adjustment.
- The principle of regulating the GAZ-53 valves is identical to that described in the first method, only the order changes.
- After turning the cylinder piston until the marks coincide, first adjust the intake valves of cylinders 1, 3, 7, 8.
- Then it is necessary to adjust the exhaust valves of cylinders 1, 2, 4, 5.
- The final stage is adjusting the remaining valves with a preliminary rotation of the crankshaft 360 degrees.
With a little experience and knowledge base, you can follow the steps outlined and complete a full tune-up in as little as an hour, saving a lot of time and money on engine repairs. But you should be extremely careful and visually check each stage.
Sources
- https://avtocranarenda.ru/zazor-klapanov-benzin/
- https://avtika.ru/kak-otregulirovat-klapan-na-gaz-53-dvigatel/
- https://ProDemio.ru/regulirovka-klapanov-zmz-53/
- https://autogearspb.ru/uhod-za-avtomobilem/gaz-53-regulirovka-klapanov.html
- https://invrus.ru/regulirovka/gaz-53-regulirovka-klapanov.html
- https://avto-mechanik.ru/klapana-gaz-53/
- https://auto-park24.ru/uhod/gaz-53-regulirovka-klapanov.html