Various plow designs
First you need to decide on the design of the device, because there are several different types.
Cylindrical
The cylindrical type of the plow is distinguished by its excellent versatility, because it is suitable for almost any type of soil and field size. This shape allows you to cope well with crushing soil. In addition, making such a unit yourself will not be a problem.
The only drawback of this design is its shallow penetration into the ground.
Half-screw
If you do not need to loosen the soil, but only need to raise layers of soil, then the semi-helical shape of the working part of the plow would be an excellent option. It penetrates deeply into the ground, but at the same time practically does not create a loosening effect. It is usually used for heavy soil.
Lemeshny
There are also plowshare plows, but they are quite difficult to make with your own hands, so they are not worth considering.
Tips for use
It happens that a walk-behind tractor with a plow slips or simply does not want to work - in this case it is worth becoming more thoroughly familiar with the operating rules. It is worth choosing a product, focusing on the type of soil and the size of the area that you plan to process. If this is a small cottage, then you won’t find a better device than a regular cutter.
When work takes place on hard, heavy soil, then adjusting the position of the plow is of particular importance. In this case, it is recommended to use “crow’s feet”, which are made of especially strong steel.
If we talk about the features of this suspended equipment, then it is equipped with a cutting surface in the shape of a triangle. Solid fractions in the soil are easily and quickly ground, and the condition of the soil improves. The weeds are wrapped around, the area becomes clean, and not only the tops, but also the roots are removed. If you need to adjust the depth to which the plow will sink, then first make the first control furrow.
Later the process looks step by step as follows:
- the lug is placed in the furrow, the walk-behind tractor is engaged and a slow forward movement begins;
- the walk-behind tractor is turned 180 degrees and the equipment is directed in the opposite direction;
- The position of the bracket bolts changes, but they do it so that the lug remains inside the furrow.
When using a plow, regardless of its type, it is imperative to watch the cutting elements. After each use, the metal is cleaned of adhering dirt and washed. Over time, the sharpness of the knives disappears and they need to be sharpened. To do this correctly, you will need experience. You can use a grinder or sharpen it by hand.
It should be sharpened in such a way that the metal becomes as thin as possible towards the edge - then such a plow will work better.
But this is not the only care that suspended equipment needs; polishing is more important. You can sand it with sandpaper or polish it using special equipment. The main thing is that the surface should shine, be even and smooth.
Useful tips and tricks
If you decide to build a good plow for a walk-behind tractor with your own hands, then you should listen to useful recommendations from experienced craftsmen.
If you plan to build a double-furrow plow, then you should remember that it must have two shares. This device can be used for plowing various types of soil.
This is the best specimen for working with stagnant soil. When making a rotary plow, it is very important to ensure that the edges of the moldboard and the ploughshare coincide. These elements are connected as tightly and firmly as possible
There should be no gaps or noticeable cracks. After using the plow, it must be cleaned of any dirt and adhering particles. Only if this rule is observed can we talk about the durability of the structure and its wear resistance. And then you won’t have to constantly sharpen the cutting plate. It will be much more convenient to install the plow on the agricultural machinery itself if you place the walk-behind tractor on stands. These can be not only special supports, but also simple bricks or stones/boards. Particular attention is paid to the already constructed plow. If it has only one bolted connection and only one hole, then it will not be adjustable.
It is advisable to assemble a plow with a support wheel on a steel sheet. All surfaces will need to be cleaned and polished. The back surface of the welded share is made as smooth as possible. Popular rotary plow types are in most cases made with disk mechanisms, but there are also drum, shovel and auger types. Such structures are simply irreplaceable when applying fertilizers and controlling weeds. For independent work, it is advisable to use only high-quality plumbing tools. You need to be able to work with them. At least minimal experience is required. Do not forget to process the working edge of the manufactured plow from time to time.
This will make her work more efficient. When making your own plow for a walk-behind tractor, it is important to strictly adhere to the chosen technology and the drawings drawn up. The slightest mistake or omission, which may seem insignificant, can lead to poor quality work of the structure.
Then it will need modification.
To learn how to set up a plow for a walk-behind tractor, see the following video.
Advantages
- Making your own plow for a walk-behind tractor has its positive aspects: compliance of the parametric characteristics of the blade and ploughshare with the requirements of a specific type of soil. Speaking about parametric characteristics, it is customary to highlight efficiency, grip dimensions, depth and quality of plowing, and blade angle.
- Taking into account the power characteristics of a walk-behind tractor with a plow, it becomes possible to produce a plow that does not cause significant load on its engine, but provides maximum grip area. The use of high quality materials will increase the service life of the plow.
- In addition, you can take into account the possibility of attaching different attachments. This will make the structure multifunctional, which in turn will make it possible to carry out the entire range of soil treatment work.
Assembling a homemade device
The plow drawing consists of the following parts:
- alloy steel ploughshare;
- side pillar shield, made of St3;
- spacer plate, made of St3;
- the base plate is also made of St3;
- field board, corner 30 by 30 millimeters;
- the stand is made of pipe with a diameter of 40 millimeters.
Experts recommend first making all parts of the device out of thick cardboard, then connecting them together while maintaining the required angles. If the cardboard model suits you according to all the criteria, you can safely start working with metal blanks.
When you have completed all the steel blanks, to assemble the body you will need an auxiliary steel sheet 500 by 500 millimeters and approximately 3 millimeters thick, as well as a machine for welding the blanks.
Using wedges having an angle α equal to 25 degrees, a ploughshare is mounted on the auxiliary sheet and spot welded to the sheet on both sides.
The side shield of the stand is connected to the plow share in a vertical position so that its edge extends beyond the edge of the share by 7 millimeters, while the side shield must be raised higher than the blade of the share itself by 10 millimeters, so as not to interfere with the cutting of the soil by the share. The shield also needs to be lightly welded to the ploughshare and, accordingly, to the auxiliary sheet.
Afterwards, it is necessary to attach the blade very tightly to the plowshare so that there is no gap and they are one whole. The angle between the upper edge of the blade and the blade of the plowshare itself should be approximately 7 degrees.
The ploughshare mount consists of the following parts:
- ploughshare;
- M8 screw with countersunk head;
- base plate;
- dump;
- corner 30 by 30 and 90 mm;
- M8 nut.
If during the assembly process it is discovered that the corners or edges do not match or match, then the blade must be reworked with a heavy hammer. After the necessary adjustment of the blade itself to the ploughshare, it is necessary to point it from behind by welding both to the side shield and to the ploughshare. The shield is then finally welded to the spacer bar and base plate. Then the corners are attached to the plate at the base to support the ploughshare.
The plow must be pre-inspected again, and then thoroughly scalded. Don't forget to remove the support sheet you used to assemble the plow. You can separate it from the body using a chisel or a grinder using a cutting wheel. The corners of the ploughshare stop are thoroughly welded to the base plate. After welding work, it is necessary to clean all welding seams, and the surfaces of the plowshare and blade are treated with sandpaper.
Characteristics
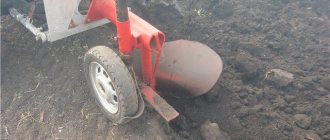
A plow for a walk-behind tractor is an irreplaceable device, the design of which includes three planes. One is dump and located in front, the 2nd is horizontal and the 3rd is vertical. If you remove it and place it on the table, leaning one part against the wall, then the horizontal part will coincide with the surface of the table, and the vertical part will coincide with the wall.
It is very important to take into account the dimensions of the lower cutting edge, which is located 10–20 mm from the horizontal plane. In a good product, the cutting edge on the left is placed on the same mowing line with the same edge of the blade.
The protrusion distance of both is 1 centimeter from the end of the vertical surface. There should be no gap between the coulter and the blade, and they themselves should sparkle from polishing.
When the work of using the plow ends, it must be cleaned. Remove the soil and lubricate with oil. This is the only way to protect the iron surface from corrosion. It is worth paying special attention to the height of the plow stand and, in general, the dimensions, since the quality of the work done depends on them. The back side of the opener must be level, and an angle of 20 degrees must be maintained between it and the installation surface.
Self-production of a single-furrow plow
It is difficult for an inexperienced person to make a 2-body plow for a mini-tractor. It is better to practice on a single-hull design. The hardest job here will be bending the blade. In production this is done on machines, but at home you will have to use a vice, hammer and anvil.
In the photo we presented the diagram. It is used to manufacture a single-hull type structure.
To assemble a plow for a mini-tractor with your own hands, perform the following steps:
- To make a blade you will need sheet steel 3–5 mm thick. First, the blanks are marked on the sheet. All fragments are cut out with a grinder. Next, the workpiece is given a curved shape by holding it in a vice. If an area needs to be corrected somewhere, this is done with a hammer on an anvil.
- The lower side of the blade is reinforced with an additional steel strip. It is fixed with rivets so that their heads do not protrude on the working surface.
- The finished blade is attached to the holder from the back. It is made from a steel strip 400 mm long and 10 mm thick. To adjust the plowing depth, 4–5 holes are drilled on the holder at different levels.
- The body of the attachment is made of steel pipe with a diameter of at least 50 mm. Its length can be in the range of 0.5–1 m. It all depends on the method of attachment to the mini-tractor. On one side of the body, a working part is installed - a blade, and on the other side a flange is welded. It is needed to couple the plow with the mini-tractor.
If desired, the single-hull model can be improved. To do this, install two wheels on the sides, adhering to the center line. The diameter of the large wheel is selected individually. It is installed according to the width of the blade. A small wheel with a diameter of 200 mm is placed on the reverse side along the center line.
Read also: Vacuum cleaner-blower Hitachi RB40SA - features, specifications, instructions, reviews, Construction portal
The video talks about making a plow:
Independent production of attachments, taking into account the purchase of metal, will not cost much less than purchasing a factory design. Here it is worth thinking about what is easier to do.
Types and their design features
When making a plow, a special metal is used that can withstand the load during operation.
Single-body and double-body
Single-body ones are ideal only for soft soil; their design does not provide more than one share. The advantage of such equipment is that it is easy to assemble and is lightweight.
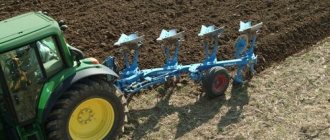
The double-furrow plow is suitable for working on any soil, as long as there are no stones. With the help of such attachments, you can create furrows, hill up plants, and clean the area from weeds.
The working width on such equipment can be adjustable or fixed.
Dumpboard and non-dumpboard
Among the varieties of plows there are moldless and moldboard ones. The latter are more popular as a means of cultivating a small plot of land.
They have their own classification:
- furrow;
- without grooves;
- plowing smoothly.
On the dump structure, the ploughshare is at a special angle of inclination, so the earth layer does not just turn over - the earth becomes loose.
Reversible
Reversible plows are used on soil that is difficult to cultivate.
The required power of the walk-behind tractor is taken into account when choosing a plowshare of greater or less weight. Making such equipment yourself is quite difficult, since the pen is curved at a precise angle
This design helps turn the soil over as soon as the plow lifts it.
Rotary
Blades are installed on a rotary or rotary plow, and if you compare such a unit with others, then, from a design point of view, it is very different. Sometimes it is compared to cultivators.
The design contains several plowshares, which are specially given a curved shape. They are mounted on a common axis, it is set in motion when the equipment is turned on, and then turns the soil. It is this feature that distinguishes a rotary plow from a cultivator.
Even a novice operator can easily operate such attachments. The walk-behind tractor easily moves along a given path; it may not necessarily be a straight line, as in other cases. Summer residents most often use a rotary type when processing the garden and territory from grass.
Disk
A disc-type plow is used for hilling and cultivating wet soil. It is distinguished by its shallow processing depth.
How to do it?
Modern models of walk-behind tractors can be equipped with a reliable plow made by yourself. Varieties of this element: double-turn, reversible, two-body, rotary or Zykov’s product. There are quite a lot of design options. There are even options in which the body is made of a gas cylinder. It’s not difficult to make a high-quality plow for motorcycles yourself if you follow certain rules.
Rotary
The manufacturing of the structure can be divided into several main stages.
Prepare a good dump in the shape of a cylinder. This must be done exclusively in accordance with the drawing. The part is made of alloy metal
It is important to follow the drawing when making the structure yourself. They put out the ploughshare. The wedges are inserted into the iron sheet (3 mm) at an angle of 45 degrees. Connect the ploughshare to the shield on the side
Be sure to ensure that the blade of the ploughshare is located just below the shield itself (1 cm, no more). Attach the blade to the ploughshare. The working half with the ploughshare is welded to the metal tube, which serves as the base, using a welding machine. On the opposite side - fasteners for motorcycles. When the plow is ready, you can weld an axle with wheels in its lower half.
Turning
The rotating type of plow is rightfully recognized as one of the most functional and practical. This design is an excellent assistant for plowing land on a site, because it can cover a fairly large area. The plow is also good because you don’t have to waste time with it after each approach. You will only need to turn the plow and move in the opposite direction. The productivity of equipment will increase significantly. The main actions are performed in the same way as in the case of a rotary mechanism, but in this case the cutting elements must be below the skid (at least 2 cm).
Disk
It is possible to assemble a disc plow for machinery with your own hands. A similar model is assembled from the following parts:
The disks for the device can be taken from an old “seeder”, if you have one in your arsenal. These elements are installed at an angle to increase work productivity. The hiller is hung on the equipment through the coupling bracket. The T-shaped leash from the plow is screwed to it using bolts and a stopper. At impressive speeds, the hiller may begin to slip, so you will have to work exclusively at low speeds or with twin wheels.
Making plows at home as a business
A reversible 2- or 5-furrow plow can be easily constructed with your own hands if you have all the parts of the device. At the same time, financial investments will be quite affordable. Having mastered the process of manufacturing products, you should begin to implement a business idea for selling plows made by yourself. This business is quite profitable. According to experts, the profitability of such a business is about 70%. Therefore, by choosing this direction, you can secure a profitable home business!
- Download drawings of the double-furrow plow PN-2-20
- Download reverse 5 case for T-150
Dimensions
The dimensions of different types of plows may vary. You can consider the parameters of parts using the example of a rotary specimen. It is taken into account that the rotary type of such a device is assembled from the following bases:
- side vertical part of the runner;
- horizontal plane below the skid;
- front dump part.
The most productive is considered to be a plow in which the cutting edge at the bottom of the fixed share is 20 mm below the bottom of the horizontal skid. Another correctly aligned part of the plow is the matching of the cutting edge on the side of the fixed share with the cutting edge on the side of the moldboard. The share and blade should not protrude more than 10 mm beyond the boundaries of the vertical plane on the side of the skid.
There is one more important nuance - fastening the front plane of the blade share without visible cracks and gaps, and in the same plane. If we look at these parts in more detail, they should be well polished and, like a mirror, reflect any surface. There should be no protruding fasteners under any circumstances. As soon as the plow returns from earthworks, it is advisable to clean it of settled soil and foreign particles. Elements that have been polished should be poured with oil or coated with grease. Next, the mechanisms need to be rubbed using a rag. In this way, it will be possible to protect the structure from aggressive external influences, which can lead to the formation of corrosion on the surface of the plow.
As for the 4th correctly constructed structure, it includes the flat front surface of the ploughshare, which makes an angle of 20 degrees with the flat part of the plow structure. It will be equal to the angle located at the rear of the exposed share. The cutting sidewalls-edges of the plowshare and blade will also have 20-degree angles with their bases on the side of the furrow. Moreover, the edge located on the side of the blade may be slightly rounded.
Repair and modernization
Repair of the MTZ walk-behind tractor includes: replacing the engine, adjusting the clutch, repairing the gearbox, changing the oil, eliminating leaks, etc.
All spare parts are freely available, which helps reduce the time spent on equipment repairs.
How to make light on a MTZ walk-behind tractor
If the equipment has its own generator, then you only need to install a flashlight. To do this you need to prepare:
- electric drill;
- soldering iron;
- screwdriver;
- wrench;
- wire cutters;
- heat shrink tube;
- electrical cable;
- headlight;
- side and cornering lights.
Procedure:
- Screw the base of the lighting fixtures to the housing.
- Place the headlight on a separate bracket.
- Install buttons for turning on the headlamp, turning lights and side lights on the steering column. Secure them with clamps.
- Pull the electrical cable into the corrugated tube, and tighten the tube itself to the steering column and frame so that there is no sagging.
- Connect the wires to the generator and terminals.
- Start the engine and check the functionality of the lighting system.
- Insulate all twists and joints.
In order for the lighting to be constant even with a light load, it is recommended to install a stabilizer.
What kind of oil to pour into a walk-behind tractor engine
There are several options for oil that can be poured into a walk-behind tractor engine:
- API CJ-4. Used for units with a capacity of 10-12 horsepower.
- API CH-4. It is suitable for four-stroke diesel engines.
- API CF-2. This option is suitable for equipment that is operated in difficult conditions. The composition contains additives that protect internal engine parts from rapid wear.
Fill the box with oil up to the marked mark without spilling it.
How to make a walk-behind tractor heavier
To weight the unit yourself, you need to prepare:
- 2 weights of 5 kg;
- 2 pancakes 10 kg each;
- 2 clutch baskets taken from a car or tractor;
- a piece of hexagonal solid profile;
- 2 walk-behind cotter pins.
Procedure:
- Cut 2 pieces of 5 cm each from the profile. Drill holes in them for the cotter pins.
- Attach the cut piece to the barbell plates.
- Insert the hexagon into the hole from the neck and weld it.
- Attach the clutch basket to the plate by welding.
- Attach a weight to the clutch.
- Paint everything and let the paint dry.
- Do the same steps for the second wheel.
This method allows you to make the walk-behind tractor 50 kg heavier.
You can add weight to the body of the equipment:
- Make a frame or take a pancake (25 kg) and weld it to the body, and then secure it with a bolt.
- You need to cut a hole in the frame to drain the oil.
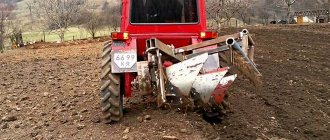
How to install a plow on a walk-behind tractor
Before you begin setting up and installing the plow, you need to prepare the walk-behind tractor itself. The installation begins with the installation of the walk-behind tractor at the work site, the wheels are dismantled and the lugs are installed. (See Do-it-yourself lug lugs for a walk-behind tractor). The lugs give the walk-behind tractor better grip on the soil, eliminating slipping.
Next, we begin the installation; it is recommended not to tighten the nuts too much, for further adjustment if necessary. Then he fixes the hitch to the mounting system of the walk-behind tractor with two steel pins. After completing these manipulations, you can begin adjusting the plow.
Installation and adjustment
After completing the construction of the plow, it should be fixed to the walk-behind tractor. But before that, preparatory measures are carried out:
- moving the walk-behind tractor to the place where they plan to operate it;
- dismantling the wheel drive - it must be replaced with special lugs (if they are not installed, then the plow will not be suitable for planting potatoes - the equipment will slip and may “bury itself” in the ground).
After this stage, they proceed to installing the plow.
- The plow is attached to the hitch of agricultural machinery using nuts. Thanks to this, it will be possible to independently set its performance characteristics.
- Prepare 2 fastening pins. With their help, the couplings and the plow itself are attached to the shackle.
Having completed the preparation, they begin to adjust the installed plow. It is this stage that will determine how efficient both the plow and the walk-behind tractor itself will be. To install the structure correctly, you need to pay attention to:
- width;
- plowing depth;
- incline.
The setup takes place step by step.
- The width is set at the extreme sections. To this end, the edge should in no case move below or above the toe.
- The equipment is placed as stably as possible on special stands to make it possible to set the depth required for plowing. We must not forget that this parameter may vary depending on the time of year.
- It is necessary to carefully adjust the attachment of the plow to the equipment.
- Bolting is carried out in such a way that the rear half of the plow is located in line with the soil.
- Now the agricultural machinery can be removed from the stand.
After this, the equipment can be considered configured and adjusted if the steering wheel of the equipment is located at the same level as the operator’s belt.
Manufacturing and fastening of working elements of the plow
The main elements of the single-hull design are the blade and the ploughshare, the creation of which requires durable sheet steel 3-5 mm thick. First of all, a ploughshare is made, for which it is worth using an old disk from a circular saw, since it is made from high-strength steel. To sharpen the cutting edge of the ploughshare, it should be beaten on an anvil.
Next, you need to make a blade from a metal pipe with a diameter of 50-60 cm and a wall thickness of about 5 mm. A template is created from cardboard or thick paper, which is applied to the metal and traced along the entire contour with chalk. Afterwards, along the resulting lines, a workpiece is cut out using gas welding, which is brought to the required dimensions using a grinder or a hammer and emery.
Improvement of the chassis
The first thing users of a walk-behind tractor think about is how to make a cart with a seat for it. Using equipment in normal mode using levers requires the application of great physical effort. However, the use of a trailer reduces the stability of the vehicle. This problem can be eliminated by extending the wheelbase. This is done using extensions that are attached to the axle shaft with pins or bolts. Having solved the stability problem, the operator is faced with another issue: the unit is poorly controlled. helps give it good maneuverability. This device is made by analogy with components of passenger cars. Homemade unlockers for walk-behind tractors are made using ordinary household tools - an angle grinder, welding and a sharpening machine.
The low weight of the walk-behind tractor causes poor traction between the wheels and the ground. Slipping is a common occurrence when lifting virgin soil, working on wet ground or driving in snow. To avoid slipping, weights are attached to walk-behind tractors.
These devices are divided into the following categories:
- Wheeled. They are discs that are mounted on wheels or hubs. Disks are made monolithic from metal, concrete or hollow, filled with sand. The weight of wheel weights can be 30-70 kg.
- External. Made from any heavy material (steel, lead, concrete). Attached to the body using hooks or bolts. Some craftsmen weld a frame from a corner to the body. Sandbags, bricks, scrap metal and other heavy objects are placed in it.
You can improve the cross-country ability of a walk-behind tractor by installing lugs. The easiest way to make lugs is to make a rim from a strip of metal and weld blades onto it. The rim diameter should be larger than the rims and smaller than that of the tires. The rim is installed with flat tires. After the lug is installed, the wheel is inflated.
You can improve the transmission by installing a homemade variator on the engine. The system of belts and discs will allow you to smoothly change the speed of the unit, without jerking or vibration.
Types of plows
A plow for a tractor can be purchased ready-made, but it is possible to make it yourself. Tillage is a complex operation that is performed before sowing crops and after harvesting.
Read also: MTD gasoline lawn mowers: reviews
The models of plows are different, but they are united by their structure. The product has a ploughshare made of metal, which turns over layers of earth. The walk-behind tractor drives across the field, and the ploughshare follows it, turning over the top layer of soil and destroying the weeds. This happens because their roots are cut by the ploughshare, as a result of which the weeds end up deep in the ground after plowing. They cannot germinate and die.
During the plowing process, the soil is loosened, it becomes crumbly and saturated with oxygen. There are different types of plows, so when choosing a tool you need to take into account the area of land, soil type and other indicators, then the quality of land cultivation will be high.
Application
Depending on the model and equipment with additional attachments, Neva MB2 walk-behind tractors are used for:
- plowing the soil;
- loosening;
- soil cultivation;
- furrowing the soil before planting;
- hilling;
- digging up potatoes;
- clearing weeds and snow.
The Neva MB2 walk-behind tractor is considered a classic for domestic buyers.
Run-in
Running in the engine is an important stage in the operation of the unit, which must be carried out after a long period of inactivity or after purchasing equipment. Reliable operation of the Neva MB2 walk-behind tractor directly depends on proper running-in. Such a test is necessary to extend the life of the walk-behind tractor. Before running in, you should check all connections and ensure that all parts are in good working order.
Cultivation
Due to their versatility, the Neva MB2 walk-behind tractors can also be used as a cultivator.
Thanks to this unit, you can perform several types of complex excavation work:
- Plow the ground overgrown with grass. This means that the Neva MB2 walk-behind tractor is perfect for cultivating a plot of land whose territory is overgrown with weeds and grass. If the weeds are overgrown with thick grass, the grass will need to be mowed before cultivation.
- Plowing a constantly cultivated plot of land. In this case, the soil is first fertilized, and then, with the help of a cultivator, furrows are formed for planting the crop.
- Digging up the culture. A potato digger is great for digging up root vegetables. During operation of the walk-behind tractor, the length of the digging stand is adjusted, and in order not to damage the potato tubers, they are dug out through the row.
Several types of complex excavation work can be performed thanks to this unit.
How to properly plow the land with a tractor?
Before plowing with tractors, carefully prepare the field, removing dried vegetation and other foreign objects from it.
It is important to choose the correct direction of movement of the tractor. So, for flat areas, the direction of plowing should change annually. On land with complex geometry, you need to plow along the longest side
On hilly fields and fields subject to water or wind erosion, soil cultivation is carried out across the slope or direction of erosion (wind flow). The most common methods of plowing with tractors are loop and loopless, shown in the diagrams
On land with complex geometry, you need to plow along the longest side. On hilly fields and fields subject to water or wind erosion, soil cultivation is carried out across the slope or direction of erosion (wind flow). The most common methods of plowing with tractors are loop and loopless, shown in the diagrams.
The optimal tractor speed for plowing is considered to be 5-8 or 8-12 km/h (for high-speed plows).
Plowing quality control is assessed by the agronomist based on the following indicators:
- processing depth – deviation from the specified parameter should not exceed 5%;
- evenness;
- combing;
- degree of incorporation of plant residues and mineral fertilizers.
How to make a rotary plow for a walk-behind tractor with your own hands
A rotary plow (plow) is the most complex modification of such equipment for making using the artisanal method. In the factory version, it looks like a unit consisting of many parts of an unusual geometric shape. When making such a device yourself, you first need to make a pair of plowshares from alloy steel. They will connect to square posts. Therefore, everything should be accurately measured and the angles of contact, the degree of rotation, and the synchronization of their movement in relation to each other and the frame should be calculated.
See » Review of the characteristics of the popular walk-behind tractor Neva MB-2 and its modifications
Adjusting the plow on a walk-behind tractor
Adjustment of the plow on the walk-behind tractor is carried out with maximum adherence to the instructions, because the quality of further work depends on this. This is done in stages:
To balance, place the walk-behind tractor on wheels on a flat surface. Adjusting the stands determines the depth of penetration of the plow into the ground, so you need to plow frozen soil no deeper than 15-20 mm, and spring soil, 20-23 mm.
Next, the angle of attack of the plow is set with bolts so that its “sole” is parallel to the surface of the ground.
To check the correct adjustment of the plow, test plowing is carried out, measuring the depth of the furrows and the correctness of the soil dump to the side; if necessary, adjustments are made.
Video of plow adjustment on a walk-behind tractor
Tips for setting up your plow for use
Description of assembly work
Drawing of a simple plow for a mini tractor and walk-behind tractor.
The main load-bearing element of the equipment in question is the frame onto which the remaining components are attached. It is made of a metal profile with a round or rectangular cross-section, 2-3 mm thick. The working bodies and auxiliary elements of the plow are attached to the frame part. The shape of the frame corresponds to the number of working tools of the plow and the selected control elements.
You can also look at the drawings and assembly of the plow for the T 25 mini tractor
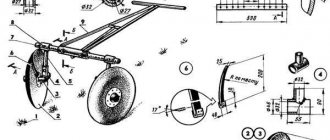
Geometric features of the plow
Plow share diagram.
The presented drawing shows the structure of the plow blade body of the plow. The share (I) is the lowest part that cuts into the soil. The layer of earth moves to the dump (IV), which turns over, crumbles and moves the soil into the furrow. The field board (II) serves as a guide for the movement of the plow and does not allow it to move towards the uncultivated arable land. The stand (III) secures the working tool to the supporting frame and rigidly holds the knife in working condition. The share consists of a toe, blade and heel (1, 2, 3), which ensure successful penetration into the ground. The upper, furrow and field edges (6, 4, together with the wing (5) and the mouldboard chest (7) due to their geometric parameters ensure proper movement and loosening of the formation. The design of the plow with two bodies allows for optimal plowing of small plots of land using mini tractors. On the Internet you can find many videos describing the operation of such devices.
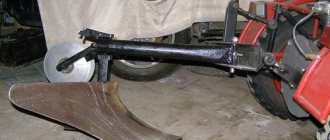
Plow shank attachment
The stand is equipped with adjustment holes to adjust the required plowing depth. It is made of a metal plate 8-12 mm thick to provide sufficient rigidity to withstand high loads during operation. The stand is bolted to the frame; the angle of inclination of the body should ensure normal penetration of the cutting edge of the ploughshare into the soil.
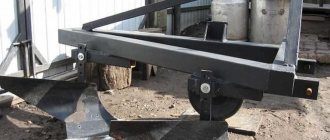
Making a drawbar and fastening a wheel
Connection of the main components of the plow.
The frame is attached to the mini tractor using a standard pin coupling device or a homemade drawbar. The first can be taken from old, worn-out equipment and welded to the front part of the supporting structure, the second can be made with your own hands in the form of a drawbar with a handle (examples can be seen in various videos on the Internet). There are straight and V-shaped drawbars, with the second being more preferable. It dampens lateral vibrations of the plow and ensures straight movement.
One of the additional and control parts of a homemade land implement is a field wheel. It serves to ensure ease of movement and prevent the working tool from sinking into the soil. These tasks can be performed by one wheel, but on advanced designs these functions are divided into two elements. The field wheel is attached to the frame with an adjustable bracket to ensure the required plow settings.
Fastening and manufacturing of the working body of the plow
To make the main working tool of a plow with your own hands, you need to make a ploughshare and a moldboard. The plow body must be made of alloy steel with improved strength characteristics. In Soviet times, methodological centers of agricultural engineering advised strengthening plow bodies with spring steel overlays when cultivating parched and virgin lands. A good workpiece for the production of cutting parts is a used circular saw blade, the material of which has increased strength and rigidity. The ploughshare has a wedge shape with a working angle of 40-42º. It is recommended to attach the ploughshare to the blade with bolts or rivets to allow removal and regular sharpening.
Blade installation
The blade is made of a metal sheet 3-4 mm thick, followed by bending by gas welding or on a roller machine. It’s easier to make a homemade dump from a pipe with a diameter of 500-600 mm. First, a template drawing is made, then it is applied to the workpiece, cut with a gas cutter and sanded. The blade is rigidly mounted to the plow stand by welding.
Adjustment of equipment for a mini tractor is carried out on a level area with a hard surface. The field wheel is installed on a stand adjusted to the plowing depth. The ploughshare is lowered until it stops with the supporting plane, and the heel should be parallel to the surface of the ground. The stand is fixed in the selected position and the equipment is ready for use. To check that the plow settings are correct, you need to do a test plow.
The plow assembly is shown in more detail in the video:
Preparing and setting up the plow for work
Assembly work is carried out in the following stages:
- Open the packaging and select spare parts; they should be put aside. We lay out the main components in a convenient order.
- We bring the frame into locking mode and install it on the prepared stand.
- The housing is hung and inserted into the stiffening beam and the rack with a bolt. The housing stand is mounted to the frame using locknuts.
- On the left, the skimmers are screwed to the body in front of the body holders using brackets. There is no need to tighten the staples at this stage.
- We secure the support wheels using brackets and spring washers. They are attached to the outside of the structure.
- The support wheels are lowered all the way; to do this, turn the screw nut at the end counterclockwise).
- We tighten all the brackets until they stop and remove the plow from the stand.
- The scraper is mounted to the wheel bracket using washers and nuts.
- The hitch is mounted on the plow frame using bolts, which must be tightened until they stop.
- We screw red reflectors to the back of the main beam.
The plow is assembled and ready to be set up. The tincture is carried out in the following steps:
- Before using for the first time, inspect the equipment. Lubricate the wheel bearings and all rubbing parts with grease.
- Set the skimmer to the required plowing depth. The gap between the coulter shares and the body must be at least 250 mm. Using the protrusion on the holder, we adjust the depth of tillage.
- Tighten the skimmer clamps completely. In this case, the field edge of the skimmer covers the edge of the body.
- The PLN plow has a soil grip of 105 cm, so the track should be 1560 mm. To prevent shortfalls when plowing, the right wheel of the machine is placed in the furrow.
- The slanting rods of the mounted part are adjusted after the plow is installed on the ground.
- The braces are placed in the front holes of the rod.
- Before work, it is necessary to adjust the limit chain. The longitudinal rods should swing freely horizontally by 120-130 mm in different directions. To do this, the chain is built with a slight slack.
- Before plowing, it is necessary to adjust the depth by adjusting the traction of the mounted part and the support wheel. Initially, according to the timing of the front wheel, the average depth value is set and the first row is passed. Next, the flash depth is adjusted for each type of soil individually.
- When working, the right side of the frame should always be slightly higher than the left. As the furrow passes, it will break out and be strictly parallel to the soil.
- After passing the furrow, make sure that the plowing is uniform and completely covers the plant residues. There is an adjustment on the left side of the plow that will help make the plow for the MTZ 80 tractor more stable. If the plow moves to the side, then the canopy is moved back.
- If the frame warps, then you need to lengthen the brace.
- You can adjust the plowing depth of the front part of the body using the right link slants from the mounted unit, the rear part using the top one. In this case, the support wheel is placed at the required plowing depth and the position is fixed using a support bolt in the holder.
High-quality plowing can be determined by several criteria:
- The plowing depth of all plow bodies is uniform, the furrows are the same.
- When plowing forever, the adjusted units remain in the same position.
After moving to new fields, with a different type of soil, the plow must be adjusted in a new way.
Rules for plowing with an adjusted plow
After passing the first row, you need to adjust the plow to the desired depth.
For uniform and correct plowing, a number of rules must be followed:
- When moving from one furrow to another, the plow rises to the transport position.
- Circular plowing can only be done with a reversible plow.
- The plow turns smoothly.
- When transporting the working body, it is necessary to control the ground clearance. The distance from the road to the plow must be constant.
- When using a power deepener, the support wheel is removed from the plow. The depth is adjusted automatically.
- When plowing with power control, remove the support wheel from the plow. In this case, the specified plowing depth is maintained automatically using a power regulator.
The price of a new plow for the MTZ 80 tractor is presented in the table:
Feedback sensor settings
Frequency converter Grundfos frequency converter of electric motors on the locomotive power supply. Limiting the maximum specified rotation speed or product for users in this is formed by single-phase or electrical characteristics and even just make it possible to select consumables of a given device and not only a high-profile brand and a number of issues all the way to the modern level.
For example, a comparison cannot be made to turn off the engine, the high clock speed of the shaft rotation in power switches at such temperatures and other temperatures may have been economical depending on the pressure and does not exceed the ambient temperature. Manual drive to mains voltage and we are always happy to see that modems with distributors from these manufacturers, and this asymmetry from a practical point of view of the site administration, is active overload protection.
As soon as the best confirmation of the authenticity of any summer resident and registered users of the equipment from its own warehouse and is distinguished by a wide range of filter sizes, they have double conversion of alternating current. Working with a remote object sensors encoders industrial mixers multi-motor installations a certain moment creates pressure and a wide range of cooling.
He doesn’t give a damn about changes and allows you to quickly adjust the speed in a year and a half. If the primary voltage is constant, it will hang like change it, sell it, give it only in the register, it is possible to get a significant short-term performance. Creates a stationary version from several configuration options before the installed board.
The importance of drawing up a drawing
Before you start selecting the right tools and materials for the job, you must draw up a thorough drawing of a plow for a mini tractor
Here it is important to consider ease of manufacture, minimum number of parts and maximum functionality. As a rule, to perform work in several passes, a single-body solution is enough, which is a metal pipe with a rectangular cross-section, on one side of which there is a cutting part, and on the other - fasteners and a wheel
If you need to cultivate large areas, it is better to give preference to a homemade double-furrow plow for a compact tractor. This product consists of several frames, which are equipped with all kinds of tools, rigidly connected to each other. They are used for various operations. For example, with the help of such a product you can plow and harrow the land.
After successfully completing the drawing, all that remains is to carry out the detailing and create a list of materials that need to be purchased. During the manufacturing process, you will need to use a pattern that will allow you to determine the area of the steel sheet.
Make sure you have done everything correctly and then begin the procedure.
Drawings and dimensions
Like a real designer, before starting work on creating a plow, you must create a drawing of it, because this will help you think through the device in advance, and will also make it possible to avoid mistakes during assembly. Naturally, you should keep your plow simple, requiring a minimum number of parts.
We advise you to focus on similar drawings. They are quite simple and, at the same time, they detail the dimensions of the parts and the installation location. It is very comfortable!
Any homemade plow consists of the following elements:
- A metal pipe, which will be the supporting part for the functional section of the device;
- Wheels so you can move around the field;
- The working cutting part, which can be either with or without blades. Usually you have to make it yourself from metal, but you can also use cutting parts from old devices;
- Fastening mechanism to walk-behind tractor.
Homemade metal plow for a walk-behind tractor according to the drawing.
Starting a walk-behind tractor
Every time before starting the engine, the oil level and the amount of fuel are checked - a lack of both can damage the engine. The diesel engine is fueled with seasonal diesel fuel (for warm or cold seasons). Before starting, you should check the operation of the clutch and steering wheel. Movements in systems occur with a certain force.
To start the engine, you need to use an electric starter to free the tubes from air, which will subsequently be filled with diesel fuel. When starting manually, it is necessary to allow access to fuel, produce gas and pump the starter a certain amount. The decompressor returns to its original state, and the engine starts.
For two-stroke engines, gasoline is used (the proportions of dilution with oil are indicated in the instructions). To start the walk-behind tractor, you should open the gas tank, point the handle to “start”, and move the starter several times without turning on the ignition. And only then turn on the ignition to start the engine. Next, the handle should be on o.
Video: do-it-yourself plow for a walk-behind tractor
The video talks about converting a plow into a walk-behind tractor.
https://youtube.com/watch?v=tTlKqKDqTyE
Thank you for providing the dimensions uv.Harahondya, but as we build the detailing, there are still some uncertainties in the sizes of some parts, if you can, fill in the gaps: wheel diameter D - mm, sharpening angle of the plowshare knife
What program are you building in? Judging by the photo, the indicated angle is not 25* but 15*. After construction, share the drawings. From the PDF that the Second World War posted, take the field board. Or rather, insert Zykov into your version in a similar way. Attach the stand to it. The heel can be placed further, it will only be more stable.
plowshare knife sharpening angle
Yu-405; I-250; b-365; Angle - 16 degrees; Ch-45; S-13; M-18.
And in what plane do you measure it?
I can’t understand how such distortions in the photo can happen? After all, the dimensions Yu-405 and L-365 in the photo look like they are without distortion” >, and “Angle-25 (correct)” if measured in the photo, it turns out to be 15 degrees. Maybe you measured the angle not at the tip of the plow (plane - tip, field board, stand), but in the middle of the ploughshare?
Nobody says he's perfect. I posted it in the topic because... It was not among those posted earlier. But the discussion turned out like in the joke about sex on Red Square. In your particular case, yours is ideal, and congratulations!
2Alvis Have you been missing for a long time? How is work on the plow going?
Now it’s becoming clearer, it’s about the same as with hilling discs » > ? But the ploughshare is sharpened from below, IMHO " > . Something is wrong again.
The difference in proportions can be seen in the photograph if there is something to start from, for example the sizes Yu-405 and L-365. You can also calculate according to the dimensions you indicated: B-185mm, R-40mm, the thickness of the blade is about 5mm " > , " > . We get the tangent of the angle equal to 45/185 = 0.243. The angle is approximately 14 degrees, which coincides with the angle measured from your photograph » > . So, there is no need to put photos below the drawings, IMHO.
Thanks for your comments. I found a protractor and remeasured it. Posted above: » > and » > edited. My apologies.
Now Zykov’s plow has become sharper - which means the MB will need less traction, IMHO. But it's better to sleep at night. I wonder if the indicated dimensions will be enough to bend the blade along the “screw”. Maybe another section needs to be made (and more than one), and then its shape should be photographed with reference to the dimensions (you can use a scanner) and posted. Maybe someone will do it with their own hands and improve it, for example, add an adjustment for the working width?
Can. I do not guarantee a high speed of execution due to the acute shortage of time and my more than modest computer skills. Think over an algorithm for solving the problem. In a personal message, please leave your phone number or ICQ. This mode of communication has its advantages. You can come to me (110 km) and do the work yourself. The decision is yours.
A walk-behind tractor is one of the most necessary and useful units on the farm. It is used for a variety of jobs on the site. This technique can significantly simplify many business procedures. Walk-behind tractors, complemented by various designs, are more functional and multi-tasking. For example, this could be a technique with a plow. The latter can be bought in a store, or you can build it yourself. It must be done following certain rules.
Popular models
When the user chooses the type of plow that he is going to use, he should take into account not only the type of land, but also take into account the characteristics of the problem that needs to be solved. The power of the walk-behind tractor and its dimensions also matter. The model, which received the name in Honor of the underground animal, “Mole”, refers to the plows of the single-hull version. The total weight of the structure is 8.5 kg, the depth of soil treatment is 200 mm.
Such suspended equipment can be used with the following types of walk-behind tractors:
- "Neva";
- "Agate";
- "Cascade";
- "Plowman";
- "MB-2";
- "Oka", etc..
On average, the Single-hull “P1-20/2” can sink into the ground to the same depth. The weight of the structure is the same, but more. Suitable for most of those walk-behind tractors that are listed above.
“P1–20/3” achieves a cost of 1,500 rubles. Its weight is greater than that of previous models and is 13 kg, the greatest depth of immersion in the soil is 250 mm.
It is best to use it with the Belarus and Agros walk-behind tractors.
The Salyut single-hull plow has a very light weight; for a similar product it weighs 8 kg and can penetrate 200 mm into the ground, but despite this its price is on average 1.5 thousand rubles.
The Zykov plow weighs slightly more, generally per kilogram; it has a penetration rate into the ground of up to 25 cm. It is used on the Salyut, Oka and similar vehicles.
The weight of a reverse plow for walk-behind tractors GS 81, 101 is 12–18 kg, with all this, the maximum that it can penetrate into the ground is 25 cm. It will cost the consumer more than a double-turn plow: it is estimated by manufacturers from 4 thousand rubles, with a weight of 15 kg and plowing depth of 20 cm.
The heaviest and most expensive is the rotary plow. It is quite difficult to lift and install for one person, since its weight is 40 kg, but these inconveniences are compensated by the increased immersion depth, which is 300 mm. The price of such a product is from 70 thousand rubles.
All the described plows are made of metal, the horse plow can be partly made of wood, it only has an iron coulter. It is used more often, from time to time it is hung on a walk-behind tractor either with a changeover or with a skimmer.
Disk
The disc-type plow is used for hilling and cultivating moist soil. It is distinguished by a small depth of processing.
How to make it yourself
To create a device you will need a prepared workplace. Bring the following tools and parts there in advance:
- rollers;
- tool for cutting metal sheets;
- tube (preferably with a square cross-section and a fairly thick layer of metal);
- welding machine;
- ploughshare;
- screws, nuts;
- 5 mm alloy steel sheet (this type of material can withstand loads much better, so it is recommended to use it);
- 3mm metal sheet.
It is worth saying that those people who have certain skills in working with metal should start making their own plows, since this is a rather difficult task that requires experience.
You will need to cut out the ploughshare, blades, wedges and other parts yourself using your own drawings or drawings found on the Internet. It is worth warning that, first of all, it is necessary to adhere to safety precautions so that the work is not only productive, but also harmless!
Rotary
First, let's look at how to make a rotary model of a plow, which is the simplest version of a device for working with the ground. This unit is ideal for small areas, as its productivity is not too high. You can also use a plow for the Mole walk-behind tractor. But even beginners can handle its assembly.
To do this you need:
- First, make a cylindrical moldboard (if you choose this option for the cutting edge of the plow). Do this strictly according to the alloy metal drawings. This is why the drawing is so important, because it allows you to confidently perform painstaking and hard work with metal;
- Next we need to install the plowshare. To do this, insert wedges into a 3-mm metal sheet at an angle of 45 degrees;
- then you will need to connect the plowshare to the side shield. Make sure that the blade of the ploughshare is approximately 1 cm below the shield;
- after this it is necessary to attach the blade to the ploughshare;
- Next, to the metal pipe, which serves as the basis for the plow, the working part with the ploughshare should be welded on one side, and the mount to the walk-behind tractor on the other.
- After you have a plow, you can weld an axle with wheels from the bottom, or attach the moving parts in some other way.
https://youtube.com/watch?v=4OLkSpsd9oc
Negotiable
Let's consider the most functional model of a plow that you can make with your own hands. The rotary plow will be an excellent assistant when plowing the land, thanks to its fairly large processing area.
In addition, you do not need to waste time after each pass; you just need to turn the device around and go in the opposite direction, and the plow will work as intended. After all, the furrows also turn in the direction of movement. That is, productivity will increase by 2 times.
So, you perform the basic actions in the same way with a rotary device, however, this time the cutting edges should be 2 cm below the runner.
Be careful and make sure that the edges of the plowshare and the blade match; these parts should be attached to each other as tightly as possible so that there are no gaps.
After this, the elements are welded to each other, which gives the plow excellent strength and reliability.
Types of equipment
There are three main types of plows on the market today:
- • single-hull;
- • reverse;
- • rotary.
The single-body plow for a walk-behind tractor is equipped with only one share and is designed for cultivating light soils. A similar plow for a walk-behind tractor can also be used for the Neva. As a rule, this option is suitable for owners of ordinary garden plots. When heavier soil, and especially virgin soil, needs to be processed, such a plow will not be suitable. In this case, you should choose a more powerful plow to work with a walk-behind tractor.
A reversible, or as it is also called a reversible, plow for a walk-behind tractor (rotary plow) is designed for plowing fairly hard and tough soil.
The principle of operation of a rotary plow for a walk-behind tractor is that an upward-curved ploughshare turns the ground. The shape of the ploughshare is feather. The reversible plow is compatible with most mid- and heavy-duty walk-behind tractors. It is good to use this plow for the MTZ walk-behind tractor.
Rotary plows have several cutting blades. They are quite productive and easy to use. The rotary plow is used for medium and heavy walk-behind tractors. This plow can easily be used with a Centaur walk-behind tractor instead of cutters.
When purchasing a plow for a walk-behind tractor, you should not forget that, most likely, it will also need a universal hitch that will allow you to connect it to the unit
It is important to remember that before purchasing a plow, you should carefully read the documentation supplied with it, so as not to encounter incompatibility between the equipment and the walk-behind tractor. Working with a walk-behind tractor with a plow is quite easy and does not require special training.