For owners of private houses and summer cottages, a motor cultivator is not only a useful gardening assistant, but also a universal invention that can perform a lot of other tasks. With a little imagination and effort, you can turn the unit into a means for clearing snow from the area. But before that, you need to figure out what a cultivator for snow removal is and how long it will take to make the structure at home.
Operating principle of a snow plow cultivator
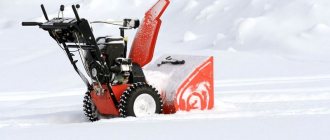
Cultivator snow blowers are popular because they can be used to throw snow masses the greatest distance. Sometimes it reaches 12 meters. This snow blower has a standard metal body, inside of which there is a rotatable auger shaft.
The removed snow is picked up by the auger shafts and gradually moves to the impeller. There, snow masses are removed by blades into the internal compartment of the system, and then removed through a special pipe.
Snow is thrown over a long distance due to powerful shocks, which are ensured by the presence of reliable adapters and belts in the system. To activate the operation of the device, it is necessary to connect two shafts (walk-behind tractor and snow blower) through a belt drive.
Making a rotary auger snow blower for a walk-behind tractor with your own hands
To independently manufacture a mounted homemade auger snow blower (auger rotor), you need to think about the placement of the main elements of the equipment, as well as link the dimensions to the existing walk-behind tractor. Therefore, first of all, a layout diagram of the device is created.
It is important to develop a mechanism for transmitting torque from the power take-off shaft to the actuating elements of the snow blower
Necessary materials
To make an auger-rotary snow blower, you need to purchase:
- roofing galvanized sheet, it will be used for the manufacture of auger and rotor housings, as well as a snow ejection pipe with a deflector;
- an equal-field corner of 40 or 50 mm, it will be used to make the frame;
- a sheet of steel 2 mm thick, from which the auger and rotor blades will be cut;
- a profile pipe will be needed to make brackets;
- bearing housings and the bearings themselves for installing the shaft;
- a pipe or circle with an outer diameter of 30 millimeters or more will be used as shafts;
- pulleys, sprockets and other transmission elements;
- hardware for creating detachable connections.
Making a homemade auger-rotary snow blower
An approximate procedure for manufacturing a mounted auger rotor for snow removal:
- Parts of the auger body are cut from roofing sheet. They are bent according to a suitable cylinder. The frame of the auger body is welded from a rolled angle or profile pipe. The body and frame are connected into a single unit.
- Screw parts. To do this, segments are cut out of sheet steel, and then blades are formed from them. The auger shaft needs to be adjusted to accommodate the installation of bearings, so on a lathe the surface is machined to fit the fitting size of the supports, as well as transmission elements. The blades are welded to the shaft, forming an auger converging towards the center.
- The bearing housings and the bearings themselves are installed. The auger element of the snow blower is being assembled.
- The housing of the snow removal rotor is cut out of roofing sheet metal. Using suitable items, the final shaping of the rotor housing is carried out.
- Rotor parts. Rotor blades are cut from sheet steel. The rotor shaft is adjusted to accommodate the installation of bearings and transmission elements. The blades are welded to the rotor shaft.
- Balancing is necessary, since the rotor rotates at a fairly high speed.
- The frame of the rotor housing is welded from a corner or profile pipe. The bearing housings and the bearings themselves are installed. Assembly: the rotor assembly is assembled.
- A homemade frame is made on which the rotor and auger assembly will be placed.
- The working part of the machine is being assembled. Transmission elements are installed.
- Brackets are adjusted to connect the working tool to the walk-behind tractor.
- Bench tests are carried out, based on the results of which defects and shortcomings are determined. After eliminating the shortcomings, they begin testing the auger-rotor type snowblower under operating conditions.
All that remains is to use the manufactured rotary snow blower on the walk-behind tractor for its intended purpose.
Necessary materials
To make a full-fledged snow blower from a cultivator, you should select all the materials and tools from the following list:
- Keys of various diameters.
- Bolts and nuts.
- Drill.
- Bulgarian.
- Several screwdrivers of different diameters.
- Hammer and file.
- Pliers and vice.
- A hacksaw powered by electricity.
- Various chains.
- Welding machine.
- Metal sheet (roofing iron).
- Profile pipes of several varieties in size.
- Plywood.
- Conveyer belt.
- Metal corners.
- Closed bearings.
If you do not have so many necessary tools, then we suggest you assemble a lightweight version, namely a manual snow blower with your own hands.
Sheet steel shovel
Some craftsmen prefer to use new material rather than used elements. This way you can assemble a homemade blade from an iron sheet 3 mm thick. To strengthen the device, you can use a steel strip with a thickness of at least 5 millimeters.
Then a rotating device is created. It is an eye with a hole for the axle. The eye is fixed by welding to a corner that is attached to the shovel. The axis is fixed on one edge of the pipe, and the other edge is fixed on the walk-behind tractor. The required degree of rotation is fixed by a cylindrical rod (dowel). 3 millimeters is a small thickness, which means it needs to be strengthened. Cut a strip of 850x100x3 mm from a sheet 3 mm thick.
You can fix it with bolts, but you will need to drill or weld the strip first.
To carry out the work you will need:
- sheet metal;
- angle grinder with discs;
- electric drill;
- set of drills;
- bolts with self-locking nuts (with plastic inserts);
- welder with electrodes;
- wrenches;
- profile or round pipe.
If you have the necessary abilities, the work is not difficult. And the created device can be used not only in winter, but also in summer. Improve the site after completion of construction and installation work, plan the area for a children's sandbox, etc. What type of construction to choose is up to you to decide.
To learn how to make a blade blade for the Neva MB-2 walk-behind tractor, see the video below.
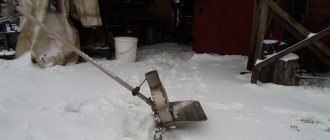
Instructions
- The snow blower frame can be made from metal corners using the welding method. The pipe, which takes up about half an inch, can be secured and used as a handle in the future. The auger shaft can also be created from pipe, but it must be three-quarters of an inch long.
- A through cut should be created in the middle part of the pipe, that is, a straight line should be cut. It is necessary to install a metal plate, which in turn should have the following dimensions: 12 by 27 cm. This metal plate is often called a spatula.
- It is necessary for throwing away snow. Performs this function by rotating the shaft during operation of the device.
- When snow hits a snow blower, it does not immediately reach a place where it can be caught by the shovel. It should be pushed towards this element by a two-threaded auger. To create it, you can use the sidewall of a tire or a conveyor belt 1 cm thick.
- You need to stock up about half a meter of this tape, then cut 4 rings from it with a jigsaw, 28 cm in diameter.
Engine platform - It is necessary to attach the platform of a quick-detachable engine, which can be taken from a walk-behind tractor, to the structure. To do this, attach metal corners to the pipe by welding. They need to be placed perpendicular to the plate.
- The shaft should fit easily into sealed bearings. To do this, you need to saw through the material at its ends several times and then tap them. If this action is carried out correctly, the diameter of the shaft will decrease slightly. You should also create free space for the key, so you need to make a groove on one side of the shaft.
- For smooth and fastest movement in the snow, it is advisable to leave the device without wheels. It is appropriate to replace them with skis. Making them yourself is very easy. It is enough to cut out the bases from wooden blocks.
- Plastic strips should be attached to them so that the structure slides as smoothly as possible. You can also save on these elements by replacing them with special boxes, often used when installing electrical wiring.
- The snow is thrown away directly due to the rotary chute. At home, it can be made from a sewer pipe whose diameter is greater than or equal to 16 cm.
- To attach the rotary chute to the base, you should connect a pipe with a small diameter to the auger, and weld this structure to it.
- The rotary chute, in turn, is equipped with a small section of sewer pipe, which acts as a regulator of the direction of movement of snow masses during discharge.
- When arranging the structure, it is necessary to ensure that the width of the auger blade is necessarily smaller than the diameter of the chute.
- This way you can ensure free removal of the snow mass without delays or clogging of the working hole.
Painting a snow blower - To make the structure look aesthetically pleasing, it is enough to paint it. Do not neglect the need to paint all the details. It is advisable to choose bright paint; you can also use your imagination and make designer ornaments on the snow blower.
- When all work on the manufacture of a snow blower is completed, the product should be tested. From now on, the device is completely ready for use and can be actively used throughout the winter period.
The simplest DIY snow blower Mole
This type of design is carried out with a factory walk-behind tractor engine. It is advisable to create drawings of suitable parts in advance, indicating their parameters, so that in the future there will be no problems with preparing original samples.
For more details, watch the video below:
If the process you saw seemed a little complicated to you, then click here and you will find a more detailed description of how to make a snow removal attachment for a Mole walk-behind tractor.
To make a simple snow blower with your own hands, you need to have a TV-6 lathe, sheet steel and a welding machine. You don’t have to purchase a lathe, but in this case you will have to order all the parts from a professional lathe.
Homemade circular sawmills are very popular among site owners, because they can easily cut a log of any thickness.
The Shacman dump truck from the Chinese manufacturer costs much less than its counterparts, but does its job no less efficiently. Find more detailed information here.
You will find useful tips on how to choose a gasoline lawn mower here //machinspec.com/kommunalnaya/kosilka/vybrat-benzinovuyu.html.
When creating a snow blower with your own hands, you need to take into account that its main part is the auger. To make it, you will need a pipe with trunnions on both sides. Eight half-disks should be welded to the structure, which in turn are cut from sheet steel 2 mm thick. You will find more detailed information on how to make an auger for a snow blower with your own hands in this article.
With their help, a kind of double-sided spiral is formed. All contact points between the rings in the spiral must be thoroughly welded to avoid deformation of the product.
Auger spiral
The auger spiral can be welded not only from separate half-rings, but also from two parts. To do this, you need to cut the elements on each side, wrap them and fasten them so that you get a full-fledged spiral.
If creating an auger is difficult or a person does not want to make it with his own hands, you can use a ready-made device. The best option would be an auger left over from old agricultural equipment, but in good condition.
To activate the rotation of the auger, ball bearings No. 203 will be required. The housings are made in the form of cups made of aluminum AMgb or AMg3. They should be attached to the sides of the snow blower using MB bolts, tightened with suitable nuts. With this design, snow will be fed to the rotor.
The rotor itself operates inside a drum, which you can make yourself from an aluminum boiler with a capacity of 20 liters. It must be fastened to the front wall of the equipment housing using 4 mm rivets. The mechanism works very simply: snow falls into the drum and is then thrown by the blades to a distance of 3-5 m.
The range of departure of the snow mass depends on the parameters and quality of the internal configuration of the device).
An important aspect is the creation of torque, which must pass from the walk-behind tractor to the design of the snow blower. In a walk-behind tractor, torque is transmitted from its engine to a shaft, which must be connected to the shaft of the snow blower.
For this, a V-belt connection is used.
To organize this mechanism, it is necessary to select an A-100 belt, as well as a pulley adapted for it.
The standard snow blower body is made of steel sheets 2 mm thick. The corners are made in a proportion of 2 by 2 cm. They should be fixed with rivets 4 mm in diameter; the structure can be strengthened using M4 screws.
It is advisable to place the structure not on wheels, but on skis, since with their help the snow blower will not only move easier and faster, but the owner will also be able to control the height of snow clearing. However, if you have enough finances for the unit, then it’s better to take a closer look at the Champion 656 self-propelled gasoline snow blower, which will make the work much easier and make it safer for you.
Making a dump shovel from a gas cylinder
Another available means for making a dump shovel is a gas cylinder. For this event you will definitely need a detailed diagram. It must indicate the parameters of the spare parts used and the order of their installation into a single structure. The creation work takes place in the following order.
- Release excess pressure from the cylinder, if any.
- Cut off both edges of the lid so that the width corresponds to one meter.
- Cut the resulting pipe into 2 halves along the length.
- Using a welding machine, connect these 2 segments so that the height of the blade is approximately 700 millimeters.
- The mounting holder is made like this. Cut a scarf from thick iron. Make a series of holes in it to rotate the blade in different directions. Weld a piece of pipe to the gusset.
- Weld the prepared product to the snow dump at the level of the holder location on the walk-behind tractor.
- Installation is carried out using a cylindrical rod.
The thickness of the walls of the cylinder is sufficient; there is no need for reinforcement. However, the bottom can be equipped with durable rubber, which will remove loose snow and not damage the compacted road. To do this, you need to take hard rubber from rotary conveyor lines.
The width of the rubber strip is 100×150 mm. Using an electric drill, make holes in the shovel to secure the rubber. To thoroughly fix the rubber strip, you need an iron strip 900x100x3 mm. Drill holes in the metal and rubber, marking each one with a shovel in advance. Secure with bolts.
Helpful Tips and Warnings
All bearings used must be sealed. This will help eliminate the risk of snow getting on their surface. Some materials can be purchased at an auto store. They are especially important for driving the auger using a chain and belt.
This requires the following elements: bearings, pulleys and belts. To use as little force as possible when clearing snow, you need to mount the snow blower on skis, as they glide best on a flat surface. If you are interested in building a unit from scratch, we advise you to follow this link, which contains a diagram of a DIY snow blower.
Snow blower skis
Using a rotating chute, you can adjust not only the direction of snow ejection, but also the distance over which it is thrown. It is its length that influences how far the snow will fly. When working with a walk-behind tractor, you need to pay special attention to its internal structure.
Each time it is necessary to check for blockages, and also immediately seal all kinds of holes through which snow or other elements can get into the internal structure of the system.
How to completely clear snow with a cultivator with brushes
Newly fallen snow or remnants of snow masses after removing large accumulations of this precipitation can be easily swept from asphalt or other surfaces using a suitable attachment on a snow blower. To completely remove snow, brushes with increased rigidity and the ability to constantly rotate are suitable.
This type of snow blower is especially important in those areas where the paths are equipped with decorative coating, which changes the appearance for the worse if it is not promptly and completely cleared of snow.
Also, a rotating hard brush helps remove snow gently, that is, it does not injure or deform the coating during operation. Such a brush is usually mounted under a canopy, directly under the rotating shaft.
With the help of such a brush, snow removal is carried out not only efficiently, but also quickly. In one pass, you can completely eliminate snow from an area of more than 1 m. The grip angle can be adjusted to suit the worker. There are three options for brush placement: left, right and center.
Rotating wands
Attachments in the case of using a rotating rigid brush can also be easily used to improve the comfortable conditions when clearing snow, since the height of the brush can be adjusted at your discretion.
How to deal with large snowfalls?
If the snow is already wet or has been lying there for a long time, then it is impossible to completely remove it with hard rotating brushes. You will need a special snow shovel. It has a suspended design and is equipped with special knives that simplify work.
If you use such an attachment to a walk-behind tractor, from a distance it will look like a small bulldozer. In terms of technical capabilities, there are also undoubted advantages: loosening a layer of snow with subsequent capture and transfer to the dump is very simple.
Special snow blower shovel
The bottom edge of the shovel must be covered with a rubber band. This helps protect the road surface and the device itself from possible mechanical damage. The snow shovel is attached to the device using a universal hitch. At a time, the surface is cleaned 1 m wide.
During operation, it is possible to install the blade vertically and also move it in 3 directions. A walk-behind tractor that works with such a shovel can move at a speed of 2-7 km/h. Do not forget that this unit is designed for the Mole walk-behind tractor, but if you do not have this device in your arsenal, you can purchase a snow blower for the Neva walk-behind tractor, which is much more common in our country.
How to convert a snow blower into a cultivator
It is very common to find a two-in-one cultivator together with a lawn mower or other equipment. If this is a factory option, for example, a unit was assembled based on a walk-behind tractor, then this will require changing the main parts for securing the attachment and installing the required parts.
Important! Not all walk-behind tractors allow the use of various snow removal equipment as additional attachments. The same applies to mowers. But most domestic walk-behind tractors are easy to move and allow you to install a universal adapter.
In fact, to convert a factory or semi-factory version of a snow blower into a cultivator, it is enough to remove all additional elements, the equipment itself and adapters. After this, the cultivation equipment is installed. This is suitable even for low-power units.
If the snow was removed using homemade equipment, then you will need to remove some of the spare parts that were installed according to the drawings. After this, the drive switches to the newly installed equipment, but of a cultivation nature.
In this video we will look at how to make a snow blower from a trimmer:
Important! For factory models, there is a different conversion scheme, since it already takes into account various nuances regarding the characteristics and features of each specific manufacturer.
In this case, you must act according to the instructions:
- a proposed drawing of the cultivator is created;
- the nature of connecting attachments of another type is schematically drawn;
- Next, it is necessary to draw up a plan for phased collection, since it may be necessary to use adapters and lengthen the frame of the equipment;
- the unit is disassembled;
- the engine is left on the frame, which is extended or expanded if necessary;
- a connection is formed with new parts of the cultivator, in particular with cutters or other elements;
- a universal hitch is installed;
- an adapter is used if necessary;
- The cultivator is assembled on the basis of the base;
- Along the way, all systems are being connected;
- After assembly, the equipment is checked for quality during running-in.
This plan is standard for converting equipment into a cultivator. It is worth considering that most snow-removing walk-behind tractors do not need this, since in their case it is enough to change and reconnect the attachments.
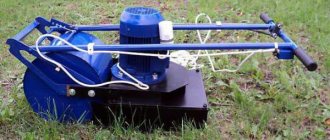
A simple and reliable scooter with a petrol trimmer motor
Greetings to all DIY enthusiasts, I offer for your consideration instructions for making a simple gasoline scooter.
The author used the motor from a gas trimmer; you can buy a reduction gear for it, on which a sprocket is installed for a chain drive. Such gearboxes are called t8f gearboxes and can be ordered from China. The author used wheels from a bicycle; the homemade product accelerates to 40 km/h, which is quite enough for such a light and small piece of equipment. Of course, if you twist the carburetor, you can squeeze higher power and speed out of the engine. If the homemade product interests you, I suggest you consider it in more detail! List of materials:
- motor from a lawn mower; — gearbox t8f; — profile pipes; - chain and sprockets; — wheels from a bicycle and parts of the frame; — sheet metal for the floor; — steel plates; - bolts, nuts, plastic ties, etc. List of tools:
- welding machine; — grinder (angle grinder); - drill; - paint for metal. Homemade manufacturing process:
Step one. Drive sprocket installation
We place the driven sprocket on the rear wheel, it is welded tightly. Similar sprockets can be ordered from China along with chains. As for coasting, we have a centrifugal clutch for this.
Step two. We cut the material and weld the frame
The author also welded steel plates to the frame, which will be needed to mount the engine. The author used a ready-made steering system; for this, the front part of the frame was cut off from an old bicycle.
Step three. Installing the engine
The torque from the motor shaft is supplied to the T8F gearbox, and it already reduces the speed and, having increased the torque, transmits it through the chain to the rear wheel. As a result, the scooter turns out to be quite high-torque, but not very fast. Well, here you can already play with gear ratios.
Step four. Seat and frame modification
We weld all the open ends of the pipes to prevent dirt from getting there, and clean everything well with a grinder.
Step five. Painting, assembly, testing
The scooter is ready, start the engine and you are good to go. The homemade vehicle accelerates without problems and coasts beautifully. Of course, the driving speed is low, but for safe driving, which brings pleasure and benefit, this is quite enough.
This completes the project, I hope you liked the homemade product and found useful thoughts for yourself. Good luck and creative inspiration if you decide to do this again. Don't forget to share your ideas and crafts with us!
Become the author of the site, publish your own articles, descriptions of homemade products and pay for the text. Read more here.
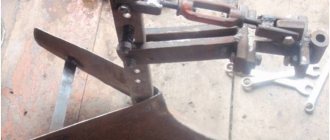
Design Features
First, let's define the design itself. A walk-behind shovel is a curved working surface that consists of the following elements:
- rigid frame;
- stiffeners;
- curved steel sheet 2 mm thick;
- heels (2 pcs.);
- knives (metal and rubber).
A metal knife is used for excavation work, when it is necessary to level the ground, etc. In cases where areas are cleared of snow, debris, etc., a rubber knife (gentle) is used, which will protect the nozzle itself from damage upon contact with solid covering, and pavement (tiles, asphalt, concrete).
Blade shovel
A standard shovel is 100 cm wide and 40 cm high.
There are two types of walk-behind blades, which have some visual differences in their design:
- Blade shovel.
- Ladle.
A shovel blade for a walk-behind tractor is intended only for clearing areas of debris, snow, and is used for leveling crushed stone, soil and sand. The bucket is closed at both ends with welded plates, so in addition to the actions already described, it can also be used for loading the same sand, earth, snow, garbage, etc.
We invite you to look at the photo, which shows how a shovel differs from a bucket:
Installation type relative to walk-behind tractor
Due to the relative simplicity of the design, relatively low weight (up to 16 kg) and great functionality of the work performed, the dumps can be attached to both medium and heavy walk-behind tractors.
Depending on the design of the walk-behind tractor itself, the canopy can be attached to:
- to the front;
- behind the motorized device, taking into account that the steering column of the latter rotates 180 degrees around its axis.
Location of the working body
There are two types of dumps:
- adjustable (rotary);
- unregulated.
Rotary blades are universal, as they allow you to set the required angle of attack:
- right tilt;
- left tilt;
- direct installation.
Non-adjustable canopies are rigidly fixed in the position required by the operator (straight, right, left) and are not subject to adjustment.
We invite you to watch a video of a walk-behind tractor using a straight and rotary blade:
Types of hitches for walk-behind tractors of famous brands
The hitch is an indispensable device that comes complete with a walk-behind tractor, which allows you to aggregate various attachments. Depending on the brand of walk-behind tractor and its design, the configuration of the hitch itself also changes. In addition, hitches are also adjustable (angle of attack, horizontal) and non-adjustable.
Screw option
A device with a blade has drawbacks, and the main one is the waste of time and effort to remove the layer of snow picked up by the blade. Often it is left right next to the road, creating high snowdrifts, which is not always acceptable.
The version of the snow blower with an auger will allow you to get rid of even roadside sediment, because its design provides for the throwing of the captured mass over a distance of several meters. This will help clear the yard or street completely, leaving the piles next to the fence.
This option is welded or screwed from the front to a frame with wheels, which can be removed from an old wheelbarrow, for example.
Another design is a wheelless version, controlled by a tube. The body is mounted on a frame made of angles, from the bottom of which skis are screwed.
Main components and materials of both options:
- box - welded from sheets of metal;
- central shaft - is a ¾-2 inch pipe;
- gripper (scapula) - iron plates or pieces of channel;
- supporting elements;
- auger - made of rings or tape;
- motorcycle sprocket;
- ski made of plates or pipes;
- frame made of corners;
- bearings;
- a pipe for throwing out snow - you can take it from the stove.
Screw assembly sequence:
- 4 rings and 6 support plates are cut from roofing sheets or other metal.
- Six strips are placed on the shaft and welded to it at an angle of 90°. Then the sprocket is strengthened and the bearings are pressed in.
- Two blades made of plates are inserted between the middle guides. They are welded to the shaft and to the supporting elements. If pieces of channel bars are used as gripper blades, they are rotated 180° relative to each other.
- The rings are cut, bent and welded so that two intersecting spirals are obtained.
You can straighten them in two ways:
- Clamp the middle part in a vice, grab one edge with pliers and pull it to the side. Do the same with the other end.
- Weld one edge to the support element at the blade and stretch it.
If the rings are made of thick material and it is difficult to grasp them with pliers, then you can use two clamping devices, such as a vice.
After making the auger, a sheet of metal is laid out and the box is welded. A hole is cut out in its middle part for a pipe to throw out snow. You can make it yourself or use one already prepared from an iron stove. Some craftsmen use plastic ones.
Then a rectangular hole is cut in the body opposite the sprocket to allow the chain to pass through. The box is installed on a frame with runners or wheels and the chainsaw is strengthened.
Manufacturers rating
Russian brands are considered the most popular: finding components is not difficult on the domestic product market.
Company rating:
- Husqvarna;
- "Patriot";
- Champion;
- MTD;
- Hyundai;
- "Firework";
- "Megalodon";
- "Neva MB".
Husqvarna
The equipment is equipped with a powerful engine fueled by AI-92 gasoline; the snow throw distance is from 8 to 15 meters. The snow blower copes with compacted masses, wet snow, and can withstand operation at low temperatures. A special feature is the reduced level of noise and vibration during use of the unit.
The equipment is intended for work on private property and in local areas.
"Patriot"
The model is equipped with an electric starter that allows you to quickly start the engine with power from 0.65 to 6.5 kW. The dimensions of the equipment allow cleaning in narrow passages with a width of 32 cm.
The design of the device easily cleans compacted snow. The auger is rubberized, making it easier to work with the surface being processed, and does not leave marks on the working surface. The nozzle is made of plastic with the ability to correct the angle of snow ejection.
Champion
The machine is assembled in the USA and China, the quality of the equipment remains at a high level. The nozzle in the form of a bucket clears areas of fresh and icy snow and compacted snow deposits. A spiral auger is located inside the bucket.
The equipment is equipped with protective skids and tires with large, deep treads that provide excellent traction on flat and inclined surfaces. The model is equipped with a powerful engine (up to 12 kW), with speed control functions that allow you to save gasoline while cleaning the local area.
MTD
This equipment is represented by a wide range of models designed for small and large cleaning areas, coping with various types of snow cover.
Various design features affect the pricing of snow blowers. The rotation angle of the plastic nozzle reaches 180 degrees. The gearbox is made of a cast housing structure, the auger with teeth is made of high-strength steel. The wheels are equipped with self-cleaning treads, which reduces the possibility of equipment slipping.
Hyundai
This technique is more suitable for cleaning large areas. Available in a wide range of models and various modifications.
All products cope with the tasks of cleaning surfaces even at –30 degrees. In addition, it has excellent maneuverability and efficiency.
"Firework"
The mounted nozzle copes with work at temperatures from -20 to +5 degrees. It is used only on flat areas of land and is available in two models, the differences of which lie in the method of fixation to the walk-behind tractor.
Among the control functions, it is possible to adjust the range and direction of snow emission.
"Megalodon"
Russian-made equipment. It is equipped with a toothed auger that crushes the snow from the edges to the middle and transfers the mass to the nozzle. The direction and range of the ejection are adjusted using a screen; the height of snow removal depends on the placement of the skids.
Innovations and modifications:
- the chain is located outside the working area and is protected by a casing, allowing for quick replacement;
- the screw is manufactured using laser processing, which improves the quality of the material;
- lighter body weight;
- increasing the service life of belts due to the alignment of the pulleys.
"Neva MB"
The attachment is attached to various models of walk-behind tractors based on the engine power of the equipment, which affects the lack of versatility.
- "MB-compact" copes with freshly fallen snow in small areas. To achieve the best results, the use of lugs is necessary.
- "MB-1" is capable of crushing wet and rough snow. Best suited for cleaning medium-sized areas, parking lots, sidewalks.
- On the MB-2, the nozzle removes all types of soft and deep snow masses. Universal for any area. When cleaning asphalt or concrete, you should use standard wheels, and when cleaning soil, use lugs.
- "MB-23" copes with the removal of all types of snow cover exclusively in large areas.
Start of assembly
To make your own snow blower, you first need to select the type of device. It is quite possible to get by with a single-stage model if the area is small. For larger sizes it is better to use a two-stage model.
You should also be aware of weather conditions. If the snowfalls are heavy and heavy, then you simply cannot do without a rotary auger snow blower. When there is very little snow in winter, you can do
the most primitive apparatus.
Rotary linkage
To make a rotary snow blower, you will need to show some skills in turning and welding. This type of hitch is also called an auger hitch, because a screw is placed on its internal bearings.
Spiral knives capture snow masses and push them towards the central part. They quickly pick up the snow and then push it out through the nozzle.
A visor is used to adjust the direction of snow emission.
Combined snow blower for motor cultivator
Craftsmen who love to invent something special have combined a rotary and a fan snow blower
into one design. The result is an effective attachment. In such a snow blower, the auger mechanism cuts off compacted and wet cover. The blades throw the snow into the nozzle, where a running fan pushes it through the sleeve with air. The effectiveness of using a combination snow blower lies in increasing the throw range.
When making this attachment, the rotary snow blower is first assembled. The output nozzle on the body is welded to a large diameter. Additionally, a ring is fixed on the side into which the rotor with fan blades is inserted. A sleeve with a rotating visor is put on top of the nozzle. The rotation of the fan and auger is organized from the cultivator engine through a belt drive. It may be necessary to install three-groove pulleys on the shafts.
Attachments for walk-behind tractor: homemade snow removal bucket and auger
The photo below shows a version of a homemade Cuznetzov snow blower, made in the form of an attachment to a walk-behind tractor.
The portal user already has a factory-made snow blower, so his thought process when creating a homemade product is interesting.
A commercial snow blower handles regular snow well. I will throw my homemade product into the “battle” of removing heavy wet or trampled snow, icy crust, which can only be broken with a shovel.
So, a homemade snow blower is intended for heavy work, for which it would be a pity to “kill” the branded unit. This determined its design:
- Open type screw made of thick metal.
- Powerful motor, gearbox and transmission.
- Big wheels.
The last two points are best answered by the drive of a snow blower - a walk-behind tractor. All that remains is to make the auger and select parts for the gearbox. The work was divided into stages:
- Making a bucket and auger.
- Bucket after painting.
- The gearbox is taken from an old Ural motorcycle.
A snow blower made by hand from scrap metal in assembled form. For comparison: next to the homemade product there is a factory (blue) snow blower.
After testing the snow blower, I can say that it takes any snow: stale, with ice, with debris, wet. Among the disadvantages: 1. The further you drive into the snowdrift, the higher the snow blower tries to climb onto it. This is due to high screw speeds and low torque. In dense, heavy snow, the auger choke and the engine of the walk-behind tractor loses speed. 2. When clearing frozen crust for the first time, I tore the right auger. The second time I bent the impeller and cut off 7 bolts. I fixed everything quickly. A factory snow blower would not be able to work in such conditions, if these were not flagship powerful models of equipment.
Conclusion: an open auger is an advantage when working on frozen snow. A motorcycle gearbox is not the best option, but it can withstand loads that would kill the gearbox of a regular snow blower one or two times.
Subsequently, Cuznetzov installed wheels with developed lugs on the walk-behind tractor and, without a shovel, made paths in the snowdrifts with a snow blower.
The user also plans to remake the bucket and remove the gearbox from it. Increase the rotor speed to throw snow further. Reduce the speed of the auger and make it and the shaft even stronger, so as not to have to straighten the metal after working on old snow.