The most effective equipment for a summer cottage in rural areas and for a country house is a walk-behind tractor. Just as a device in itself, the walk-behind tractor is useless. In order to work with it, you need attachments.
For the owner of small plots, buying canopies for his walk-behind tractor will not be very profitable. But for the owner of a large plot, the purchase of high-quality equipment will quickly pay off. But what to do if you already have a walk-behind tractor on your farm and are not able to buy additional equipment for it? The answer is simple: make attachments for walk-behind tractors with your own hands.
About the device
As mentioned earlier, mini grain harvesters are practically no different from larger combines, performing absolutely identical work.
Such units collect the ears of corn and then grind them. It often happens that it is not necessary to immediately process what has been collected. In such cases, a grain hammer crusher is used. The final process will be to clean the resulting grain from straw and other debris.
The use of this technology allows you to simultaneously perform several tasks that were previously available only to a certain type of equipment performing each type of activity.
We are talking about a thresher, a winnower and a reaper.
As for modern mini grain harvesters, they can be equipped with additional equipment that can significantly expand their functionality. In particular, with the help of such units it becomes possible, in addition to harvesting grain, to sow vegetable seeds, knit sheaves, etc.
Most models of mini combines are equipped with a seat for the operator, and some are smaller copies of large combines, i.e. their design includes a full-fledged operator cabin.
Movement is carried out using three forward gears (some models may have more gears) and one reverse gear.
There are several levers in the cockpit, each of which is responsible for a specific task.
In particular, there is a clutch lever, a gear shift lever, as well as control levers with which you can adjust the cutting height of the ears. This is a very useful feature, especially in areas with slopes and difficult terrain.
These grain harvesting units have a low-power diesel engine , which allows significant savings on fuel consumption.
This is very important for individuals who have a fairly small subsidiary farm, where large capacities are not required, but the issue of saving is always quite acute.
At the final stage, when straw and other debris are removed, the grain ends up in a special bag or tank (in larger models). As for the straw, it is discharged through a different channel, separate from the cleaned grain material.
Based on this, we can summarize the main advantages of this type of technology:
- Affordable price for a mini harvester, which is acceptable for most categories of citizens.
- Economical fuel consumption, which has a positive effect on the cost of the final product.
- The compact dimensions of the unit allow it to show good maneuverability, which is very useful in areas where there is difficult terrain.
- Ease of operation allows you not to obtain a special permit or appropriate certificate.
- Possibility of carrying out repairs directly on the job site, without transportation to a service center.
- Due to their small dimensions, these mini harvesters can be easily stored in relatively small spaces.
For more information about the operation of the mini-harvester, watch the video:
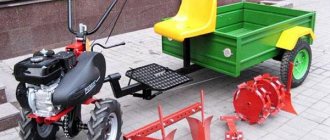
Drawings of a trailer for a walk-behind tractor
Conventionally, a trailer can be divided into several main components: carrier, frame, body, wheels.
The carrier includes several parts connected by welding. The main load here is borne by the junction of the drawbar with the body of the rotary unit, so this place is reinforced with 4 stiffening ribs.
Carrier
1
- swivel body,
2
- drawbar (pipe 49x3, L1850),
3
- footrest frame (angle 25x25x4),
4
- stop (pipe 58x4),
5
- stiffener rib (s4),
6
- trim (strip 25 ×4).
The frame is made of steel elements: pipes, rectangular and round sections, angles and rods. They are welded together and form a structure (frame), the design features of the frame are determined by the rural area, where when driving the road is replete with uneven spots, potholes, etc.
For the wheel axle, a steel rod with a diameter of 30 mm is used, which is connected by welding, gussets with side members and a longitudinal hinge housing, and corner supports. The length of the rod is 1070 mm, the length is chosen so that the wheels do not protrude beyond the contours of the body.
Trailer frame
1
- brace (angle 21x21x3),
2
- seat frame (angle 21x21x3),
3
- riser (pipe 50x25x4),
4
- seat posts (angle 40x40x4),
5.14
- front struts (pipe 50x25),
6, 15
- longitudinal spars (angle 40x40x4),
7, 8
- right wheel axle supports (angle 32x32x4),
9,16
- rear struts (pipe 50x25),
10
- reinforcing cross member (angle 40x40x4),
11
- longitudinal hinge body ( pipe 58×4),
12
— wheel axle (bar 0 30),
13.17
— transverse spars (angle 40x40x4),
18
— gussets (s4).
Trailer body - choosing material of manufacture
The trailer body is made of boards, 20mm thick, for greater strength, and at the corners it is reinforced with metal plates. The body is attached to the frame using three support frames made of 50*50mm timber and bolts.
This cart is mainly intended for transporting goods in bags, so its sides do not recline.
Also, the trailer body can be made from various available materials, sheet metal with a thickness of at least 1-1.2 mm, corrugated sheets, boards and even plastic. Any material is suitable for the body if it meets your goals and requirements. Here you need to calculate the load, type of cargo transported, etc.
— The most versatile option would be to fabricate the body and sheet metal, and to extend the life of the trailer, the metal should be primed and painted.
— For a wooden body, metal plates are installed on the corners, this gives rigidity and strength to the homemade trailer. Fastening to the frame is carried out with bolts and three support frames.
— When making a body from corrugated sheets, it would not be superfluous to install additional stiffeners.
Axle and wheels for walk-behind tractor trailer
The wheels in this trailer are borrowed from the SZD motorized stroller, the wheels come with assembled hubs, and the axle is machined to fit the landing diameter.
To make a wheel axle, you will need a steel rod 1-1.05 meters long. This length of the rod is determined by the size of our homemade trailer body. Make the corners and gussets into steel supports. Using a welding machine, weld the longitudinal hinge and side members to the steel rod using gussets and angles. The bracket axis and earrings are placed on the side members.
Wheels for a homemade trailer are suitable for any vehicle, as long as they are the right size. So, it’s quite easy to fit wheels from a Zhiguli or a motorized stroller; the latter version already has hubs with the axle diameter we need.
Those who are strong in technology claim that you can use wheels from a garden cart, the radius of which is 16-18 inches, and fits perfectly under the trailer.
The trailer is connected to the walk-behind tractor using a console, the console is made in such a way as to fit the standard hitch of the walk-behind tractor for attachments. The upper part of the console is an axis around which the carrier rotating assembly rotates in two bearings. The bearings are covered with anthers, and the space between them is filled with lubricant. Perhaps the topic “Do-it-yourself trolley for a walk-behind tractor” will be useful.
The carrier is connected to the trailer frame, pivotally, i.e. the drawbar is inserted into the tubular body of the longitudinal hinge, all this is secured with an M8 bolt and a thrust ring. On an uneven road, this allows the wheels of the trailer to be independent of the position of the wheels of the walk-behind tractor.
Carrier swivel assembly
1
- console,
2
- boots,
3.6
- bearings 36206,
4
- housing,
5
- spacer sleeve,
7
- remote sleeve,
8
- washer,
9
- nut M20x2.5,
10
- oiler,
11
- drawbar.
Types, technical characteristics and prices
For private owners
A mini grain harvester for a private owner can be called such if its design complies with
certain
parameters and conditions. In particular, the “mini” category includes those units whose header working width does not exceed three meters, unlike trailed grain harvesters.
In most cases, this indicator varies from one to two meters.
Accordingly, the simpler the design of the combine, the lower this indicator, i.e. such models may lack not only a cab, but also a seat for the operator. A header working width of two meters or more is found in mini-harvesters equipped with a seat and a full-fledged closed cabin.
Based on this, a certain classification of this technique can be distinguished:
- small mini harvesters. Such units are controlled by a person walking behind, i.e. they lack basic conditions, such as a seat. The width of the header in such devices rarely exceeds one meter;
- medium mini harvesters. The working width of the header exceeds one meter, and the unit itself is equipped with a seat for the operator;
- large mini combines. Such units are already similar to full-fledged combines; their design includes not only a seat, but also a cabin. The width of the gripper is from 2 to 3 meters. A prominent representative is the Niva combine.
The Russian agricultural market offers a wide variety of mini grain harvesters manufactured not only at domestic factories, but also abroad.
One of the most popular walk-behind tractors is the Salyut brand. You can read about his additional equipment here.
The largest mining dump truck in the world began to be produced for the first time in the USA. If you follow the link above, you can see his photo.
Chinese
In particular, Chinese units have become widespread, featuring quite good performance indicators, just like mini tractors. In this case, we will consider them in more detail, and also pay attention to some Russian models.
Chinese industry traditionally produces a lot and supplies a lot of different equipment, including agricultural equipment.
The big advantage is that you can order additional options from the manufacturer, thanks to which you can significantly expand the functionality of mini harvesters.
The DongFeng 1548 mini-harvester is fully adapted to the harsh Russian conditions, and is also considered one of the most profitable purchase options in terms of price-quality ratio. Such a unit, which is an almost exact copy of standard combines, can be equipped with additional equipment.
- total weight - 2.175 tons;
- length – 510 cm;
- width – 190 cm;
- height – 240 cm;
- power indicators - 53 hp;
- header working width – 2 meters;
- grain tank capacity – 0.8 m3;
- productivity indicators – up to 5300 m2 per hour.
The average cost of such a unit is about 900 thousand rubles.
Another Chinese representative is the Foton Gushen D180, which has a tilting cab in its design. In principle, this combine is capable of performing all the work that is required of it, i.e. mow the ears, process them, and then clean them of straw.
- total weight - 2.38 tons;
- length – 485 cm;
- width – 210 cm;
- height – 260 cm;
- power indicators – 40 kW;
- header working width – 1.8 meters;
- performance indicators - 1.5 kg per second.
The cost of this mini harvester is about 800-900 thousand rubles.
Grain harvesting equipment Farmer
The Farmer mini-harvester is equipped with one drum, and its design includes a fairly powerful engine - D 243-91. This unit shows a fairly good throughput - about three tons of grain per hour of operation. For other crops, this figure may differ, but the spread will be small.
- total weight - 4.6 tons;
- length – 850 cm;
- width – 290 cm;
- height – 330 cm;
- power indicators - 85 hp;
- header working width – 2.3 meters;
- grain tank capacity – 3 m3;
- performance indicators – 3 kg per second.
The average cost of this unit is more than one million rubles.
We create a hiller for a walk-behind tractor with our own hands
It is quite logical that owners of walk-behind tractors want to expand the range of tasks performed by the machine with the help of a hiller. But some people do not express any particular desire to spend money on this, trying to create homemade devices. Oddly enough, but they do it very well!
It is worth noting that you cannot do without basic plumbing equipment.
For further manipulations you need:
- Welding machine (arc);
- Electric sharpener;
- Gas-burner;
- Vise;
- Bulgarian. It is desirable that the device be of medium power and have a set of roughing and cutting discs;
- Drill and drill bits;
- Files;
- Mechanic's workbench.
Hiller with fixed and adjustable angle (lister)
We have already mentioned this type earlier, and now we will look at the drawings that allow you to assemble this part yourself.
The fixed type belongs to the class of the most easily created hillers. The base is obtained using a steel sheet, the thickness of which is at least 3 mm. For its formation, only high-quality materials should be used, because this unit is the first to encounter soil resistance. To create a bracket, use a four-millimeter steel strip
It is important to harden the part after the forming process. You can use a spring leaf as a field board
But first, the metal should be “released” and hardened. For the stand, it is important to choose strips with a thickness of at least 8 mm. Welding is carried out in several passes, on each side of the joint. You can create wings from thinner sheets (2 mm)
It is necessary to pay special attention to the dimensions, otherwise the joining of the base to the wings may fail. To bend the wings, you can use almost any template, even a steel pipe of suitable diameter
Concave geometry and welded seams increase structural rigidity. As for the two-row model, its layout is almost the same. You should use the drawings presented below and increase the processing speed of the parts themselves.
Hillers have managed to become an integral part of the lives of many landowners, because if earlier the procedures of loosening the soil and throwing it to the roots were carried out manually, today they are carried out with minimal physical and time costs.
How to make a mini grain harvester with your own hands - assembling a homemade device
In principle, a homemade mini grain harvester can be made on the basis of any tractor, for example, the T-40. U
These units have all the necessary components that are necessary for the full operation of the combine, i.e. sufficiently powerful engine, wheelbase, driver's seat, etc.
Due to the fact that grain harvesting is carried out in the summer, the tractor cabin can be removed for greater driver comfort.
The main essence of the modification is to add a header to the tractor structure. You can take KPKU-75, whose working width is approximately three meters, or use another one. The Internet is full of advertisements for the sale of such components, so there should be no problems finding them.
For better balancing, you need to provide some kind of counterweight (water tank or gas cylinders) behind the tractor. As a tractor, you can easily use the Terrion, Challenger, New Holland or MTZ 80 model. We wrote about the latter in detail in this article.
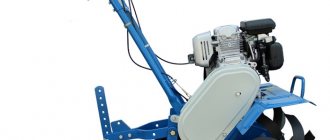
The simplest attachments for a motor cultivator
The simplest devices for a walk-behind tractor are plows, hillers, cutters, etc. Most designs are single-row. Heavier types of walk-behind tractors are also produced, including multi-row ones.
Attachments allow you to diversify the capabilities of the walk-behind tractor
The manufactured equipment for the walk-behind tractor makes it possible to increase the wheelbase and increase the stability of the couplings, making it possible to install a plow or a knife hiller. The use of a small harrow or rake, which is mounted on an Oka, Luch or Neva walk-behind tractor, allows you to work with mown crops and their remains in the ground. Mandatory devices are lugs installed on motor cultivators. With their help you can perform complex types of work: plowing or milling the soil.
Among the new models used for walk-behind tractors are potato planters, seeders, and equipment for snow and harvest removal. Mechanization allows seeding to be done at the right time. For example, attachments for motor cultivators allow you to sow small seeds and grain crops.
Using KS-1 potato planters weighing more than 40 kg, you can plant about 100–120 kg of potato crops in 1–1.5 hours. The seed material is loaded into the hopper, and then it is fed using the chain drive of the planter. Before using mounted equipment for walk-behind tractors, it is necessary to cultivate and cut furrows in the ground in advance.
You can install equipment on the walk-behind tractor that allows you to dig and collect potatoes. Tubers can be dug out of the ground using a plow. It is best to use more universal types of attachments and equipment for them, allowing for partial harvesting.
Attachments for walk-behind tractor: types and their application
Everyone knows the saying that the king is played by his retinue. Without a crowd of nobles, advisers and formidable guards, any monarch will seem like an ordinary person to you. Likewise, without the addition of attachments, the most expensive walk-behind tractor is a useless piece of metal.
We will talk about the types of attachments for this type of equipment and their capabilities in this article.
The content of the article:
Homemade products for walk-behind tractor
The question of where to start designing attachments for walk-behind tractors is quite reasonable. The fact is that almost all walk-behind tractors are equipped with factory-made trailers, designed for the use of standard types of equipment. It is necessary to clarify, however, that it is the standard equipment that does not satisfy the needs of buyers - trailed systems turn out to be too delicate and fragile when used in harsh operating conditions.
For domestic walk-behind tractors, trailers are mainly made of welded steel, but for mass Chinese production it is mainly cast iron or a metal alloy. It is clear that for one body plow even the most powerful cast iron adapter will not withstand.
Therefore, the first thing you need to create is a do-it-yourself plow towed to a walk-behind tractor. Here, it is better to take the standard design as the basis of the design - the adapter is a hinge with the ability to fix the plow in different positions, which is especially convenient for plowing small areas when a plow is used with both a left and right blade.
It is recommended that the adapter itself be made with the ability to be fixed not only in the vertical, but also in the horizontal planes using turnbuckles and bolted connections.
This option will help you use it for plowing, hilling, and for installing a seat adapter for a mower or a rake for turning hay in haymaking.
Universal trailer for walk-behind tractor
The presence of a trailer ensures mobility, because it is one thing to drive a walk-behind tractor with already installed units; it’s another thing when a plow, cutter or potato planter is simply loaded onto a trailer and transported by the walk-behind tractor itself.
You need to calculate the parameters of trailed equipment for a walk-behind tractor based on its power, the principle here is simple - 1 liter. With. means the ability to transport 100 kg of payload on a trolley. The simplest and most reliable design is a single-axle trailer with a load on the central axle. And although the carrying capacity of such a trailer is small, only up to 500 kg, this is quite enough to install a seat on the trailer and operate a walk-behind tractor while sitting on the trailer.
The most difficult thing here is to select the necessary components. It's easiest to use ready-made parts. For example, a do-it-yourself hub for a walk-behind tractor is made from an automobile hub for passenger cars. This allows you to use standard car wheels and tires for the equipment of the unit. On the other hand, a hub from a VAZ classic is perfect for making other useful homemade products - lugs, winches, wheel weights.
For the trailer, a structure made of a rectangular pipe is mainly used, but a channel and an I-beam can be used as a frame base. It is better to provide removable sides for the trailer. It is preferable to immediately provide for the possibility of installing several types of sides on the platform:
- wooden or metal for transportation of bulk cargo;
- light, mesh for harvesting green mass for animals;
- folding, with the possibility of increasing the usable area for transporting hay.
But in order to move comfortably on the roads, it is worth making wings on the walk-behind tractor. If possible, immediately install mudguards on them. After all, not all roads have asphalt and hard surfaces.
According to the law, a walk-behind tractor with a trailer cannot be called a vehicle today, but this does not mean that the trailer should not be equipped with light signaling devices.
Be sure to install at least 4 reflective elements on the trailer - 2 red at the back and 2 white at the front. This will help the car driver identify the cart in the dark.
Read also: What is the difference between a torch and a cutter?
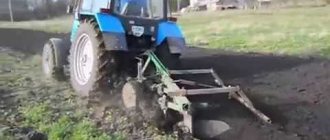
Tillage tools - do-it-yourself plow and plow for a walk-behind tractor
Before attaching a walk-behind tractor to tillage, you should decide what is more important and set priorities in terms of technology for cultivating the site. For large areas used for planting potatoes, root crops, and grain crops, the best option would be a do-it-yourself plow for a walk-behind tractor. Make it simpler and easier. But for beds for vegetable crops, for processing strips between rows of the garden or final processing for planting, it is better to use a milling cutter. This will make further work much easier.
When the coupling to the walk-behind tractor is ready, the most difficult thing in making the plow is its shape. The body has a shape that is difficult to mold and therefore it is better to make a plow from several components. It is better to make a coulter for a walk-behind tractor with your own hands from steel. The large force that this element will experience should not lead to its deformation. Moreover, it is the coulter that is responsible for the depth of lowering of the plow.
The plowshare should be made of the hardest possible metal. This is the part of the plow that cuts into the ground and cuts its layer. The strength and power of this element will allow you to work with the plow both in the conditions of cultivated arable land and to do preliminary processing of virgin soil. Despite the complexity of the blade design, it is quite simple to make. For a curved blade, it is better to take a ready-made round or oval-shaped workpiece. Make a dump out of it according to the drawing. For this, craftsmen usually use large pipes of 350 mm in diameter or gas cylinders. This results in an almost ideal blade shape.
One of the questions on how to make a plow for a walk-behind tractor will be the manufacture of a field board - a stabilizing element for the plow, which sets the direction of its movement when working on arable land.
A do-it-yourself plow for a walk-behind tractor, just like a plow, is assembled from several elements. True, to use a plow in soil cultivation, it is better to provide a blade made of reinforcement, so that during cultivation the soil is loosened as much as possible when the formation is turned. In the design of the plow, it is better to provide not a frontal blade, but a double-sided blade with reinforcing bars.
Do-it-yourself cutter for walk-behind tractor
Attachments for a walk-behind tractor in the form of a soil cutter can be used mainly for light and medium-sized units. For heavy models with a separate power take-off mechanism and transmission of torque to trailed units for a walk-behind tractor, cutters with a chain drive will be optimal.
The simplest cutters for loosening the soil can be four segmented reciprocating cutters. Structurally, such a cutter is a pipe on which reciprocating cutters are rigidly mounted. For medium and light units, the axle shafts for the walk-behind tractor are made collapsible. This way you can adjust the width and speed of tillage. If two segments are installed on each side of the gearbox, then the processing speed is significantly higher. True, the width in this case will be small. For axle shafts consisting of two or even four elements, the working width can be increased to 1.5 meters.
Do-it-yourself attachments for a walk-behind tractor are made from a profile pipe. The profile is easier to install on the wheel gearbox. Yes, and connecting them when building up is much simpler and easier.
Simply insert them into each other and secure with pins. Do-it-yourself axle shafts for a walk-behind tractor are made from a square or hexagonal pipe with thick walls. For 1 set of cutters you will need:
- pipes for the axle housing with a wall thickness of 2.5-3 mm and a length of 50-80 cm;
- for connecting pipe segments of smaller diameter 50-60 cm long;
- 8 saber elements for the working body;
- clamps on the axle shafts - 4 pieces;
It is recommended to make the cutters themselves from a steel strip with a thickness of 5 mm or more. The best solution for making cutters is to use forged metal. In this case, the strength is higher and there is no need to sharpen the tool frequently. When developing the shape of a cutter for a walk-behind tractor with your own hands, it is recommended to use drawings of the most successful models - a saber cutter, a curved cutter, or a cutter with a triangular pointed element.
Disc cultivator for walk-behind tractor
One of the most popular types of attachments for a walk-behind tractor during the summer plant care period is a cultivator. You can make a weeder for a walk-behind tractor with your own hands:
- following the example of a classic cultivator in the form of a trailed ripper;
- in the form of disk hillers used for processing root crops.
The processing technology involves passing a walk-behind tractor between two rows of crops or when using a multi-hull cultivator of three or even four rows.
The hiller ripper can have several types of tools installed in one housing:
- ripper;
- two double-moldboard flat-cutting plows;
- 2 disc harrows for forming beds;
- two disks for plant protection.
Do-it-yourself plant protection discs for walk-behind tractors are usually made of sheet steel. Depending on the purpose of the device to which they will be applied, their diameter is calculated. For cutters, the diameter is usually 5-7 cm smaller than the cutters, and for a cultivator they should be 30-35 cm in diameter. It’s just that when milling an area, the plants usually have a small height. But cultivation is carried out when the plants reach significant growth, and their breakdown at this stage can result in the death of the vegetable crop.
Medium-sized disks can also be universal, with a diameter of 20-25 cm. In this case, it is necessary to provide a universal type of fastening to each type of attachment.
Types of attachments
The main motivation for purchasing any walk-behind tractor is cultivating the land. The designers paid maximum attention to this task.
The list of attachments offered for sale includes:
- plow;
- harrow;
- hiller (a type of plow with a V-shaped or disc-shaped plowshare);
- cutter;
- potato digger;
- potato planter;
- mower
Plows
The evolution of swing devices is embodied in the following types of devices:
- Standard plow . A wide knife - a ploughshare of such a device - loosens the ground when plowing, cutting off the roots of weeds. A bent sheet - the blade turns over the layer of earth.
The method of attaching a standard plow to a walk-behind tractor is illustrated in Figure 1. The main parts of this device: ploughshare, blade, stand, heel, field board are visible in Figure No. 2.
- Reversible (rotary, double-revolved) plow . Two plows are mounted on a common frame at an angle of 90 or 180 degrees. Their dumps are directed in different directions. In the working position, one of them plows the ground, and the second is located on the side. After passing the furrows, they are swapped by pressing (or removing) the latch and turning to the side. Thanks to this, the operator does not have to return to the beginning of the section each time, making an idle run.
- Zykov's plow . An improved version of the classic plow. It differs from it in the modified geometry of the plowshare-mouldboard surface. Thanks to the modification, it turns over the soil layer well and crumbles it.
Designed and produced in Ukraine, the Zykov plow is still rare in Russia. Only a few DIY enthusiasts are trying to reproduce it in home workshops.
Harrows
Soil turned over by a plow is a “semi-finished product” that requires finishing. For this work, a harrow is used, which breaks up large clods and levels the soil.
There are two types of harrows:
It should be noted that disc designs perform harrowing better and cleaner than toothed ones.
Hillers
This type of attachment for walk-behind tractors is designed for loosening the soil and creating furrows during sowing, planting seedlings and weeding.
By design, hillers are:
- single-row and double-row (with fixed and variable working width);
- disk;
- rotary (active);
Single-row hillers with a fixed width (25-30 cm) are designed to work with light walk-behind tractors (up to 4 hp). Variable working width and double-row installation allow you to use these devices on more powerful mechanisms and use them to process beds of different widths.
Rotary (propeller) hillers do not require the use of a hitch, since they are installed instead of walk-behind tractor wheels. Toothed discs of a special configuration loosen the soil well and pull out weeds between the rows.
Milling cutters
Can perform several operations:
- loosen and level the ground;
- crush lumps of soil and mix its layers;
- mix fertilizers;
- destroy weeds.
The walk-behind tractor usually comes with universal cutters equipped with saber-shaped knives. They are comfortable to work on soft soil. For dense and weed-filled soil, mechanisms called “crow's feet” are designed.
The high mechanical strength and special shape of the cutters allows them to loosen neglected areas, pulling out weeds by the roots. In the fall, they are used to destroy insect pests that have hid in the ground for the winter.
Potato planter and potato digger
The main crop of our fields and summer cottages - potatoes - requires significant labor input during planting and harvesting. To mechanize these operations, two mounted units are used: a potato planter and a potato digger.
The first is equipped with a small plow that makes a furrow. Immediately behind it, a hopper is installed on the frame, from which the potatoes fall into the ground at regular intervals. Two inclined hiller discs attached to the back of the frame fill the bed. So, three operations are performed at once in one pass.
Anyone who has dug potatoes with a shovel at least once will certainly appreciate the usefulness of this simple device. The potato digger, mounted on the hitch of a walk-behind tractor, consists of a plow with steel rods welded to it. Lifting the soil under the bushes, he carefully removes the tubers to the surface. Collecting them in a bag or box after such processing is not difficult.
In addition to fan type diggers, there are more efficient vibrating screen type diggers. They are designed for processing large areas. Such equipment is connected through a power take-off shaft, which transmits torque to the potato digger pulley, causing the working elements of the mechanism to vibrate.
Mowers
Mowing grass is another important work operation performed by mounted units.
Two types of mowers are produced for walk-behind tractors:
The rotary design is easier to maintain. The segmented one resembles a hairdressing machine. It is more complex in design, but cuts the grass cleaner than a rotary one. This type of attachment is used for mowing large lawns.
Reversible plow for walk-behind tractor Neva descriptions and advantages
A plow for a walk-behind tractor is used for plowing the ground, turning over the formation, as well as burying mineral and organic fertilizers. Plows for walk-behind tractors come in three types:
- The single body plow has one share and is suitable for plowing light soil.
- Reversible or reversible plows immediately turn the soil over thanks to their feather-curved shape. This plow can work on relatively hard soil, which, after plowing, becomes more crumbly and easier to further cultivate. There is practically no chance for weeds to grow in such soil.
- Rotary. Has several blades.
The design of a reversible plow is quite complex to manufacture, and only a professional can do it. This is due to increased requirements both for materials and for the process itself.
Zykov's reversible plow
One of the most widely used mounted plows is the Zykov reversible plow, which contains:
The right and left-side plow body, having a ploughshare for cutting the soil and a blade for wrapping and crushing the cut layer of soil;
- Rack for attaching the plow to the beam;
- A field board that rests against the wall of the furrow and ensures stability of the plow during operation;
- Support ski for stability of the plow;
- A feather that adds to the layer of soil to obtain a continuous arable land;
- Rotary mechanism with locks securing the plow bodies;
- Support wheel.
The reversible plow is attached to the Neva walk-behind tractor using an additional bracket KR-20N.
What attachments for a walk-behind tractor can you make yourself?
It all depends on the qualifications of the home craftsman and the set of tools he has at his disposal. We advise beginners to start their experiments with the simplest designs - a fan potato digger or hiller.
The design of the device for digging potatoes is shown in the sketch. It consists of a wide bent plate (foot) welded to a vertical bipod and field bar. Teeth made of reinforcement are attached to the rear edges of the paw by welding.
It is easier to make a disk model from hillers. Its main elements - disks - can be cut from the ends of old gas cylinders. They have the right shape, diameter and metal thickness.
Quite a lot of design solutions for the device itself have been invented, you can see this by watching videos of homemade people, as well as various assembly diagrams.
In addition to the disc disks you will need:
- two racks made of steel strip;
- two rolling bearings;
- bolts for attaching the racks to the frame and adjusting the rotary sectors;
- cross member made of profile pipe;
- T-shaped leash.
The main condition for the high-quality operation of such a mechanism is the precision of manufacturing of all parts and the symmetry of the installation of disks. Otherwise, it will be pulled away from the furrow while moving.
Do-it-yourself potato digger for walk-behind tractor
This type of attachment greatly facilitates the process of harvesting potatoes, as well as other tuber crops.
The main structural elements of the potato digger are:
- welded frame;
- ploughshare;
- editorial node;
- cleaning drum.
The ploughshare, the moving part of the potato digger, is made of steel rods and one or more sharpened steel plates. The sharp edges and ends of the plowshare structural elements are blunted so as to prevent damage to the potato tubers.
To make a welded frame, you need a metal corner measuring about 60x40 mm, a profiled pipe and a section of channel No. 8. The dimensions, as well as the weight of the frame, which depends on the weight of the materials used and the features of the design solution adopted, must correspond to the dimensions and power of the walk-behind tractor.
The editorial unit is the main element of the potato digger. To manufacture it, you will need two metal cylinders, which will act as cups for the connecting bushings - this design ensures the interaction of the drive and driven shafts. Next, you need to make hubs from a metal pipe with a diameter of 25 mm, to which the transmission sprockets are welded. The latter are mounted on the bushings using prismatic keys.
The most difficult part of the potato digger is the cleaning drum. Its design includes a pair of roller chains of 94 links each, which are mounted on special rods. This element, called the “squirrel wheel,” is fixed on two fixed axes, which ensures its mobility during rotation. Thus, by the force of the engine shaft, the potato digger share, attached to the movable casing, will change the angle of inclination, making digging movements as the walk-behind tractor moves.
Components of the header design
Windrow harvester ZhVN-6A
Where: 1—cutting device; 2 — reel drive mechanism; 3 - reel; 4 — windrow laying device; 5 - conveyor.
The mounted roller header is assembled on a frame-type platform, supported by copying shoes, which ensure a constant position of the unit above the soil level.
It is aggregated with a self-propelled chassis through a linkage and a power take-off shaft.
Roller mounted header on the Niva combine
Comprises:
- An executive body , which, with the oncoming movement of knife elements made of cast iron or high-strength steel, cuts the stems. Assembled from a finger beam, segment-type knives, their clamps and a drive mechanism made according to a crank scheme. The stems pass to the knives through dividers - guide devices that organize the flow of green mass.
- Reel – provides bending of plant stems to the executive body for cutting. Upright plants are treated with a paddle reel; for laid-down crops, an eccentric rake reel is used. The spring elements of the unit enter the stale stem mass, ensuring their lifting and holding them during cutting. To lift tangled stems of legumes and cereal crops for mowing, lifting drums are used.
- Transport devices with a canvas or belt-slat type convey the beveled mass to the ejection window. In cases of direct harvesting, the stems enter the receiving device of the thresher.
- Control mechanism. Remote hydraulic cylinders regulate the cutting height of the stems within 10-35 cm and the installation height of the reel. The drive of the executive bodies of the header and conveyors receives rotation from the PTO of the self-propelled chassis.
Trailed header ZhVP 9.1S Bustard
The trailed roller header has a design similar to a mounted unit, but the hitch unit is replaced by a trailing mechanism with a spherical hinge, and the tracking shoes are replaced by wheels.
Attachments operate at the front in front of the self-propelled chassis, trailed ones are towed from the side of the tractor.
Homemade devices for walk-behind tractors
The list of additional units is not limited to a mower, plow or harrow.
This list is quite large, and not a single walk-behind tractor has such a strong package. After calculating the amount it will cost to purchase all the necessary equipment, many abandon this idea. It should also be remembered that not every model can be considered universal. Simply put, when purchasing units for one walk-behind tractor, it is very difficult to guarantee their operation on another. However, if you have the desire and a certain amount of knowledge, many additional devices can be made independently.
Their drawings are often found on the Internet, but it is important to ensure compatibility. When developing attachments from scratch, you need to focus on the available walk-behind tractor model.
DIY trailer adapter
With the help of this unit, the walk-behind tractor can easily be converted into a mini-tractor, which allows you to automate a large number of works on cultivating a personal plot. The design of the trailer adapter consists of the following elements:
- Metal supporting frame.
- Hitch.
- Cross rod.
- Braces.
- Chassis.
- Controls.
- Seat.
To make a supporting frame, you should use a pipe of any cross-section, the length of which is in the range from 1.5 to 1.7 meters.
On one side, a device for attaching to the walk-behind tractor is welded, and on the other, a transverse beam. The width of the second element is selected in accordance with the dimensions of the wheelbase of the walk-behind tractor. Then braces and wheel stands are attached to the rod to increase the rigidity of the structure. Most often, additional units are attached to the walk-behind tractor adapter using a single hitch. You also need to think about the control of the equipment, and the best option in this situation would be a lever, switching which will change the position of the auxiliary devices.
The last step in creating a trailer adapter is to install the seat, and to do this, a post is attached in the middle of the crossbar.
Homemade disc hiller
The optimal type of hiller for a personal plot is a disk one. When working with it, you do not need to exert much effort, and when the speed decreases, the power increases. Do not forget that the disc hiller is a universal tool, because it can be used not only after planting crops, but also during their growth.
The design of this type of attachment is not very complex and includes:
Thanks to the presence of talpers, it becomes possible to adjust the angle of inclination of the working disks. It is this factor that affects the depth of their immersion in the soil and the force applied during operation.
The discs can be taken from agricultural equipment that has become unusable, for example, an old seeder, or made from high-quality steel, the thickness of which is 1.5-2 mm. The outer edges are bent, and a hole is drilled in the center for attachment to the frame.
Making a potato digger
This unit can significantly facilitate the work of harvesting all tuber crops, not just potatoes. Among the main design elements of the unit it is necessary to highlight:
- Welded frame.
- Ploughshare.
- Cleaning drum.
- Editorial node.
The ploughshare is a movable element of a potato digger and can be made of sheet iron. The cut plates should be sharpened, but all edges should be blunted so as not to damage the tubers .
Making the frame should also not cause serious difficulties. To solve this problem you will need a corner, channel No. 8 and a profile pipe. The frame dimensions are selected individually, and the required amount of materials is determined on site. The main element of the entire structure of the unit is the editorial unit. To make it, you will need two metal cylinders , into which connecting sleeves are then installed. After this, you have to make hubs from a metal pipe with a diameter of 25 mm. They are used for fastening sprockets, pre-fixed to the bushings using keys.
The most difficult to manufacture is the cleaning drum, consisting of two roller chains of 94 links each. The chains, in turn, are mounted on special rods, and then the finished element is mounted on two axes. The result is maximum mobility.
The torque from the walk-behind tractor engine is transmitted to the ploughshare connected to the casing. During movement, the angle of inclination changes and digging movements are made. To regulate the angle of inclination of the working element of the structure, and, consequently, the depth of the dig, you can make a slider. An excellent material for the manufacture of this part would be fluoroplastic.
How does the header work?
The units are mounted on a self-propelled chassis (combine harvester) or attached to wheeled tractors.
During the working process, the header platform rests on shoes or wheels. The rakes (longitudinal bars) of the reel direct the stems, collected into a bunch by dividers, to the cutting device and the cut mass is placed on transport belts, from which it is dumped onto the stubble in the form of a windrow.
A single windrow is formed in one pass, a double roll in two passes.
Making a snowblower bucket with your own hands
The walk-behind tractor is useful on the farm not only in summer, but also in winter. It is often equipped as a snowblower. It is enough to make a bucket for the walk-behind tractor, and the iron assistant will do the hard work.
A bucket for clearing snow is usually made from a 200-liter iron barrel. You will also need strips of metal, a square pipe, rubber and steel plates and fasteners - bolts, nuts. Tools include pliers or pliers, drills and metal drills, wrenches, grinder, welding machine.
Using a grinder, cut out the side parts of the barrel. Then the workpiece is cut into three parts. Two of them are welded along the contour. The remaining third of the barrel must be divided into metal strips that will serve as ladle knives. Three holes with a diameter of 6 mm are drilled into them for fastening along the edge of the bucket. Instead of a barrel, you can use a metal sheet, which will need to be bent by heating.
A strip of metal is welded to the bottom of the bucket to make it heavier. The metal strip is completely covered with rubber to prevent wear. Then the bucket is attached to the walk-behind tractor. To protect against corrosion, a homemade bucket is primed and painted.
You can turn a walk-behind tractor on wheels into a snowmobile using a trailer and winter wheels . Using a channel, the trailer is fixedly fixed to the frame. Instead of expensive wheels, used truck tubes are used. On each wheel, the deflated tube is secured with chains and inflated again. It is quite simple to equip a snowmobile with a homemade sled.
Headers for various agricultural crops
The sunflower harvesting unit in combination with the combine provides:
- cutting the stem;
- separation (separation) of a heap of mown mass;
- thresh seeds from plant baskets;
- collecting grain into a bunker device;
- chopping and placing stalks and threshed baskets on the field.
The Zaffrani sunflower harvesting header is popular among grain producers - a universal unit that works with any type of combine harvester.
Falcon series sunflower harvesting header
Harvesting is carried out in the chosen direction, regardless of the sowing orientation, from 7-13 rows at once. Yield losses do not exceed 0.3%. The cutting body and transmission are simple in design, strong and durable.
| ZhVN-6A | for grains | 6 | 4,6 |
| ZhVN-6A-01 with travel drive | -/- | 6 | 4,6 |
| ZhRB-4.2 | for grains and cereals | 4,2 | 2,5 |
| ZhSB-4.2 with travel drive | -/- | 4,2 | 2,5 |
| ZhVR-10 | for grains | 10 | 7 |
| ZhVR-10-03 with drive | -/- | 10 | 7 |
| ZhSK-4A | for grains from laid down plantings | 4,2 | 2,0 |
| ZHRK-5 for a tracked combine harvester | over rice | 5 | 3 |
| ZHRS-5 with drive | -/- | 5 | 3 |
| Parameter | Unit change | Sunflower harvesting machines | |||
| Frontier 1208 John Deere | Falcon 810 ROS-SELMASH | ZhNS-7.4 Berdyansk reapers | Zaffrani 740 | ||
| Width grip | m | 5,6 | 11,2 | 6; 7,4; 9,1 | 7,4 |
| Output | ha/h | by combine | 6,5 | by combine | by combine |
| Dimensions (WxLxH) | m | 5.84x2.92x1.52 | 11.56x6.0x4.11 | 7.6x2.34x1.1 | |
| Weight | 1550 | 3800 | 3070 | 2200 | |
| Cutting height | 200…600 | 250…800 | 250…800 | 220…810 | |
| Pace of movement in the work cycle | km/h | 10 | 9 | 10 | 13 |
The corn header works in tandem with combine harvesters from various manufacturers, including Don, Yenisei, Niva, Geringof, Acros, Vector, Torum.
The principle of operation of the product is as follows: the fingers of the hood of the header divide the stalks and feed them to the knife device for chopping and separating the cobs.
Through a screw feed mechanism, the cobs are brought to the combine conveyor belt, the equipment of which extracts the grain and stores it in a bunker.
Corn header Heringhof
Making a homemade trailer adapter
The adapter allows you to turn a walk-behind tractor into a mini-tractor and automate gardening work as much as possible.
Its design includes:
- metal frame;
- hitch;
- cross bar;
- braces;
- wheel stands, axle and wheels;
- controls;
- operator seat;
- cart or trailer.
A simple frame for the adapter is made of a metal pipe of round or rectangular cross-section 1.5-1.7 m long. A drawbar (hitch) is welded to it at one end - an element with which the structure will be attached to the tow bar of the walk-behind tractor, and at the other - a transverse a rod, the width of which is selected in accordance with the width of the wheelbase of the latter. Wheel stands and braces are welded to the bar, the function of which is to ensure structural rigidity and shock absorption when moving around the site. As for the wheels, they can be removed from a regular garden cart or car trailer.
As a rule, the connection between the walk-behind tractor adapter and the attachment is made using a single hitch. The control of functional units is carried out using a lever with 2 or 3 knees - by switching them you can adjust the position of the installed mounted unit. In addition, an additional lever can be used to control the applied force. Finally, in the center of the crossbar, you need to weld a metal “leg” on which the operator’s seat will be placed.
The longer the adapter drawbar, the more powerful the walk-behind tractor should be. At the same time, the engine power of the latter also affects the choice of wheels, as well as the cross-section of the pipe from which the frame will be made.
Specifications
| Parameter | Unit change | Parameter value | |||
| Corn header for Niva Argus-470 | Corn header Heringhof RD 500 | CornMaster Gomel-Selmash | Corn header CLAAS | ||
| Width grip | m | 2,8 | 3,5 | 5,6 | 11 |
| Output | t/h | 6…9 | 8…12 | 25 | 35 |
| Dimensions (WxLxH) | m | 3.9x2.92x1.6 | 4.1x3.1x1.7 | 6.2x3.2x1.4 | |
| Weight | T | 1,3 | 1,8 | 3,2 | 2,9 |
| Number of rows in work | 4 | 5 | 8 | 16 | |
| Pace of movement in the work cycle | km/h | 9 | 10 | 13 | 9 |
Devices for harvesting soybeans are presented on the agricultural machinery market as headers that can provide low cutting and minimal grain loss.
The Krasnoyarsk Combine Harvester Plant produces a series of ZhS 5/6/7 headers for soybean harvesting. The units are effectively used for rice and cereal crops.
- The floating-type cutting device is placed on a lever suspension that connects the shoe stops of the device with the header body.
- The impact of the soil surface on the shoes ensures that the cutting device follows the relief and ensures a constant cutting height of the stem.
- Provision is made for setting a constant position of the cutting device relative to the body.
- The drive of the knife device operates on the “swinging washer” principle.
What can be made from a walk-behind tractor
The use of specialized equipment allows you to solve a wide range of problems. However, some owners want to get even more functions from the walk-behind tractor.
Do-it-yourselfers are constantly inventing something and showing what can be made from a walk-behind tractor. Upgraded adapters turn into mini-tractors; you can also create a snowmobile, swamp vehicle, or ATV. By replacing the wheels with caterpillar tracks, you get a motorized towing vehicle.
These and many other amazing homemade products, methods for creating them, drawings, etc., are available at the link:
Operating parameters of soybean headers
| Options | Unit change | JS series headers | FLEX attachment | ||
| 5 | 6 | 7 | |||
| Width grip | m | 5 | 6 | 7 | until 9 |
| Cleaning area per hour | Ha | 3,7 | 4,4 | 5,1 | 6 |
| Transport cycle rate | km/hour | 4 | |||
14
The use of FLEX attachments allows you to convert the headers of grain combines for work on soybeans and other legumes.
FLEX soybean attachment attachment
The main part of soybeans ready for harvesting is located in the lower part of the plant, hence the need to cut the stem at a height of no more than 5 cm.
FLEX, due to the floating design of the cutting device and copying the terrain in automatic mode, ensures mowing at a height of up to 1 cm and reduces the level of losses by up to 20%.
The attachment is mounted on the bracket of the grain header and secured using locking ties.
Universal harvesters work on grains, oilseeds, and legumes. Units specialized for a specific crop are more effective in terms of productivity and loss reduction.
How to install a hiller on a walk-behind tractor?
Since recently agronomists are increasingly using a two-row hiller, we should consider the specifics of installing a hitch of this particular type. Often, fixation occurs through the use of special couplings SV-2 and SV-1/1. A prerequisite for proper installation is the presence of lugs, the diameter of which should not be less than 600 mm. Otherwise, it will be impossible to avoid squeezing the potato tops by the reducer.
It is important to direct the hiller correctly, because you can get the desired result only if it is oriented parallel to the ground surface. This can be done simply by just adjusting a few bolts on the bracket
During the process, special attention should be paid to selecting the width of the furrow and the depth of immersion in the ground, because after processing the ridges should be at the same level. This depth is adjusted in several ways:
- The master should be guided by the height of the mounting holes;
- The presence of a screw adjustment (for adjustable objects) will allow you to change the angle between the nozzle frame and the unit itself while turning the handle.
To adjust the width of the furrows, you should use the frame fastening brackets (move them or spread them apart). You can also follow the directions described in the following videos:
Attachments for walk-behind tractors: types and subtleties of choice
The walk-behind tractor itself is an engine, a traction force. It becomes useful on the farm thanks to attachments. This technique can work all year round: in the spring, plow the ground and plant seeds and potatoes, and in the summer, hill up and water the plants. In autumn, the unit is capable of harvesting crops, and in winter – removing snow. The walk-behind tractor is also used for collecting firewood, when mowing grass, as a small truck for transporting weights. Every year new models of equipment for the universal worker appear.
How to choose?
The choice of attachments to some extent depends on the power of the walk-behind tractor motor. This equipment comes in three classes: light (household), medium (semi-professional) and heavy (professional). A power take-off shaft promisingly increases the capabilities of equipment; it can be used to equip attachments.
Attachable attachments for different types of economic activities are often more expensive than the walk-behind tractor itself. To make a choice, you should think about which jobs are the most labor-intensive. For them, you can choose more complex equipment. Simplified attachments are quite easy to make yourself.
Sometimes they don’t know what is better to choose for soil cultivation: cutters or a plow. To choose, you should study the soil characteristics of your site. Mills are used to plow fields with soft soil, and plows are used to work on hard ground.
When choosing a small walk-behind tractor for a summer residence, many turn to the Czech-made MF-70 model. It can be used for mowing grass on the site, removing snow, and delivering small loads. Thanks to its compactness and maneuverability, the MF-70 is used for working in hard-to-reach places. To help gardeners and gardeners, a new model of the StavMash BM-15 walk-behind tractor has been developed. This technique has already proven itself well; with the help of attachments, any work on the garden plot is carried out.
The Brado BD-1600 walk-behind tractor is purchased for work on small farms. It is equipped with the most powerful four-stroke engine that runs on gasoline. The equipment weighs 120 kg and is capable of plowing depths of up to 30 cm. The self-propelled walk-behind tractor SW 360 (SunGarden MF 360 S) is intended for professional use. There is a large selection of equipment for equipment, the replacement of which occurs without the use of tools.
A walk-behind tractor with attachments will make the work easier for a summer resident with a small plot of land and a farmer with a medium-sized field. The amount of work performed directly depends on the engine power and the specifics of the nozzles.
Next, watch a video review of attachments for a walk-behind tractor.
What it is?
The walk-behind tractor is similar to a mini-tractor; its real participation in work begins with equipping it with attachments. The “symbiosis” of the engine and all kinds of attachments allows you to plow, loosen, chop wood, transport cargo, mow grass, and clear snow. All these devices can be placed on a walk-behind tractor and you will get a miniature excavator, tractor or lawn mower.
A walk-behind tractor is often confused with a cultivator, both of which carry out pre-planting work on the ground.
But it should be understood that the capabilities of the first are much wider than the second, although they completely depend on the attachments. A walk-behind tractor is more powerful than a cultivator; its traction is due to the wheels. It also has an engine, often internal combustion, a transmission that regulates the speed and gearbox, and a steering wheel (remote control). As you can see, the device is simple and can be repaired independently.
Various types of attachments are purchased for the walk-behind tractor, for example, stationary equipment is mounted on an adapter. The activator depends on the rotational power of the gearbox. On axial equipment, the nozzles rotate under the weight of the walk-behind tractor. Landing and steering accessories refer to adapter attachments.
How to make a hitch for a walk-behind tractor yourself
During operation, the device will be subject to heavy loads, so you should adhere to the recommended dimensional and strength characteristics of all assembly elements. In this case, the following coupling qualities will be guaranteed:
- Ensuring reliable fixation with the walk-behind tractor.
- Attachment to attachments.
- Ensuring the declared performance qualities of equipment.
- Affordable price.
- Reliability, long service life.
When choosing a model, you should check the dimensions of the walk-behind tractor towbar and attachments (plow, trailer, harrow, etc.). The task of the master is to ensure full compatibility of elements, ease of operation and the ability to easily configure the equipment for a specific task. The main part of the hitch is a U-shaped bracket. Through the holes on one side, it is attached to the walk-behind tractor using pins; on the other side, the rack of the necessary attachments is fixed to the body of the device.
Required tools and materials
A person engaged in economic activities on land usually has a sufficient set of equipment for making a hitch. To work you will need the following tools:
- Bulgarian.
- Drill, drilling machine.
- Measuring tools: ruler, tape measure, square.
- Welding machine.
- A set of keys.
It is important to accurately select drills according to the diameter of the studs and bolts. No backlash will extend the life of the attachment
The housing can be cut from a metal sheet or a suitable channel can be used.
Preference should be given to a hitch with an adjustment mechanism. In this case, you can use attachments of different classes, from different manufacturers, achieving maximum operational efficiency.
The photo below shows a universal hitch with a threaded adjustment mechanism. A simple but effective device that is easy to make with your own hands:
Working with a drill on metal will be easier and more productive if you make a preliminary hole of a smaller diameter when drilling. For example, a 5 mm drill is used first, and then a 12-16 mm drill according to the size of the bolt.
Making a universal connection
Work must be done on a flat surface. A table of the right size or workbench will do. The operating procedure is as follows:
- Marking. According to the drawing, the contours and dimensions of the elements are indicated.
- Drilling. The operation is performed with a drill or on a machine. The accuracy of the holes is checked with a caliper, as well as a pin or bolt, inserting them into the seat. Both backlash and jamming of parts are eliminated. To make work easier and to avoid injury, the holes are machined with a countersink.
- Welding. It is preferable to use electric welding. The metal heats up only at the junction and does not critically lose its properties. If a suitable channel is not found, then a structure is made from sheet steel of the required quality.
- Assembly. The bracket is attached to the channel with bolts. If an adjustment mechanism is provided, it is also fixed to the structure.
Typical components
The industry produces simple and complex equipment for walk-behind tractors. Typical components include simple attachments that are included with the unit at the sales stage. Or they can be purchased at the time of purchase of the equipment for an additional fee. Let's look at some of them.
- A mandatory addition to the walk-behind tractor is lugs. These are special iron wheels with studded elements that give stability to the equipment during field work. With the help of lugs, the walk-behind tractor can easily move on any, even difficult, soils. In addition, they contribute to better soil treatment.
- An all-season attachment for a walk-behind tractor will ensure its operation on caterpillar tracks. Thanks to increased traction, it improves maneuverability on difficult soils and snow cover.
- Typical components include a lifting mechanism for the hitch. It is horizontal to the surface in any position of lifting the load. The force on the hitch pedal does not exceed 10 kg per 100 kg of load.
- Flat cutters-rippers are mounted on a walk-behind tractor to grind weeds in the ground. Over time, cut weeds turn into humus (organic fertilizer).
- A walk-behind mulcher copes well with tops, weeds, and weak growth, but it cannot process hard trunks of corn or sunflower.
- A weeder or weeding cultivator can be purchased at agricultural equipment stores; they come in different shapes and sizes. This is one of the most popular field work shelters.
- A baler for a walk-behind tractor (baler) forms bale briquettes with hay.
- A three-point hitch is installed on the walk-behind tractor, but it is important to know the type of structure (plow, harrow, etc.).
- Hedgehogs are disks with spikes of different sizes; they are used for hilling and weeding potatoes.
- Walk-behind tractors equipped with brushes are used to clean sidewalks and roads from falling leaves and snow drifts.
These tools are useful throughout the year.
Do-it-yourself hitch to a walk-behind tractor
The U-shaped fastening is the basis of the hitch for the walk-behind tractor, therefore, to make it, a channel of suitable thickness and size is perfect. This mount is located under the steering wheel of the walk-behind tractor.
When making a hitch mount with your own hands, you need to drill several holes to secure the bracket and mounting pin in them. Therefore, the holes must be of the required diameter. The pin also needs to be made of high-strength steel.
To attach additional accessories to the walk-behind tractor, you will need a bracket. The long end of the bracket should be positioned either down or up to avoid interference with connected equipment. In this case, the end of the bracket should not touch the surface of the soil that we are cultivating.
When making a homemade coupling unit, we used a standard sample. Often, additional devices are used for the walk-behind tractor, with non-standard types of coupling. To connect them to a walk-behind tractor, you need to either purchase a special adapter or make an adapter yourself. As a rule, these are U-shaped brackets.