ISOTHERMAL van made of SANDWICH PANELS
Isothermal vans are designed for transporting goods that require protection from the effects of the atmospheric environment and maintaining a certain temperature regime inside the body. Most insulated vans are equipped with refrigeration units; such vans are called refrigerators. Depending on the temperature requirements of the transported products, isothermal bodies of three degrees of isothermality are installed on vehicles: low; medium or high.
| SANDWICH van options: | Clad » HIT SELLING » | Plastic |
| Cladding material: | Clad metal | Reinforced plastic |
| Thermal insulation material: | Polyurethane foam (PPU) | |
| KFG Color: | White | |
| KFG design: | Frameless | |
Table of correspondence between vehicle modification and standard dimensions of the chassis superstructure:
| MODIFICATION IVECO 65C15 Single Cab (single cab) | Short wheelbase 3450 mm | Average wheelbase 3750 mm | Long wheelbase 4350 mm | Long wheelbase 4750 mm |
| Dimensions of KFG (mm.) | 3750x2200x2200 | 4350x2200x2200 | 5350x2200x2200 | 6190x2200x2200 |
- It is possible to manufacture and install CFGs with modified (increased/reduced) overall dimensions within the limits permitted by OTTS. Detailed information from our specialists.
As standard, the vans are equipped with:
- The outer frame is made of galvanized steel with an enamel coating. The roof and front wall frames have a rounded profile, which improves the aerodynamic properties of the van. Vans are equipped with side lights (2 front white and 2 rear red)
- Rubber bumper (2 pcs.)
- Handrail
- Retractable ladder
- Plastic fender liners with mudguards
- Floor covering - laminated plywood mesh wear-resistant
Optionally, vans can be equipped with:
- Additional doors
- Changing standard sizes of KFG
- Imported stainless steel fittings
- Rings for securing cargo
- Rigging rail for securing cargo
- Aluminum frame KFG outside (semicircular corner)
- The inside of the van is covered with 6mm plywood.
- Aluminum/steel quintet flooring
- Filled floor
- Placing your advertisement on the van
Chassis Specifications
| Modification of the IVECO 65C15 Single Cab car | Single cab chassis | |||
| Code | 65C15 | 65C15 | 65C15 | 65C15 |
| Wheelbase | 3450 | 3750 | 4350 | 4750 |
| Gross weight (kg) | 6500 | 6500 | 6500 | 6500 |
| Load capacity (kg) | 4255 | 4240 | 4205 | 4175 |
| Vehicle's own weight (unloaded) (kg) | 2245 | 2260 | 2295 | 2325 |
| Maximum permissible load on the front axle (kg) | 2300 | |||
| Maximum permissible load on rear axle (kg) | 5000 | |||
| Clearance | 210 | |||
| Number of seats | 2+1 | |||
| Wheel formula | 4×2(spark) | |||
| Engine | F1C turbo with intercooling | |||
| Number and arrangement of cylinders | 4, in-line | |||
| Working volume (cm3) | 2998 | |||
| Maximum EC power: kW (hp) at rpm | 107,38 (146) | |||
| Maximum torque according to EC: Nm (kgm) at rpm | 350`0-2600 | |||
| Environmental class | Euro 4 | |||
| Fuel | DT | |||
| Fuel supply system | Common Rail Multijet | |||
| Transmission | ||||
| Drive unit | Rear | |||
| Clutch | Single disc, dry | |||
| Gearbox: number of steps | 6 + 1 | |||
| Gear ratios 1st stage | 5.37 | |||
| 6th | 0.79 | 0.79 | 0.79 | 0.79 |
| Steering | ||||
| Type | Rack and pinion with amplifier | |||
| Brake system | ||||
| Type | Hydraulic with ABS, EBS | |||
| Front brakes | Disk | |||
| Rear brakes | Disk | |||
| Suspension | ||||
| Front | Front independent suspension, torsion bar | |||
| Rear | Dependent with longitudinal parabolic leaf springs, telescopic shock absorbers and elastic travel limiters. | |||
| Wheels | ||||
| Tires | 195/75R16C | |||
| Total information | ||||
| Fuel tank capacity | 70 | 70 | 70 | 70 |
| Maximum speed (km/h) | 90(160) | 90(160) | 90(160) | 90(160) |
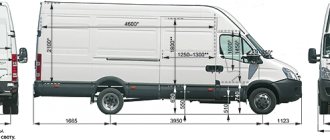
| Dimensions, mm | ||||
| Wheelbase | 3450 | 3750 | 4350 | 4750 |
| Length | 5905 | 6515 | 7340 | 8200 |
| Width | 2060 | 2060 | 2060 | 2060 |
| Front track | 1725 | 1725 | 1725 | 1725 |
| Rear track | 1661 | 1661 | 1661 | 1661 |
| Height (no load) | 2280 | 2275 | 2270 | 2280 |
| Front overhang | 998 | 998 | 998 | 998 |
| Rear overhang | 1355 | 1665 | 1890 | 2350 |
| Frame height | 763 | 769 | 769 | 774 |
| Permissible rear overhang of the body relative to the axis of the rear axle | 1355 | 1665 | 1890 | 2350 |
| Fuel consumption, l/100 km | 10 | 10 | 10 | 10 |
Device and characteristics
The bus and other modifications of this vehicle are equipped with a supporting type of all-metal body, which is mounted on a rigid frame. This design increases the level of reliability and service life of transport.
The vehicle also includes a support frame, electrical circuit, batteries, and gas equipment, since some models run on methane.
The drive goes to the rear wheel mechanisms, and modifications with all-wheel drive are equipped with two series-connected range-multipliers and center differentials.
Iveco Daily - technical characteristics and parameters such as: load capacity, engine power and fuel consumption of Iveco Daily depend on the selected model.
Chassis equipment:
| IVECO 65C15 S/C | |
| ABS + ASR + Electronic Stability Program (ESP) | + |
| Generator 110A (12V) | + |
| Chassis without superstructure | + |
| Driver's seat on air suspension with adjustable lumbar support | + |
| Exhaust in the center | + |
| Multi-leaf rear springs | + |
| Fuel filler neck on the cabin | + |
| Standard heated fuel filter | + |
| Fuel tank 100 l | + |
| Standard stove | + |
| Instrument panel "Comfort" | + |
| 12-pin connector for connecting external electrical equipment | + |
| Standard key with immobilizer | + |
| External rear view mirrors on long brackets | + |
| 2-person passenger seat with 3-point safety belts | + |
| Main gear ratio 4.556 | + |
| Rear bumper | + |
| Seat upholstery - fabric | + |
| Standard chassis color | + |
| Electronic tachograph | + |
| Forced speed limiter up to 90 km/h | + |
| Standard steering wheel | + |
Repair manual
Iveco Daily repairs are carried out only with the power unit turned off and using protective clothing (goggles and a mask).
The main malfunctions of this vehicle:
- The steering mechanism wears out quickly. This may be due to high levels of loads and improper operation of transport.
- Failure of the coupling device. The cause of this breakdown may be low-quality fuel or oil fluid. You should fill the gearbox with only those brands recommended by the manufacturer.
- Toothed belt malfunction. Failure of this mechanism can be caused by oil getting on the device roller. Oily liquid causes the lubricant to dissolve, which can cause the belt to slip when starting the power unit.
According to the Daily Repair Manual, it is recommended to carry out maintenance on time to avoid breakdowns.
Error codes
Error codes:
- Error 134 - the sensor displaying the pressure level of the charger has failed.
- Error 081 - insufficient fuel level in the power system.
- 0116 - malfunction of the circuit responsible for turning off the coupling device.
- 0117 - driver's cabin airbags need to be replaced.
- 0135 - the speedometer does not work.
- 013E - low level of fluid pressure in the engine cooling system.
- 013F - incorrect signal in the cooling system circuit.
- 0141 - there is a break in the crankshaft speed sensor circuit.
- 0143 - The camshaft position sensor is faulty.
- 0126 EDC - the on-board network voltage is above the permissible value.
- 014D - maximum permissible crankshaft speed.
If it doesn't start
The reason that the engine does not start or starts poorly may be:
- low level of pressure on the ramp;
- clogged fuel drives;
- malfunction of the fuel pump mechanism;
- clogged filters;
- Malfunction of the ignition system and electronic starter.
During repairs, it will be necessary to rinse and blow out the fuel fluid tank and fuel drives. Clean the filter elements or replace them with new ones. It is also recommended to conduct an external inspection of the entire mechanism of the power unit for damage and cracks. You should inspect the coupling device, gearbox, camshaft and crankshaft, check the amount of working fluid, replace the oil in the power system and diesel fuel.
Replacing the timing chain
Instructions for replacing the timing belt:
- Unscrew the ignition coil wires.
- Remove air hoses.
- Remove the right engine mount.
- Unscrew the plug.
- Drain the old oil fluid.
- Remove the filter element.
- Drain the antifreeze from the radiator section.
- Remove the radiator and inlet pipe clamp.
- Remove the drive belt from the generator set.
- Remove the block of heads of cylindrical parts.
- Remove the engine sump.
- Remove the pulley and gasket from the crankshaft.
- Remove the tensioner and bar.
- Lubricate the new chain mechanism with oil.
- Install the chain in place of the old one and reassemble the entire mechanism, performing all the steps in reverse order.
Before installation, it is recommended to rinse and clean all parts from accumulated dust and residual working fluid.
Bleeding the brakes
In order to bleed the car's brake system with your own hands, you will need to check the brake fluid level and, if necessary, add it to the maximum level.
Before starting work, it is recommended to insert a screwdriver between the plate and the piston part to unlock the rear brake adjuster.
After this, you need to remove the protective cover from the rear cap and put a hose on this cap, the second end of which should be lowered into a container filled with brake fluid.
Then you need to press the brake pedal all the way at intervals of 1-2 seconds. After repeating this procedure 3-4 times, you need to unscrew the air valve half a turn.
All steps should be repeated until the formation of bubbles in the brake fluid stops.
Clutch replacement
In order to replace the clutch on this vehicle, you must:
- Place the transport on a special platform.
- Remove the front wheel mechanisms.
- Disconnect the cable leading from the gearbox to the speedometer.
- Unscrew the fasteners.
- Loosen the rear trailing arm mounting.
- Remove the protective cover from the flywheel housing.
- Unscrew the left support mechanism of the power unit.
- Remove the transmission from the engine.
- Remove the hitch. Replace the release bearing with a new one.
- Replace the driven disk.
- Clean all mechanisms with a rag soaked in gasoline.
- Reassemble the coupling mechanism, performing all steps in reverse order.
Replacing torsion bar silent blocks
Before you start repairing torsion bars, you need to put on protective clothing, turn off the engine and place the vehicle on an inspection pit or platform for repair work.
Wheel mechanisms must be securely secured using special anti-roll devices.
You need to disconnect the brake adjuster rod from the rear beam, and then move the handbrake cable away. After this, you can use a wrench to unscrew the fasteners that connect the rear beam and bracket.
It is necessary to install a wooden beam between the beam and the bracket body and thoroughly clean the installation site of the silent block from accumulated dirt. Install the new mechanism and put all the parts in place.
Russian package:
| Front mudguards | + |
| Cabin rear wall trim | + |
| Crankcase gas exhaust with heating | + |
| Daytime running lights (DRL) | + |
| Bracket for installing a fire extinguisher | + |
| First aid kit | + |
| Emergency lamp | + |
| Heated electric mirrors | + |
| Interface in Russian | + |
| Electric windows | + |
| Audio preparation | + |
| Spare wheel bracket | + |
| Spare wheel | + |
| Warning triangle | + |
Owner reviews and how much it costs
Average cost of various modifications of Iveco Daily:
| 45C | 50C | 65C | 70C |
| RUB 2,300,000 | RUB 2,550,000 | 3,000,000 rub. | RUB 3,150,000 |
Svyatoslav, 38 years old, Omsk: “This is an inexpensive car with a powerful engine and a reliable gearbox. I've been working on it for four years now. During the entire period of operation there were no breakdowns with the main components. I recommend using different brands of oil for summer and winter.”
Oleg, 40 years old, Lipetsk: “This is a reliable technique, but with its drawbacks. For example, electrical equipment is unstable, oil is leaking from the radiator. Over the 5 years of work on the Daly 70 modification, I have not identified any other malfunctions.”


