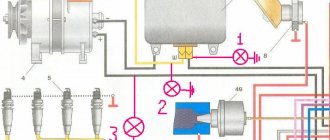
The ZMZ 409 engine was produced by the Zavolzhsky Motor Plant for vehicles produced at the Ulyanovsk Automobile Plant. Thus, UAZ cars received a modernized ZMZ 405 with some changes, namely a different shaped valve cover, an improved gas distribution mechanism and a new metal gasket.
Engine Specifications
The ZMZ 409 engine, among other changes, received a number of modifications, namely a different shaped valve cover, an improved gas distribution mechanism and a new metal gasket. Also, the volume increased, which entailed the modernization of the cooling system.
Before considering the description and design of the motor, it is worth deciding on the technical characteristics of the 409:
| Name | Characteristic |
| Type | Row |
| Fuel | Petrol |
| Injection system | Injector |
| Volume | 2.7 liters (2693 cc) |
| Power | 128 horsepower |
| Number of cylinders | 4 |
| Number of valves | 16 |
| Cylinder diameter | 95.5 mm |
| Consumption | 13.2 liters per 100 km |
| Environmental standard | Euro-2, Euro-3, Euro-4 |
| Cooling system | Liquid, forced |
| Cylinder operating order | 1-3-4-2 |
Installation of SHAAZ radiator on UAZ-3160
There are new radiators from the SHAAZ plant for the 3160. Their heat output is 62,000 kcal/hour, versus 35,200 kcal/hour for the 3741sh radiators (our “native”). Attention!
As of August 2004, in the catalog of JSC SHAAZ, the figure for 3160 is
37000.
Tubes, when new, cost about 1.5 times more often, and the plates are straight and shorter (ours are corrugated and long) - better “air permeability” and heat transfer the plate itself - because a long plate dissipates heat worse.
Questions: 1. Do they fit without modifications?
There is only one change - instead of the standard lower bolts, regular ones are installed (new radiators have threads on the radiator).
You also need to slightly move the lower pump hose down. 2. Is there any difference in size?
No width or thickness.
The height of the “honeycomb” is about 5-7 cm (due to the absence of lower “legs”, the radiator itself seems to have “lengthened”. The hole for the handle is now in the lower tank. 3. Is it really better to cool?
Yes, indeed. The design is better .
General description of the cooling system
The ZMZ 409 cooling system has a typical design for all engines produced by the Zavolzhsky plant. Thus, the power unit is built with a closed cooling system, which contains the following elements:
- Radiator.
- Water jacket of the block and cylinder head.
- Water pump.
- Expansion tank.
- Thermostat.
- Pipes.
- Radiator and heater fan.
- Main radiator electric fan.
- Coolant temperature sensor.
Heater control unit in UAZ
The control module with which the heater is equipped looks like a set of regulators that ensure the achievement of a certain task of creating the required comfortable temperature in the cabin and the required air flow rate.
The block's functions include the following:
- Manual or automatic setting of heater operating modes.
- The ability to read information from a temperature sensor located directly in the cabin.
- The presence of a fan speed switch, with which you can set optimal conditions for the operation of the unit.
Note that the maximum current consumption by the heating circuit fan reaches 14 Amps. The on-board network of the UAZ Patriot is responsible for supplying power.
The number of regulators on the block is three. The device itself is an electronic unit, which allows it to be reprogrammed by connecting to a computer and “downloading” software. The block can be dismantled, which is very convenient when there is a need for repair work or replacement of some panel components. The module is located on the center console.
Here we see a new model module.
The photo below shows a block with a previous modification of the panel.
Details and diagram of the device
The circuit diagram of the ZMZ 409 engine cooling device is quite simple and inherent in all injection versions. The coolant circulates in circles - large and small. Let's look at the details of the “cooler” assembly in more detail.
Radiator and electric fan
The radiator and electric fan ensure a constant engine temperature within the range of 87-103 degrees Celsius so that the engine does not overheat. On the first engine models, a three-row cooler of copper construction was installed. But, after unsuccessful tests, the designers decided to change the radiator to a three-row aluminum one.
The electric fan is turned on by a control unit, which regulates the engine temperature using a coolant temperature sensor. Temperature data is read from the cooling jacket and sent to the ECU, which turns the main fan on and off.
A malfunction of the fan and radiator leads to poor circulation and insufficient cooling of the system. In this case, the motor may overheat.
If this is coupled with a faulty thermostat, this will lead to overheating of the motor, which will lead to more serious problems.
Thermostat
Provides transfer of coolant flows from a small to a large circle and vice versa. So, the thermostat opens at a temperature range of 60-70 degrees. This is one of the most important parts of the engine, since it is what regulates the efficient and rapid warming up of the engine, as well as the normal operation of the coolant system.
When the engine warms up, the thermostat is in the closed position and coolant circulation is ensured in a small circle without the participation of the radiator. After the thermostat opens, the liquid begins to circulate in a large circle, which ensures effective cooling thanks to the radiator.
A malfunction of the thermostat leads to the fact that the engine begins to heat up, since it is in a closed state and often this malfunction is accompanied by frequent activation of the electric fan.
Changing the thermostat is easy; to do this, you just need to drain the coolant to a level below the part and unscrew the housing. The product is located under the body. When replacing, it is worth changing the sealing rubber.
Water pump
The water pump or pump serves to circulate coolant throughout the system. Failure of this element leads to loss of fluid and overheating of the power unit. Typically, wear on the bearings inside the product will cause it to seize, causing the water pump to start leaking.
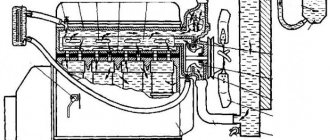
Heater
One of the integral elements of the cooling system is the heater system. It includes an inlet and outlet pipe, a radiator and an electric fan. In winter, it is actively used, which further cools the engine.
Expansion tank and plug
Gases and vapors that are formed as a result of the operation of the system are displaced into the expansion tank. There, this element also serves as the coolant level in the system. Air is forced out through the plug, as well as hot “coolant” when the power unit overheats.
Pipes
Pipes are intermediate elements through which coolant circulates and also connect different elements of the system. Failure of these parts can lead to loss of fluid, which can significantly reduce the level in the engine. Typically, depending on the mileage and terrain of operation, it is recommended to change these parts once every 100,000 km.
temperature sensor
The cooling temperature sensor reads temperature data and transmits it to the electronic control unit, which adjusts the temperature. It is installed on the thermostat.
A faulty element may cause the motor to overheat because the electric fan will not turn on. This is especially dangerous in the summer. Also, problems with the sensor can lead to a number of other problems associated with the motor.
Water jacket
The cooling water jacket is located inside the cylinder block and cylinder head. It ensures the removal of heat from these elements, which heat up during operation. So, with the help of a water pump and pipes, the liquid moves into the radiator, where cooling actually occurs, and then returns to absorb new heat.
If the motor is operated on water, then the cooling jacket channels are often corroded, which leads to destruction of the walls. Long-term operation in this mode can lead to coolant entering the engine cylinders, which can lead to water hammer and a major overhaul of the power unit.
This situation will hit the owner’s pocket hard, so it is recommended to operate the engine with antifreeze or antifreeze, which have a less detrimental effect on the elements of the power unit.
Installing an electric fan to cool the radiator
At the beginning of winter I installed an electric fan... Among all the fans with brackets (the motors are all the same, only the Tenth, Nivsky and Volgovsky propellers have more blades), the choice fell on 2106. The Volgovsky one has a very wide bracket, the radiator would have to be moved far forward or the bracket cut , Okovsky and Vosmerochny had to be installed vertically, and this also complicates the mounting.
During installation, I dismantled the original fan and casing. Using the upper mounting rods, I moved the radiator as far as possible from the engine. In this position, the new fan and shroud fit almost perfectly. I drilled one additional hole on the casing so that the 2 holes on the fan casing coincided with the standard mounting holes from the old casing on the radiator. This is on the side of the casing where the motor is mounted. To the other side of the casing I screwed a suitable corner with holes drilled so that they again coincided with the standard ones on the radiator. I secured it with the same bolts that the standard casing was screwed on. The crankshaft pulley does not interfere with the new design. As a temperature sensor I used a Zhigulevsky one (92-87), screwed in through an appropriate adapter instead of the standard emergency temperature sensor. True, it is necessary that the emergency sensor is not screwed into the top of the radiator, as in older models, but from the side, on the engine side. I used the electrical connection diagram as in a classic Zhiguli. It works for six months without problems. I didn’t notice much of a difference in operation, except that it began to warm up faster and held the temperature better in winter. I installed a fan from 2106. And 1 (ONE PIECE). It fit right in instead of the standard one and the diffuser. Moreover, it was necessary to file the corner of the diffuser in one place and drill two holes in it. I had to slightly lengthen the frame on which the fan is mounted. Everything turned out to be quite simple and took half a day. I've been driving like this for a year. There have been no problems yet. In general, the fasteners are not a problem. I lengthened the frame with a plate that is used to press the rubber mudguards in Zhiguli cars. There's even a hole in it. If you imagine a Zhiguli fan, it has a diffuser on the left with two holes for attaching to the radiator. I used one, re-drilled the second. On the right there is one hole for fasteners. This plate is screwed there at an angle so that it reaches the standard diffuser mounting hole. Yes, the overheating sensor is a little in the way, the diffuser will need to be slightly filed. You may have to tilt the radiator forward a little, I don’t remember. There remains a frighteningly small gap between the axis of the pump pulley and the device, but it turned out to be enough. When I installed it, I didn't remove the radiator.
Types of cooling systems UAZ Bukhanka
The operation of an internal combustion engine involves the generation of heat. For this reason, the cooling system of the UAZ Bukhanka 409 engine is designed to normalize the temperature regime inside the unit. This function is basic, since on modern engines cooling also performs additional tasks.
Overheating of the motor increases mechanical work, leading to loss of power, as it makes the filling of the chamber worse. Overheated parts independently ignite the working mixture, increasing wear, burning oil, reducing the mechanical properties of the material, rendering the engine unusable. Lack of heat causes fuel to condense on the walls and gradually flow into the oil pan. Lubricant dilution increases wear on rubbing parts, reducing engine power.
The difficulty of operating cooling is that the system maintains an acceptable mode, balancing between too little and too much heat. Ideally, the operating temperature is kept within 90°C.
Additional cooling features:
- Maintaining temperature in the stove, ventilation, air conditioning;
- Cooling the motor lubricant;
- Reducing the temperature in the combustion gas recirculation mechanism;
- Reducing the air temperature in the turbocharger of the engine;
- Reducing the temperature of the working fluid in the automatic transmission.
Due to the difficulty of maintaining a constant operating temperature, three types of cooling systems have been developed. Each type is used in proportion to the requirements for the motor and the conditions in which the unit will be operated.
- Liquid cooling (closed, open);
- Air cooling (natural, forced);
- Mixed cooling (hybrid).
Modern schemes, which include the 402 engine cooling system, more often than others use a combined (mixed) temperature reduction. The scheme combines the properties of liquid substance and air, which complement and compensate each other.
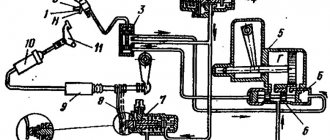
Scheme of cooling system UAZ “Bukhanka”:
UAZ stove operation diagram
In principle, the heating system of any modern car is designed approximately the same. But the UAZ, as a representative of the SUV class, stands apart in this regard - it has two standard stoves instead of one. The additional one is designed to heat the rear part of the cabin. True, this innovation was introduced in 2012, and before that the car was equipped with one heater.
Unfortunately, the front heater simply could not cope with heating the fairly spacious interior, so at temperatures exceeding 10 degrees below zero, the rear passengers had to freeze - this was the reason for making such significant changes to the design of the heating system.
But in any case, the heater on the UAZ works according to the classical scheme - the main coolant is the coolant, which is heated in the engine and gives off its heat in the stove radiator. The effectiveness of this particular scheme has been proven over time.
Unfortunately, the heating system, consisting of a number of components, begins to function noticeably worse over time, due to a number of objective and subjective reasons. It is these that we intend to talk about - this will help, if the quality of interior heating deteriorates, to correctly diagnose the cause of the problem, since in general this is not an easy task in itself. We will also describe the most effective ways to troubleshoot such problems yourself, which will help you save a lot of money.
Operating principle
Cooling is based on the principle of heat extraction by liquid. Afterwards, the substance moves into a device (radiator), where it transfers the accumulated heat to the environment through air, while cooling. Then the working fluid returns to the heated elements and the process repeats. The cooling system of the ZMZ 409, UAZ 402 (421) engines operates on this principle.
When examining the cylinder, it is clear that the product consists of an internal and external part. The gap between these parts is called a jacket; antifreeze moves through this space. You can also read about Razdatka UAZ 469.
Structural features
UAZ Patriot is equipped with a liquid-type heating system, which is part of the engine cooling system. The main heating role is played by the heater radiator, which is housed in a special plastic case located under the center console. The heating and cooling systems of the engine are connected to each other using rubber hoses, and they are separated by a tap and dampers. Below is a general diagram of the interior heating structure.
This is how the coolant circulation process in the heating system of an SUV looks schematically. Heat exchangers of heaters are shown, from which two tubes are removed. One tube is the supply tube, through which heated antifreeze is supplied from the engine. This antifreeze passes through the heater core and thereby warms it up. The stove is not only a heat exchanger, but also a centrifugal fan that operates in several different modes. With the help of a fan, air is forced through the radiator, heated, and then supplied to the cabin through special air ducts. The cooled liquid from the heater radiator flows back into the engine cooling system through a special outlet hose.
The design of the heater provides for the installation of a tap, which is used to shut off the supply of hot air to the heater radiator, and, therefore, to the interior of an Ulyanovsk-made SUV. After all, using the stove in the summer is not relevant, so the engine cooling system is separated by a special heater tap.
Air ducts and heater control unit
An electric pump is installed in the heater design, which is designed to quickly circulate coolant through the engine cooling system. In this case, literally 2-3 minutes after the engine starts, warm air is supplied to the cabin. This heating system is the best device, but it also has its drawbacks. More precisely, there is only one drawback - the impossibility of heating when the engine is turned off, which necessitates the need to periodically start the engine to warm up the interior of the body.
Ulyanovsk-made UAZ 3163 cars produced before 2012 are equipped with one heater, but depending on the configuration, they may have two stoves. Below is a schematic representation of the design features of such a unit.
The second stove is most often located under one of the front seats or between them. An additional heater allows you to deliver warm air not only to the front passenger and driver, but also to passengers sitting in the rear. The presence of two heaters is not in vain, because the UAZ Patriot has an impressive interior volume, which is problematic to warm up using one heater. Therefore, most SUV owners install
Heating and ventilation scheme
So, we looked at the principle of operation of the heater on the UAZ Patriot. Now let's look at how warm and cold air enters the car interior. To do this, you can use a diagram that shows all the main structural elements of the device in question.
Approximate air flow path
Number 1 shows a blower fan, with the help of which cold air enters the heating system. If the supply valve is open and coolant circulates through the system, then radiator 7 heats up. The air pumped by the fan, passing through it, warms up and enters the car interior through air ducts.
Number 4 shows a damper that is used to close the air duct for heating the feet. The design of the device in question also includes a special damper 8, which is used to close the air duct to the chamber with the radiator. Thus, the air pumped by the fan immediately enters the air ducts. Damper 8 on the car is presented in the form of a regulator on the center console. In the photo below, this regulator is on the left.
To summarize, the interior heater is a network of important devices. If one of the components of the heating structure fails, the functioning of the stove is disrupted. In this case, you will need to find the problem and fix it, which is quite easy to do yourself. But you can learn more about the types of heating faults in an SUV and the replacement of component parts from this website.
How often does your Patriot break down?
Poll Options are limited because JavaScript is disabled in your browser.
Design of the UAZ “Bukhanka” cooling system
The cooling system diagram of the UAZ Bukhanka is simple and typical for other engines. The design is closed, the circulation of the cooling liquid is forced.
The elements of the mechanism include:
- Radiator;
- Forced cooling fan;
- Pump for pumping liquid;
- Thermostat;
- Cooling core jacket;
- Pipes;
- Coolant temperature sensor;
- Expansion tank;
- Stove with fan.
Design features of the standard UAZ 452 stove
Most owners of the “loaf” note that at temperatures down to minus 5 degrees in the car interior it is quite tolerable. But, unfortunately, in most of Russia, winters are not so mild. And although temperature records in recent years concern only maximums, frosts above thirty are still not uncommon, and under such conditions you can only drive a UAZ with gloves.
Let's consider the main design flaws, which are the reason for the lack of efficiency of the standard stove:
- Quite large technological gaps in some body parts (especially for first generation cars). The problem is usually eliminated by carrying out thermal insulation work;
- low performance of the UAZ 452 heater radiator. According to the manufacturer, it is about 4 kW, but these are dubious figures: according to sanitary standards, 2 kilowatts is enough to heat a room of 20 square meters. meters. And although a car is not an apartment, especially a “loaf” (see point above), most likely the real numbers are much lower. However, for copper radiators with the same dimensions, this figure is higher than for their aluminum counterparts. In any case, due to the spacious interior of the UAZ 452, the power of the original stove is not enough - the rear passengers will constantly freeze;
- heater motor power. For a standard electric motor this is 25 W. This figure allows you to pump about 150 cubic meters of air into the cabin per hour. This is not much for such a large car. The same NAMI-2 motor with a power of 95 W provides three times greater performance.
Considering that the standard fan is quite noisy, then the idea of replacing it with a more efficient and quiet one comes to the minds of car owners almost first of all.
We also note that the ventilation system of the UAZ 452 does not have an air recirculation function. And although it is not used often, in some cases switching to this mode provides many advantages. So when upgrading the stove, it is advisable to take this factor into account, as well as the possibility of integrating a cabin filter into the system.
UAZ 452 stove disassembled
Radiator and fan
Antifreeze, having passed through the power plant, needs to reduce the temperature. For this purpose, a radiator is used, which performs the function of a cooler by breaking the flow into parts, increasing the blowing area. Initially, the cooling radiator of the UAZ Bukhanka engine 409 is made of copper with three rows of cells. Sometimes, to increase thermal output, the user replaces the product with aluminum. The radiator itself is cooled by the flow of air that blows over the car while it is moving. In a stationary position, or when moving slowly, the running power unit does not receive enough airflow. For this purpose, a fan is provided in the design.
The UAZ Bukhanka car fan is of forced type, which means that when the engine is running, the mechanism operates constantly. The product is driven by the crankshaft through a pulley, regardless of whether the motor is loaded or not. Sometimes users upgrade the unit by installing an electric fan that turns on when the liquid reaches the desired temperature. This saves fuel and adds horsepower to the engine.
Cooling system of UAZ “Bukhanka”:
Purpose and design
Before getting acquainted with the diagram of the UAZ Bukhanki stove, you should study the main functions and design features of this equipment. It is important to note that in the case of the Loaf, a pair of ovens is used, which are divided into a back and a front. Since most motorists drive alone or only with a front passenger, they pay most attention to the front system. As for the rear equipment, it is preferable to replace it with an autonomous heater, which copes with its tasks much more efficiently. The task of the heater on the Bukhanka is no different from the heaters on any other car. That is, here the system exists to maintain optimal temperature inside the vehicle. It is responsible for heating mainly in winter, and also works as a ventilation system, supplying air under the set due to the operation of fans and a motor. Currently, most Loaves are operated with the NAMI heating system, which is characterized by increased productivity and decent efficiency indicators. Structurally, there are 3 main components of furnace equipment. The loaf heater consists of:
- radiator;
- fan;
- a device designed to distribute air flows.
The heater faucet deserves special attention, allowing you to turn on and off the circulation of coolant through the furnace equipment, thereby switching from the heat supply mode to normal blowing of the interior with a fan. The stove system can operate in 2 modes:
- intake and supply of fresh air;
- recycling.
In the second mode, the temperature inside the cabin increases. To achieve an increase in temperature, it is necessary to close the air intakes, and then open the damper or heater tap. If the motorist only needs fresh air, then the manipulations are carried out in the reverse order. You need to turn off the stove tap and open the air intakes.
The corresponding control unit is responsible for controlling the furnace system. The adjustment is entrusted to the stove tap, which can become acidic, jam and leak. In this regard, it often has to be changed. Moreover, it is not uncommon that instead of a conventional automotive faucet designed for the UAZ Bukhanka, motorists use plumbing equipment assembled according to a special design using adapters. In practice, it works better, longer and more efficiently than a standard crane.
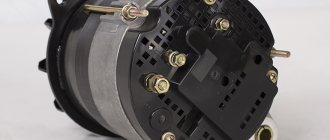
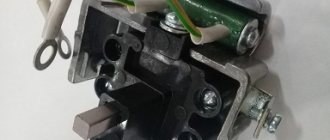
water pump
The water pump on the UAZ Bukhanka car is mechanically driven, centrifugal type. The purpose of the device is to force antifreeze to move through the pipes and voids of the engine. The pump transports the fluid flow to the radiator, where the substance is cooled and back to the cylinders. Malfunctions in the pump will lead to overheating of the motor and serious damage, so the unit requires maintenance. The pump elements are as follows: aluminum frame, impeller, seal. The impeller, rotating, creates a centrifugal force that throws the liquid towards the walls of the frame. The job of the seal is to contain the coolant and prevent leakage at the joint.
Pump for UAZ-409:
how to connect the stove. Grade:
#1 TEMA
- Guest
- Group: Users
- Posts: 7
- Registration: 14 January 07
- Thanked: 0
- Gender: Man
- City: Kyiv
- Real name: TEMA
- Car: GAZ-21
- Phone: 80683738591
- Age: 18
- Attitude towards authenticity: Serious alterations
#2 BOBA
- Guru
- Group: Users
- Posts: 272
- Registration: 28 August 06
- Thanked: 0
- Gender: Man
- City: Astrakhan
- Real name: Alexey
- Car: GAZ 21
- Age: 41
- Attitude towards authenticity: Supporter of modernization
Can I connect one pipe to the heater radiator from the tank (as an input) and the other from the pump (as an output). Exactly. And one more thing, where on the heater radiator is the inlet and where is the outlet? There isn't much difference.
And one more thing: if the partition between the heater radiator pipes is rotten, then the stove won’t heat up anyway!
Post edited by BOBA: September 29, 2008 - 08:40
#3 NoComments
- Red wheels
- Group: Users
- Posts: 4,003
- Registration: 17 July 05
- Thanked: 0
- Gender: Man
- Moscow city
- Real name: Dmitry
- Car: GAZ-21I 1962
- Attitude towards authenticity: Minor changes
#4 BOBA
- Guru
- Group: Users
- Posts: 272
- Registration: 28 August 06
- Thanked: 0
- Gender: Man
- City: Astrakhan
- Real name: Alexey
- Car: GAZ 21
- Age: 41
- Attitude towards authenticity: Supporter of modernization
#5 SERZHANT
- "Rumpled" racer.
- Group: Users
- Posts: 966
- Registration: 29 January 07
- Thanked: 0
- Gender: Man
- City: St. Petersburg, st. Sofia.
- Real name: Mirolyubov Sergey
- Car: GAZ-21 (1959), GAZ-22 (1966).
- Telephone
- Age: 37
- Attitude towards authenticity: Other
#6 vakula
- Supreme shaman
- Group: Users
- Posts: 4,893
- Registration: 05 June 08
- Thanked: 0
- Gender: Man
- Moscow city
- Real name: Burov Sergey
- Car: GAZ 21I 1961, GAZ 2402 1980 SUZUKI Grand Vitara 2.4, 2008
- Phone: 89265410183
- Age: 56
- Attitude towards authenticity: Minor changes
#7 Valday
- Supreme shaman
- Group: Users
- Posts: 646
- Registration: 25 June 08
- Thanked: 0
- Gender: Man
- City: Penza region
- Real name: Vladimir
- Car: GAZ 21R 1966
- Age: 38
- Attitude towards authenticity: Supporter of modernization
vakula (14.7.2009, 17:48) wrote:
+1 It couldn’t be any other way, what other “polar opinions”!
#8 SERZHANT
- "Rumpled" racer.
- Group: Users
- Posts: 966
- Registration: 29 January 07
- Thanked: 0
- Gender: Man
- City: St. Petersburg, st. Sofia.
- Real name: Mirolyubov Sergey
- Car: GAZ-21 (1959), GAZ-22 (1966).
- Telephone
- Age: 37
- Attitude towards authenticity: Other
Post edited by SERZHANT: July 14, 2009 - 22:08
#9 vakula
- Supreme shaman
- Group: Users
- Posts: 4,893
- Registration: 05 June 08
- Thanked: 0
- Gender: Man
- Moscow city
- Real name: Burov Sergey
- Car: GAZ 21I 1961, GAZ 2402 1980 SUZUKI Grand Vitara 2.4, 2008
- Phone: 89265410183
- Age: 56
- Attitude towards authenticity: Minor changes
#10 SERZHANT
- "Rumpled" racer.
- Group: Users
- Posts: 966
- Registration: 29 January 07
- Thanked: 0
- Gender: Man
- City: St. Petersburg, st. Sofia.
- Real name: Mirolyubov Sergey
- Car: GAZ-21 (1959), GAZ-22 (1966).
- Telephone
- Age: 37
- Attitude towards authenticity: Other
#11 Mayor
- Supreme shaman
- Group: Users
- Posts: 7,888
- Registration: 26 November 04
- Thanked: 0
- Gender: Man
- City: Baku Azerbaijan
- Real name: Adil Mehmandarov
- Car: GAZ-21R 1966/1966
- Age: 55
- Attitude towards authenticity: Supporter of modernization
What kind of book is this? Are you really that smart? Although in manual 21 from 1962 I found typos in the electrical diagram, and in manual 24 the crankcase ventilation diagram was replicated upside down. But these are typos. But the polar opinion is already serious.
Well, about the pump. In principle, our pump is an ordinary centrifugal pump. And in this case, the suction cavity is coaxial with the shaft, and the discharge cavity is at the periphery. As for the direction of rotation, it matters only if the impeller has spiral blades, and the discharge outlet is located tangential to the impeller.
#12 Igor_Kiev
- Guru
- Group: Users
- Posts: 296
- Registration: 27 December 07
- Thanked: 0
- Gender: Man
- City: Ukraine, Kyiv, Obolon
- Real name: Igor Sergeevich
- Car: GAZ-21S (1969), GAZ-21R (1965)
- Age: 44
- Attitude towards authenticity: Supporter of modernization
The funny thing is this: if the hose from the stove (connection to the upper pipe) is removed from the steel corner pipe (fitting) on the pump, then when the engine is gassed, water flows perfectly from the hose with quite a strong pressure, that is, the pump pumps water (or antifreeze) into stove radiator. That’s why, in the factory connection, the stove is connected from the stove faucet with a hose to its upper branch pipe (the valve itself is on the BC or on the cylinder head), and the liquid flows by gravity through the stove to the lower branch pipe and then flows through the hose and steel pipe to the corner fitting on the pump.
This experiment should be carried out with the corner fitting on the pump closed with a finger (or a rubber plug) and with the hose from the stove slightly raised up (that is, above the stove) so that there is no gravity flow from the stove due to gravity. This hose is connected to the upper radiator pipe of the stove. The cooling system must be filled with water so as not to wash your face and fill everything with antifreeze.
So the pump still pushes the liquid into the stove, but then, after the corner fitting in the pump, it picks up this liquid with its impeller and directs it to the BC for circulation according to the indicated scheme, at the same time washing and cooling the BC.
Post edited by Igor_Kiev: September 27, 2009 - 14:15
Cooling jacket and tubes
The space between the double walls of the combustion chambers of the UAZ car engine is located inside the power plant and the core head. Visually, it represents recesses designed to move fluid and remove heat during engine operation. Antifreeze is transported to the heat exchanger and back through pipes. Malfunctions in the elements lead to overheating of the motor and loss of operation of the unit.
Long-term operation of the engine clogs the cavities and impairs the passage of antifreeze. This is typical when the engine is running on water, since the substance is prone to scale formation and, consequently, a reduction in the cross-section of the holes and corrosion. Destruction of the cylinder walls leads to leaks and liquid entering the cylinder, and this is a major repair of the unit. In order to prevent breakdowns, it is recommended to operate the engine with antifreeze that is neutral to the engine materials, and replace the substance within the prescribed time frame.
Equipment replacement
If you decide to replace the heater yourself, you should first familiarize yourself with the UAZ Bukhanka stove diagram to connect the electrical component. It is not difficult to install the equipment itself, securing it in the conventional engine compartment located inside the car. But even here you should adhere to certain rules and recommendations. The process will be considered using the example of using NAMI equipment, which has better performance and also boasts the presence of a cabin filter, which is not present in the standard Bukhanka heater.
- The first step is to drain the antifreeze from the system and also disconnect all existing wiring. To make it easier to reassemble and connect, you can write down all your steps or mark the wires, pipes and hoses;
- You need to disconnect the console from the shield, then remove the heating unit, remove the air intake flap, remove the seal and thoroughly clean all existing open recesses;
- Take measurements under the air filter, placing its housing against the surface. Next, make several mounting holes. Just don't use a drill with a diameter larger than 3.2 millimeters;
- At the installation site, apply a layer of high-quality automotive universal sealant that is resistant to moisture and sudden temperature changes. Make the layer large enough. Install the filter housing and secure it. The filter itself can already be inserted into its mounting slot;
- A new heater is being installed in the interior. It is fixed with studs, nuts and an M6 bolt. Secure everything as securely as possible;
- Then the console is installed, the entire structure is mounted on self-tapping screws;
- Then you can start connecting the control rod and fixing it;
- Connect all pipes through which antifreeze passes. For reliability, it is recommended to tighten them with clamps;
- Don’t forget about the channels that allow you to blow on the windows, avoiding them from fogging when the car is used in conditions of high humidity or precipitation. Every car should have windshield defrost. Be it a latest generation Mercedes or the good old Bukhanochka produced by UAZ;
- The installation is completed by connecting the electrical component. There is a connection diagram here that is worth considering separately.
In reality, there is nothing particularly difficult about changing the standard heating system on Bukhanka and installing more efficient and productive equipment in place of the old stove.
Electrical connection diagram
The system will not be able to operate and heat your Loaf if it does not receive power. There is a special scheme for connection. By acting consistently and carefully, you will be able to power your new stove without any outside help and enjoy the efficient operation of the heater.
- To begin, choose a location to place the mass. The black wire is responsible for ground. It is fixed on any metal surface convenient for you. It is best to do the mass on the body;
- Next comes the positive wire. When connecting it, first disconnect the minus from the battery so that the machine is not under voltage during the work;
- Plus it is recommended to enclose in a corrugated casing. Then the wire is pulled to the safety block, that is, to the block on the Loaf;
- Please note that on a car there are 4 fuses in its block. The last one, that is, the fourth one, is constantly under voltage. You should connect to any of the first three. Just make the connection from above, in front of the standard fuse in the block;
- In principle, at this point the connection of the electrical circuit can be considered complete. Be sure to first check the functionality of the furnace equipment.
It is safe to say that the heating system used on UAZ Bukhanka vehicles has a fairly simple design and layout. Therefore, experienced motorists who are accustomed to doing maintenance, repairs and some modifications with their own hands should not have any problems understanding the Bukhanka heater. But it is extremely important to constantly monitor its performance, carry out preventive measures, and monitor the condition and amount of coolant. Pay special attention to the weakest points of the stove. The owners of Bukhanok themselves include standard faucets among them. The faucet often turns sour, jams and leaks. This is due to the long downtime of the faucet, which drivers simply forget to periodically open, purely for preventive purposes.
Heat meter
Temperature meter UAZ Bukhanka, a part that displays information about the degree of heating on the instrument panel. Since forced ventilation of the radiator is installed on the motors used, the sensor does not control the switching on of the product.
If the motor has been rebuilt and an electric fan has been installed, the temperature sensor reads information about the temperature conditions. Afterwards, the information is transmitted to the control unit, which analyzes and regulates the degree of heating. The meter is installed on the engine thermostat; product malfunctions lead to overheating of the unit and breakdown.
Heating degree meter, motor ZMZ-406:
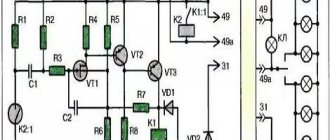
Fan cooling system indication diagram
In general, everything is simple, any two-color LED, according to your taste (in terms of size), from RingBright, with a diameter of 8 mm. Using this diagram, you can connect both electric fans and an electric coupling. Instead of a fan switching unit, you can use a fan switching sensor from a classic Lada, for example. In principle, it is logical to switch the orange wire going to the LED from the toggle switch to pin 85 of the relay, then the red indicator will light up not only when the fans are forced to turn off, but also when the relay malfunctions. Sensor switching temperature: VAZ-2108 - 94-99 degrees, AZLK-2141 - 82-87 degrees. Installation of a “double” electric fan
Expansion tank
First of all, the expansion tank stores a supply of antifreeze. A certain volume of fluid must always be in reserve to maintain normal engine operation. In addition, vapors and gas are released into the tank, which accumulates in the system during operation. The expander is connected to the atmosphere by a valve installed in the lid. The valve is configured in such a way that there is always excess pressure in the system. This allows the engine to operate at high temperatures, but without the antifreeze boiling. Excess pressure is released from the valves into the atmosphere.
What is a viscous coupling?
By means of this clutch the speed of rotation of the impeller is controlled. On a cold engine, the impeller practically does not spin. The higher the engine temperature, the faster the impeller spins. I installed a viscous coupling. I didn't like it. I left the winter and it began to spin easily all the time, and there was nowhere to get PMS 10000 for filling... I spat on it and installed two electric fans - they work fine.
The idea is generally correct, but with our quality it comes down to nothing. The difference from a meat grinder is that the temperature does not need to be regulated with blinds; unlike the Carlsons, it does not consume electricity; in addition, to overcome fords, you do not need to turn off the impeller or remove the belt; in extreme cases, it can be tied with a cord. This is in theory, in practice, for some reason, the viscous coupling works for no more than six months.