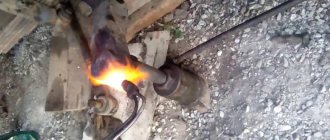
The pneumatic power steering on KamAZ is an important mechanism of the clutch system, which is designed to reduce the load on the pedal exerted by the driver of the vehicle. How to bleed the PGU on a KamAZ to restore the functionality of the clutch system? This device must be pumped from time to time, including when adjusting the clutch. The unit is subjected to serious pressure, therefore, problems often arise with it - for example, extraneous noise or crackling, slipping, etc.
How to bleed the clutch on a KAMAZ
The pneumatic hydraulic booster on KamAZ helps the driver use less force to press the clutch pedal.
If the clutch system begins to work incorrectly, you can try to bleed the PSU. The PSU needs to be periodically pumped, because the clutch is a highly loaded unit, so sometimes extraneous noise, crackling, and slippage occur. The PSU is integrated into some old and almost all new Kamaz models. The primary task of this unit is to ease the driver’s labor costs, because the clutch in a KamAZ, as practice shows, is very massive, the springs press the discs very strongly, so frequently turning the accelerator on and off can be a very tedious task.
On some Kamaz models, the PGU is part of a divider installed between the clutch and gearbox. When changing gears, the driver turns off the divider, after which the pneumatics turn on. The divider is switched off using the PSU rod drive valve. That is why the divider turns on and off along with pressing or releasing the clutch pedal. This gearbox operating system is organized in many Kamaz models, and it is especially popular for modern modifications of trucks. Classic examples of such a switching system design can be considered KamAZ 5320, 65115.
Technically, the PGU is a pneumatic-type hydraulic system, consisting of the following spare parts: piston, piston pusher, intake, bypass valves, fuel starting system, special sealing material, plug, air compression system, nut, locknut, spring, diaphragm, gearbox.
Why is it important to bleed the clutch? While driving, the clutch pedal should “move” smoothly, without delays or extraneous noise. Difficulties with switching can lead to unusual situations on the road. Bleeding should be carried out on all Kamaz models.
Kamaz PGU malfunctions
The pneumohydraulic booster (in other words, PGU) is part of the Kamaz composite clutch unit. Similar to a conventional power steering, which makes it easier to turn the steering column, the PSU allows you to apply less effort when pressing the clutch pedal.
The specifics of truck transport require the complexity of controlling the mechanisms. Among other things, the driver sometimes has to make additional efforts to control the tractor. That is why designers have come up with many upgrades to reduce physical activity to a minimum.
The body of the device is reinforced with two types of metal: the front part is aluminum, the back part is cast iron. A sealing connecting gasket is laid between the two parts, ensuring the best tightness.
In ordinary cars, a clutch that is difficult to press must be replaced because it is either burned out, or the cable is jammed, or the basket has “flyed.” However, the cargo clutch was always pressed harder than the passenger clutch. Pneumohydraulics significantly facilitate the moment of squeezing the accelerator. A small, but such an important detail, has the following components:
- The tracking system is a special mechanism that transmits information to the central electronic unit. Initially, the clutch pedal is in a hard position, it is the tracking system that transmits the pressing impulse, after which the process of squeezing the accelerator becomes easier.
- The executive pneumatic cylinder is the heart of the system and performs a mechanical function.
- Driven disc lining wear indicator - transmits information about the current technical condition of the system.
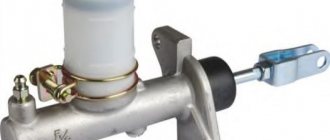
Of course, hydraulics is unthinkable without hydraulic fluid. It forms the basis of the system and is transported between the components of the mechanism under high pressure, creating the necessary torque. Location: master cylinder. The pneumohydraulic cylinder forces the pistons to work together with the servo system. After the pressure is reduced, the parts return to their original position. Actually, the operating principle is identical to almost all Kamaz cylinder mechanisms: high pressure - push, low pressure - initial position. This is why the presence of hydraulic fluid in the system is so important; without it, it is impossible to operate the mechanism.
Amplifier operating principle
The pneumatic hydraulic booster works in the clutch system so that the mechanism neutralizes the pressure exerted by the driver when pressing the pedal. By squeezing the accelerator, the fuel moves the pistons mounted on the amplifier. When pressed, the piston moves down, opening the intake valve. The hole allows air flow to reach the level of the pneumatic piston, and the pusher retracts the fork, which acts on the clutch.
The nature of the press determines the state of the clutch system. If the pedal fails, it means that an air cushion has formed in the accelerator. If the clutch system is not repaired in time, the transmission may subsequently suffer.
To identify the problem as quickly as possible, clutch diagnostics should be carried out as often as possible. Timely checking of one unit can save the “life” of the entire gear shift mechanism.
- Initially, you need to determine how much it is necessary to pump the CCGT unit. The main indicator will be the absence or presence of air leaks. If the leak is severe, then the air-hydraulic booster is not working well.
- The test is carried out by pressing the pedal with the engine turned off. If you hear a characteristic whistle, it may be due to a leak. Sometimes it can be difficult to determine the presence of extraneous noise by ear, then you can use a soap solution. It is applied to the site of the suspected leak; if bubbles appear, it means the clutch system was faulty.
- Before pumping begins, the PGU system is secured with bolts. The tank containing the hydraulic fluid is checked to ensure there is the required amount.
- It is necessary to check the springs for adjusting the movement of the clutch mechanisms; if they are stretched, they should be replaced.
If the CCGT system is faulty, it needs to be bled. This service is available at absolutely all Kamaz service centers, however, it is quite possible to do it yourself. Bleeding is possible if the hydraulic booster itself is in working condition.
- Adjust the free play of the pedal. The ideal amplitude should be 1.5 cm. It is easy to check: place a ruler under the pedal, depress the pedal, and you can see what part of the pedal “travel” is. We leave the pedal in the highest position, loosen the crown nut to allow the eccentric pin to move freely, rotate the pin, after which the gap decreases, fix the gap to approximately 0.6-1.5 cm, then tighten the nuts. The pedal itself is set at around twenty centimeters, not less than eighteen centimeters. The adjustable movable stop at the top of the accelerator pedal will help correct the position of the pedal.
- We adjust the free play of the clutch. The bleeding process continues with adjustment work around the release clutch. It is necessary when disengaging the clutch; it has a free play of approximately 3-4 mm. With this clutch indicator, the fork stroke is 4-5mm. If the indicators have a different meaning, they need to be adjusted. To do this, the deactivation fork is moved to the side to remove the spring mechanism. Lever travel can be checked manually. The shaft is adjusted using a spherical nut, which is part of the pneumatic pusher. After reaching the required amplitude, the spring is fixed.
- We adjust the full stroke of the pusher. The normal value for this system is 2.5 cm. At lower values, it will be problematic to depress the clutch normally. Initially neglected full speed problems entail problems in the operation of the gearbox. You can check the operation of this unit by pressing the pedal all the way. If the stop is insufficient, you can check the presence of fluid in the tank, or adjust the free play again. The last, third stage of adjustment ends with pumping.
After going through all the preparatory steps, you can try to bleed the system yourself.
Repair
There are a lot of Kamaz service centers, each equipped with special diagnostic equipment and fault detection. If the fault is identified by the driver himself, there is the possibility of self-repair, let’s look at a small algorithm for carrying out repair work on the PSU.
- We secure the rear body with a vice, ensuring complete immobility of the part.
- We unscrew the bolts.
- Remove the air valve inlet cover and take out the valve itself.
- Remove the front housing completely.
- Remove the diaphragm springs.
- We remove the diaphragm.
- We empty the rear housing: take out the ring and pistons.
- Unscrew the cover of the outlet seal and bypass valve.
- We remove the vice.
- Pull out the retaining ring.
- Remove the cones, washers, and seat from the valve stem.
- The follower piston releases from the sealing ring.
- The sealing ring is pulled out along with the pneumatic piston, and we dismantle the cuff.
- Removed parts must be thoroughly washed. Kerosene and gasoline are suitable for washing. The washed parts are blown with compressed air and are damaged.
- After carefully examining the spare parts and replacing unsuitable parts, assembly is carried out in the reverse order.
We can draw a simple conclusion: assembling/disassembling a PSU is a very painstaking task, but if you follow the process technology, it is quite possible to do it yourself.
CCGT pumping
An experienced mechanic will pump the PSU on his own; a less experienced specialist would be better off taking a partner. The pumping process, which is essentially also a cleaning process, consists of several important steps.
- Initially, it is necessary to thoroughly clean the system from dust, dirt, grease deposits and lubricants. After cleaning, a special hose is put on the valve, the second end of which is lowered into a container with working fluid.
- It is necessary to sharply press the clutch pedal all the way several times, after which during the last press it must be fixed in the depressed position. When pressed, the bypass valve rotates, and the liquid inside the air-hydraulic booster will begin to flow under pressure into the container. At this stage, it is easy to determine whether there is air in the system - by the presence or absence of bubbles.
- The PSU is pumped several times until there are no bubbles at all. After finishing the work, the bypass valve is screwed on, the hose is disconnected, and the rubber cap is put on.
- It is imperative to replenish the tank with working fluid, the level of which must be at least four centimeters from the edge.
Some masters bleed the clutch without a container, using a regular pump; some, on the contrary, use only glass containers. Pumping will give positive results if it is carried out correctly, performing all the work step by step.
svxab › Blog › Clutch PSU - pumping in 2 MINUTES by one person
Many truck owners have tried to bleed the PSU, others don’t even know what kind of pain it is.
The solution is simple and cheap and does not require anything supernatural. 1 Bottle 1.5 liters 2 Hose %6mm L-2 meters 3 Two nipples for car discs - remove spools 4 Clamps - plastic for wiring, thin 5 Brakes - enough to fill the entire system and the expansion tank, on the first try
I think the photo of the installation speaks for itself; comments about its production are not valid.
The system is drained and washed with fresh brake fluid (the nipple is cut out from the cargo chamber so that it covers the neck of the expansion tank and we press 3-4 atm with air)
see also
Comments 10
Vitalya, for those who have to pump up the PSU for the first time, explain again and “slowly” how to prepare and pump up correctly. I have a clutch cylinder under the pedal, it has its own fitting for bleeding, then the line for 8 meters goes into the PSU, which is not easy to get to. In short, I am learning and wise...
There is a fitting on the pedal for bleeding the master cylinder - this will be done later if necessary. You need to climb to the PSU, there should be a fitting on it and you need to put a tube on it and take it out from under the car and connect a bottle to this tube, you need to pour brake fluid into the bottle with a reserve (it’s better to let the extra one remain, than to then drive bubbles through this system because for reconnections). Hang the bottle and mark the brake fluid level on the bottle. We climb further, open the fitting on the PSU so that only the brake fluid passes and climb out, connect the air pressure to the upper nipple, gradually increase the air pressure in the bottles and wait until the level begins to fall (it’s better when slowly so that there is more time for reaction), the brake fluid goes and checks all connections for leaks quickly. There are no leaks, no drips, the brake fluid leaves the bottle in the right direction, then we go to the expansion tank where the brake fluid is filled in for the clutch according to the car’s instructions and we find the brake fluid in the expansion tank. The brake fluid appears in the reservoir, then press the clutch pedal 3-4 times. And we run to close the fitting on the PSU. Remove the pressure from the bottle. We level the level in the expansion tank as necessary. Basically everything. The pedal should immediately become hard - this means it worked.
How to bleed a PGU on a KamAZ - Proper bleeding of the clutch
The pneumatic power steering on KamAZ is an important mechanism of the clutch system, which is designed to reduce the load on the pedal exerted by the driver of the vehicle. How to bleed the PGU on a KamAZ to restore the functionality of the clutch system? This device must be pumped from time to time, including when adjusting the clutch. The unit is subjected to serious pressure, therefore, problems often arise with it - for example, extraneous noise or crackling, slipping, etc.
What kind of mechanism is this
PGU is a pneumatic type hydraulic amplifier. This device consists of the following structural elements:
- piston;
- piston pusher;
- two valves - inlet and bypass;
- fuel fluid intake systems;
- complex seal;
- traffic jams;
- air compression systems;
- a protective cover that prevents the risk of damage to the amplifier structure;
- spherical nut and locknut;
- spring mechanism;
- diaphragms;
- gearbox
The pneumatic hydraulic booster must be pumped from time to time. This allows the clutch system to work as it should. The level of safety increases, because when you press the appropriate pedal, there is no subsidence or slippage - very dangerous phenomena.
Pumping of the CCGT unit is relevant for any models and modifications of KamAZ, for example, 43114, 5511, 53501, 65117, 6520, 43118, 55111, etc.
Kamaz PGU malfunctions
The pneumohydraulic booster (in other words, PGU) is part of the Kamaz composite clutch unit. Similar to a conventional power steering, which makes it easier to turn the steering column, the PSU allows you to apply less effort when pressing the clutch pedal.
The specifics of truck transport require the complexity of controlling the mechanisms. Among other things, the driver sometimes has to make additional efforts to control the tractor. That is why designers have come up with many upgrades to reduce physical activity to a minimum.
The body of the device is reinforced with two types of metal: the front part is aluminum, the back part is cast iron. A sealing connecting gasket is laid between the two parts, ensuring the best tightness.
How an amplifier works
The essence of the PSU action is that this mechanism disables the clutch system, thus neutralizing the impact of significant pressure on it from the driver. When a person presses the corresponding pedal, the fuel fluid begins to press on the piston system of the amplifier. The piston moves down, causing the intake valve to open. An air flow rushes into the opened hole under pressure, which reaches the pneumatic piston pusher. This pusher retracts the fork, causing the clutch to deactivate.
Bleeding the PSU on a KamAZ EURO is important if the driver notices a lack of pressure in the system, which is why the clutch does not disengage immediately. In addition to such negative manifestations of this problem as slipping and slipping of the pedal, this can also cause wear and tear on the mechanisms and parts of the gearbox.
Breakdown options
Any mechanism has its own resource, therefore, breakdowns are inevitable. Some car parts are replaced as planned after traveling a certain mileage. The clutch is a specific “organ” of the car that is constantly used. Moreover, the service life directly depends on the conscientious and careful attitude of the driver. If you squeeze the accelerator carelessly, throw it, or don’t press it all the way, you can quickly “burn the clutch” or damage the PSU. Technically, these problems can be reduced to several points.
- The rubber ring or cuff swells, and accordingly, the PSU follower piston jams. A jammed part, designed to be in constant motion, naturally stops in one position, therefore slowing down the operation of the entire system.
- A damaged intake valve produces too little compressed air. Air flows help the system create the necessary pressure, the absence of which leads to breakdown.
- Air inside the hydraulic drive disrupts circulation. The driver may feel an excessive amount of air in the form of sagging of the clutch pedal.
Due to the fact that the basis of the operation of the CCGT is musculoskeletal moments occurring under high pressure, subsidence of soft rings, cuffs, lack of air or its presence in the wrong places lead to breakdowns of the entire system, disrupting the operation of the CCGT.
Inspection and testing work
Initially, it is necessary to determine whether the clutch needs to be adjusted and bled. This can be determined by the presence or absence of air leakage. The stronger the leak, the worse the pneumatic hydraulic booster works.
You can check by simply pressing the pedal (the engine must be turned off). If the driver hears a characteristic whistle, this indicates a strong leak. If you cannot detect it by sound, you can apply a soap solution. The appearance of bubbles will indicate a malfunction of the clutch system.
Before pumping the clutch on a KamAZ, the PSU device must be tightened with fastening bolts. It is also advisable to make sure that there is enough liquid in the tank to meet the needs of the system. Also check that the springs that control the movement of the corresponding clutch mechanisms are not stretched.
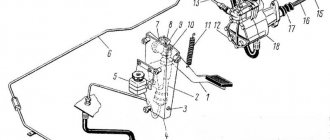
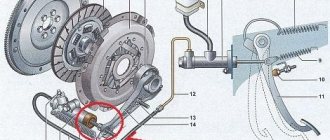
CONSTRUCTION AND OPERATION OF WABCO CCGT
The clutch is released using a pneumatic-hydraulic booster (PSU) from Wabco. The PGU consists of 3 main parts: an actuator pneumatic cylinder, a servo system and a clutch lining wear indicator.
The CCGT structure is shown in Fig. 1.
Rice. 1. Pneumohydraulic booster ( PGU ) from Wabco :
- 1 — hydraulic housing;
- 2 — hydraulic piston;
- 3 — hydraulic cuff;
- 4 - lining wear indicator;
- 5 — wear indicator washer;
- 6 — pointer body;
- 7.10—pressure spring;
- 8 — pneumatic piston;
- 9 — pneumatic cylinder;
- 11 — cover;
- 12 — rod;
- 13 — drainage tube.
- A - gap when the linings are worn;
- CCGT tracking system .
When you press the clutch pedal, the fluid pressure from the master cylinder is transmitted through pipelines to the pneumatic hydraulic booster, where it acts on the hydraulic piston 2 (Fig. 1) of the PSU and piston 1 (Fig. 2) of the follower device.
Under the action of the follower piston, pneumatic piston 2 moves (Fig. 2), which acts on the follower valve 5. The valve opens access to air into the pneumatic cylinder 9 (Fig. 1) of the PSU , increasing the force effect of the PSU on the clutch release fork. With the help of a tracking device, the air pressure entering the pneumatic cylinder of the PSU , depending on the force of the driver on the clutch pedal.
After the pedal stops working, the liquid pressure in the CCGT is released, the pneumatic valve of the tracking system is closed, and the pneumatic piston of the CCGT is set to its original state.
With the help of a pressure spring, piston 8 (Fig. 1) of the PSU with rod 12 is always connected without backlash to the clutch fork, clutch, diaphragm spring, and clutch pressure plate. of the PSU monitors the wear of the linings - as the piston wears, it moves more and more deeper into the PSU and affects the lining wear indicator.
The wear indicator 4 moves out more and more under the influence of the piston, the indicator washer 5 moves away from the indicator body 6 and when the gap between the washer and the track reaches 23 mm, the wear of the linings reaches a critical value and it is necessary to replace the linings or the driven disk with the linings assembled.
Source: avtokam.com
Adjusting the pedal free play
Ideally, its free play is no more than 1.5 cm. You can check it this way: a regular ruler rests on the floor under the pedal, after which they gently press the pedal, measuring how much it has moved freely, that is, without touching the piston.
If the indicator exceeds the established norm, it means that there is a gap between the mechanisms that should not exist. It’s easy to fix, using model 65115 as an example:
- the pedal should be in the highest position, there is no need to press it;
- the castle nut is loosened to allow movement of the eccentric pin;
- the eccentric pin is carefully rotated, as a result of which the existing gap is reduced;
- set the gap within 0.6-1.5 cm, then tighten the nut back.
As for the stroke of the pedal itself, it should not exceed 20 cm and not be less than 18 cm. The problem, if any, can be corrected by adjusting the movable stop, which is located at the top of the pedal.
Adjusting clutch free play
Further pumping of the clutch on a KamAZ 65115 vehicle involves carrying out adjustment work regarding the release clutch. The part is installed to disengage the clutch. The amount of free play should be within 3-4 mm. This indicator will correspond to a similar indicator of the fork stroke - it is approximately 4-5 mm. Changing these numbers requires immediate adjustment.
- the fork, which deactivates the clutch, is moved to the side, and the spring mechanism is removed;
- the lever stroke is checked manually;
- restoration of the normal motion of the coupling is carried out by adjusting the shaft with a spherical nut, which is part of the pneumatic pusher;
- when the required value is reached, the spring is installed in place.
Adjusting the full stroke of the piston pusher
The optimal indicator of the amplitude of movement of the piston pusher for 5320 EURO is at least 2.5 cm. If it is smaller, it will not be possible to achieve high-quality clutch release. Because of this, characteristic problems arise when working with this system, as well as the gearbox.
You can check whether the movement of this mechanism corresponds to the norm by pressing the pedal all the way. If it is insufficient, then you need to check the fluid level in the tank, and also adjust the free play again. The final stage is the actual pumping. You can also read about the KamAZ speed sensor - Where is it located and the connection diagram.
Adjustment
The final stage of returning the system to working capacity is the adjustment of the mechanism. To adjust the unit, it is necessary to ensure the full stroke of the pusher, which is approximately twenty-five millimeters. By pressing the pedal all the way, the clutch performance is measured. A proper indicator indicates that the repair work has been carried out correctly. If the indicator is below the norm of 25, you should first check the presence of hydraulic fluid and the condition of the air systems.
The occurrence of any malfunction of the CCGT is the reason for urgent repairs. Different Kamaz models may have slightly different structure and functionality of the PSU system. The simplest mechanisms are those installed on the 5320, the most popular type of tractor-semi-trailer among the Russian truck industry.
Source: www.opex.ru
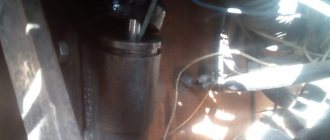
Pumping PSU on KamAZ
It is advisable to do this work together. If a person is experienced, he can do everything alone. Bleeding the KamAZ clutch begins with thoroughly cleaning the rubber cap of the bypass valve from dust, dirt and grease. After this, a standard rubber hose is put on it. The second end of this hose is lowered into a suitable container that already contains the working fluid. The container should be filled no more than a third with it.
Next, you need to sharply and quickly press the clutch pedal three or four times. The last time it is not released, but held in the pressed position. In this case, it is necessary to unscrew the bypass valve slightly. At this moment, the liquid inside the pneumatic amplifier under pressure will begin to flow into the glass container. It is important that characteristic air bubbles indicate that there is air in the system.
How to pump up a PGU on a KamAZ
When replacing the PSU or clutch master cylinder, you have to refill the system with brake fluid, so it becomes necessary to remove air plugs from the pipes and cylinders. The usual method of pumping by pressing the pedal and releasing air through the bypass valve, as a rule, does not give any results. Therefore, we have to use alternative pumping options.
The simplest and most effective way is to fill the brake fluid through the PSU bypass valve. To do this, you need to use a regular pump for inflating car tires. Pour liquid into it. Connect the hose to the PSU bypass valve and fill the fluid until it appears in the expansion tank of the clutch master cylinder. After this, close the bypass valve and press the clutch pedal several times. All clutches are bled. And you don't need to put in any more effort.
If you have already filled the fluid through the expansion tank and you cannot bleed the clutch, you can cheat the situation in another way. I can’t say one hundred percent why this happens, but if you press the pedal a little and fix the clutch master cylinder piston with a stiff wire so that the piston cannot return to its original position,
When you press the pedal again, the clutch begins to pump. If you perform this operation several times, the clutch will be completely pumped. This method almost always helps. Apparently, air is squeezed out of the cylinder cavity and it begins to work, which leads to the desired result.
There is another option for pumping when nothing else helps. Forcefully squeeze out the clutch fork drive lever, that is, using a crowbar or a powerful pry bar, squeeze out the clutch basket. In this case, the PSU rod that presses on the lever will be released. In this case, just a few presses on the clutch pedal will allow the rod to rest against the lever again, after which the clutch will begin to pump.
I would also like to draw your attention to one detail. There is a rubber seal on the rod of the main working cylinder; it very often breaks and jumps off the rod, but without it it is almost impossible to bleed the clutch, and therefore you have to constantly check its presence.
It is also worth paying attention to how the PGU is installed; if on KamAZ 5320 the installation does not raise any doubts, then on the 65115 PGU it can be installed and vice versa. And if in doubt, make sure the bypass valve is on top. Otherwise, the clutch will not bleed.
Source: avto-mechanik.ru
How to bleed a pg on a Kamaz 65115
Many truck owners have tried to bleed the PSU, others don’t even know what kind of pain it is.
The solution is simple and cheap and does not require anything supernatural. 1 Bottle 1.5 liters 2 Hose %6mm L-2 meters 3 Two nipples for car discs - remove spools 4 Clamps - plastic for wiring, thin 5 Brakes - enough to fill the entire system and the expansion tank, on the first try
I think the photo of the installation speaks for itself; comments about its production are not valid.
The system is drained and washed with fresh brake fluid (the nipple is cut out from the cargo chamber so that it covers the neck of the expansion tank and we press 3-4 atm with air)
Pneumohydraulic booster (PGU) KamAZ
- Pneumatic hydraulic booster (PGU) 13
- Pneumatic hydraulic booster (PGU) 6
- Pneumatic hydraulic booster (PGU) 3
Code: 000001060
Manufacturer: KNORR BREMSE
97 pcs
7 781
Code: 000040081
65 pcs
7 326
Code: 000030602
Manufacturer: WABCO
30 pcs
8 545
Code: 000008991
Manufacturer: KNORR BREMSE
18 pcs
11 990
Code: 000428634
Manufacturer: HOTTECKE
16 pcs
4 635
Code: 000025677
Manufacturer: WABCO
15 pcs
10 163
Code: 000066716
Manufacturer: HOTTECKE
5 120
Code: 000050149
Manufacturer: WABCO
13 048
Code: 000460182
Manufacturer: PJSC PAAZ
4 994
Code: 000018428
Manufacturer: WABCO
17 676
Code: 000756336
Manufacturer: KNORR BREMSE
8 days
8 370
Code: 000832418
Manufacturer: HOTTECKE
to order
4 490
Code: B00009679
Manufacturer: WABCO
to order
25 980
did not you find what you were looking for?
Please tell us about your problem
Thank you! Your comments are very important to us and help us improve our search results for all our customers
see also
Comments 10
Vitalya, for those who have to pump up the PSU for the first time, explain again and “slowly” how to prepare and pump up correctly. I have a clutch cylinder under the pedal, it has its own fitting for bleeding, then the line for 8 meters goes into the PSU, which is not easy to get to. In short, I am learning and wise...
There is a fitting on the pedal for bleeding the master cylinder - this will be done later if necessary. You need to climb to the PSU, there should be a fitting on it and you need to put a tube on it and take it out from under the car and connect a bottle to this tube, you need to pour brake fluid into the bottle with a reserve (it’s better to let the extra one remain, than to then drive bubbles through this system because for reconnections). Hang the bottle and mark the brake fluid level on the bottle. We climb further, open the fitting on the PSU so that only the brake fluid passes and climb out, connect the air pressure to the upper nipple, gradually increase the air pressure in the bottles and wait until the level begins to fall (it’s better when slowly so that there is more time for reaction), the brake fluid goes and checks all connections for leaks quickly. There are no leaks, no drips, the brake fluid leaves the bottle in the right direction, then we go to the expansion tank where the brake fluid is filled in for the clutch according to the car’s instructions and we find the brake fluid in the expansion tank. The brake fluid appears in the reservoir, then press the clutch pedal 3-4 times. And we run to close the fitting on the PSU. Remove the pressure from the bottle. We level the level in the expansion tank as necessary. Basically everything. The pedal should immediately become hard - this means it worked.
I noticed a fact after which PGUs fly: they don’t like it when you press the clutch pedal if there is little or no air pressure.
Thank you Vitalya. Do we connect the tube to the pg fitting with air inside the tube or bleed the brake fluid into it and immediately pump it into the system towards the reservoir? Will the clutch pedal with the master cylinder underneath prevent the brake fluid from passing through it and into the reservoir?
“The brake fluid appeared in the reservoir, then we press the clutch pedal 3-4 times. And we run to close the fitting on the CCGT” i.e. Does the PSU release some liquid back into the bottle? The bottle is under pressure, will it “open up” a little? Is the compressor switched off at this time and not pressurizing? The top nipple in the bottle through which air is supplied, should you remove the nipple from it? We remove the nipple from the lower nipple.
Take a cola bottle or something thicker, dry and clean. There is no need to twist the nipple. Press with air, gradually increasing the pressure from 0 and above, as soon as the liquid comes out of the bottle, for me at 1.5 the movement began. And 3-4 times on the pedal is to ensure that there is no air left in the system, and the liquid should go back into the bottle and it turns out that the air presses on the liquid on one side, and you press the pedal on the other, due to this, the liquid is evenly distributed.
The air did not bleed out.
It wouldn’t hurt to mention the pedal - that’s the whole point of this event - to press the liquid from the bottom up. The liquid is heavier than air and tends to the bottom, and the air is lighter and tends to rise.
When the pedal is not pressed, the liquid should pass through the working cylinder and into the reservoir without any hesitation. I don’t know about ekarus.
The compressor from a passenger car pumped up a little and turned off, pumping up more if necessary.
The bottle seems to withstand 2-2.5. Take an experiment and explode one bottle. And you will know the pressure limit of the bottle.
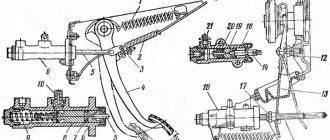
On cars, depending on the models and trim levels, the following clutch is used:
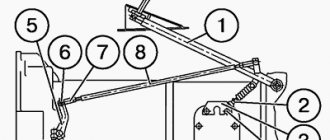
Pneumohydraulic booster: 1 — lining wear indicator; 2 — washer; 3 - body
— friction, dry, double-disc, with peripheral springs, model 142;
— single-disk, diaphragm, exhaust type models MFZ 350, MFZ 430 f. “SACHS” (Germany) (see Fig. Clutch of models MFZ 350. MFZ 430):
— friction, diaphragm, single-disk, push-type model MF-395 f. "SACHS" (Germany) (see Fig. Clutch model MF-395).
The clutch control drive is hydraulic, equipped with a pneumatic hydraulic booster (PGU), the clutch of models MFZ 430, MFZ 350, MF 395 is PGU (Germany).
Brief technical characteristics of the clutch
Transmitted torque, N.m (kgf.m)
Number of compression springs
Force of springs and diaphragm during clutch, kN (kgf):
At PGU f. “WABCO” has installed lining wear indicator 1 (see Fig. Pneumohydraulic booster). Complete wear of the clutch driven disc linings is indicated by the distance between the plastic housing 3 and washer 2, which, as the linings wear out, becomes equal to 23.25 mm. With new linings, washer 2 should rest against body 3.
Clutch models MFZ430, MFZ350: 1 - gearbox input shaft; 2 — driven disk hub; 3 — driven disk; 4 — pressure disk; 5 - diaphragm; 6 — clutch release clutch.
Clutch model MF-395: 1 — gearbox input shaft; 2 — drive disk hub; 3 — driven disk; 4 — pressure disk; 5 - diaphragm; 6 — clutch; 7 — pneumohydraulic booster
Determine the free play of the clutch release clutch by moving the lever by hand (see Fig. Free play of the clutch release clutch). Disconnect the spring. The normal clutch stroke corresponds to a lever stroke of 45 mm. If the lever stroke is less than 3 mm, then adjust the lever stroke by rotating the spherical nut.
To release the clutch of models MFZ 430, MFZ 350, MF 395, a drive without a gap between the clutch release clutch and the diaphragm is used.
Free play of clutch release
The free play of the clutch pedal (before the master cylinder starts operating) depends on the gap A between the piston and the piston pusher of the master cylinder (see Fig. Adjusting the gap). The normal clearance corresponds to a pedal stroke of 6-12 mm.
Free play of the clutch pedal
Measure the free play of the clutch pedal in the middle part of the clutch pedal area. If the free play of the pedal goes beyond the specified limits, adjust the gap A with the eccentric pin that connects the upper eye of the pusher to the pedal lever (see Fig. Free play of the clutch pedal).
Adjust gap A when the pedal release spring presses the clutch pedal against the upper stop. Rotate the eccentric pin so that the movement of the pedal from the top stop until the pusher touches the piston is 6-12 mm, then tighten and cotter the castle nut.
Removing air from the clutch release hydraulic drive (bleeding) is carried out in the following order:
— remove the plug from the tank and fill the tank with working fluid to a level not lower than 1520 mm from the top cap of the tank filler neck (see Fig. Adjusting the gap):
— remove the cap from the bypass valve, put a hose on the valve head, lower the free end of which into a transparent vessel with working fluid (see Fig. Bleeding the bleed);