1. Disconnect the wire from the negative terminal of the battery.
2. Remove the distributor cap.
3. Rotate the crankshaft until the compression stroke begins.
To determine this moment, you need to unscrew the spark plug of the 1st cylinder and close the hole for the spark plug with your finger.
At the beginning of the compression stroke, air will begin to escape from under the finger.
4. Carefully rotate the crankshaft until the second mark on the pulley coincides with the boss on the camshaft sprocket cover.
This mark corresponds to an ignition timing angle of 5° on an engine with an exhaust gas recirculation system (for engines without exhaust gas recirculation systems, install the pulley so that the middle of the pulley between the second and third marks is against the tide on the camshaft sprocket cover, which corresponds to an ignition timing angle of 2°) .
5. Loosen bolt 3 securing the distributor. Set pointer 2 of the octane corrector to the middle of scale 1 and tighten bolt 3.
Loosen bolt 4 securing the octane corrector plate to the distributor body.
Lightly press the slider with your finger against its rotation (clockwise) to select the gaps in the drive.
Holding the slider, slowly turn the distributor housing 5 until the red mark “ A”
on the rotor with arrow "
B"
on the stator.
Tighten bolt 4 securing the octane corrector plate to the distributor body.
6. Install the distributor cap and connect the high-voltage wires in accordance with the operating order of cylinders 1-2-4-3.
7. Check the ignition timing setting. To do this, warm up the engine to a temperature of 80-90 °C and, moving on a flat road at a speed of 30-40 km/h, sharply press the accelerator pedal all the way.
In this case, detonation should be heard briefly.
If detonation is not heard, it means the ignition is late.
If the detonation is too strong, it means the ignition is too early.
When igniting early, turn the distributor body one scale division towards “+” (counterclockwise), and when igniting late, turn towards “-” (clockwise).
Then check the ignition timing again while the car is moving, as described above.
8. More precise setting of the ignition timing can be done using a strobe in accordance with the instructions included with the strobe.
Starting the engine of any car is possible due to the ignition of the combustible mixture in the cylinders of the power unit. To ensure normal operation of the engine, proper adjustment of the ignition system (IS) is necessary. In addition, all elements, including the coil, distributor of the UAZ vehicle and other components must always be in working order.
Description of SZ on UAZ
How is the ignition circuit installed, configured and adjusted on the AUZ 417 or any other? We will talk about this below. But first, let's understand the principle of operation of the node, as well as the types of SZ.
Operating principle of SZ
As already said, the ignition on an UAZ performs one of the main functions when starting the power unit. Thanks to this system, the procedure for igniting the air-fuel mixture in the cylinders of the power unit is carried out by supplying a spark. The spark is directly supplied to the spark plugs; one spark plug is installed on each cylinder. All of these safety devices operate in sequence mode, igniting the combustible mixture in the required period of time. It is also necessary to take into account that the ignition system on cars not only provides a spark, but also determines its strength.
The vehicle battery is not able to produce the voltage and current required to ignite the mixture, since this device only produces a certain amount of current. The help comes from the ignition system, the purpose of which is to increase the power of the car’s battery. As a result of using the SZ battery, it is possible to transmit sufficient voltage to the spark plugs to ignite the mixture.
Types of ignition systems
Today there are three main types of ignition systems that can be installed on cars:
- Contact SZ. It is considered obsolete, but continues to be successfully used on domestically produced vehicles. The principle of operation is that the system produces the necessary impulse, which appears due to the operation of the distribution component. The contact-type device itself is simple, and this is a plus, because in the event of a breakdown, the driver can always diagnose and repair it himself. The cost of replacement components is not high. The main components of a contact type system are a battery, a short circuit, a drive, spark plugs, a capacitor, and a breaker with a distributor.
- A non-contact ignition system called transistor. Many vehicles are equipped with this type. When compared with the type described above, the system is characterized by a number of advantages. Firstly, the generated spark has greater power, which is due to the increased voltage level in the secondary winding of the ignition coil. Secondly, the contactless system is equipped with an electromagnetic device that allows for stable operation, as well as energy transfer to all nodes. As a result, with proper tuning of the internal combustion engine, this allows not only to increase operating power, but also to save fuel. Thirdly, it is convenient in terms of node maintenance. To ensure long-term performance, after setting up and installing the distributor drive, this element must be lubricated from time to time. To ensure normal operation, the element is lubricated every ten thousand kilometers. As for the disadvantages, it is the difficulty of repair. It is impossible to repair the device yourself; this requires special diagnostic equipment, which is only available at service stations.
- Another option for SZ is electronic, which is the most technologically advanced and expensive today, which is why new vehicles are equipped with it. Unlike the two systems described above, the electronic ignition system is characterized by a complex device that ensures the functionality of not only the torque, but also other parameters. Currently, all modern cars are equipped with electronic systems. The key advantage is a more simplified procedure for setting the advance angle, as well as the absence of the need to periodically check the contacts for oxidation. In practice, the air-fuel mixture in engines with electronic combustion almost always burns completely. This type also has its disadvantages, in particular in the matter of repairs. It is impossible to produce it with your own hands, since this requires equipment. Detailed instructions for adjusting the ignition using a light bulb are presented in the video below.
How to set it correctly?
After connection, how is the ignition installed for proper engine operation?
What is the procedure and how to correctly set the node settings, read below:
- To begin, the vehicle must be secured in place, and turn on the handbrake. The piston of the first cylinder must be installed at top dead center; note that the hole on the crankshaft pulley must coincide with the mark located on the timing gear cover.
- The cover must be removed from the switchgear. Having done this, you will see a slider located opposite input 1, inside the cover. If it is not there, then the crankshaft must be turned 180 degrees and the octane corrector set to 0. Using a wrench, screw the pointer to the distributor controller body so that it is aligned with the middle mark on the octane corrector. Loosen the screw securing the plastic to the distribution controller housing a little.
- Carefully turn the housing, holding the slider with your finger so that it does not rotate. This way you can eliminate gaps in the drive. The housing is rotated until the sharp part of the petal on the stator is aligned with the red mark on the rotor. Secure the plate with a screw to the controller body.
- The next step will be to install the controller cover in place and diagnose the high-voltage wires. They must be installed in accordance with the order of operation of the cylinders, that is, first, second, fourth, third. When the ignition timing is set, it is necessary to diagnose the correctness while driving.
- Start the power unit and warm it up for about ten minutes until the temperature is about 80 degrees. Moving on a flat and straight road at a speed of approximately 40 km/h, sharply press the gas pedal. If, when accelerating to 60 km/h, you feel or hear detonation, it should be short-lived, then everything has been done correctly. If the detonation is very strong, then the distribution controller must be turned half or one division counterclockwise. In the complete absence of detonation, the set advance angle should be increased, that is, the controller should be turned clockwise.
Checking for correct installation
After the ignition timing adjustment is completed, it is necessary to diagnose the correct setting of this parameter. To do this, you need to listen to the operation of the power unit while driving.
The check looks like this:
- Start the power unit and warm it up to operating temperature, which should be up to 85 degrees.
- You need to drive onto a flat road without obstacles. Accelerate to approximately 35 km/h, then sharply press the gas pedal.
- After pressing, you may hear a short-term detonation, the sound of metal or “fingers,” as professionals say. If minor detonation occurs, then you have completed all the setup and adjustment steps correctly.
- If the detonation is strong enough, then it is necessary to make a few adjustments. Open the hood and rotate the distributor housing on the octane corrector scale. It will be enough to turn the distributor one notch, but keep in mind that you need to turn it counterclockwise. Please note that each division of the scale indicates a change in the ignition angle by two degrees, if you count along the crankshaft. If during the check it turns out that there is no detonation at all, then the distributor body will also need to be turned one notch, only now clockwise. After the re-adjustment has been carried out, the checking procedure must be repeated again, starting from the first point.
Ignition system UAZ 469
To start the engine of any vehicle, it is necessary that the combustible mixture ignites at the right moment in the combustion chamber. Effective operation of the piston system is achieved by correctly setting all parameters. The UAZ 469 ignition system allows you to operate the vehicle regardless of climate, temperature, humidity and other external factors.
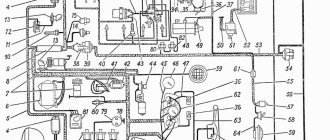
The ignition of the UAZ 469 ensures that all elements are in good working order and flawlessly perform their assigned functions. For UAZ 469, the ignition circuit consists of the following components:
- ignition coil UAZ 469;
- distributor;
- tourniquets;
- switch;
- candles.
Each individual component of the electrical circuit must not allow breakdown to the car body and current leakage.
The ignition of a UAZ 469 car includes the following elements:
- battery;
- mass button;
- voltage regulator relay;
- generator;
- ammeter;
- ignition switch UAZ 469;
- breaker-distributor contacts;
- distributor;
- capacitor;
- ignition distributor-distributor cover;
- slider;
- spark plug;
- high voltage wire;
- additional resistance;
- additional starter relay;
- ignition coil;
- starter.
The ignition order of the UAZ 469 is strictly regulated; the spark occurs exactly in the specified sequence. An important point is not only the timeliness of the spark supply, but also its size. If the slightest interruption occurs, the entire chain is reconfigured.
A car battery is not designed to produce sufficient current and voltage required to ignite a combustible mixture. The charging current is only capable of spinning the engine flywheel for a short time. For stable operation of the engine, the entire ignition system of the vehicle must begin to fully function.
This important component of the machine is designed to significantly increase the power characteristics of the battery. Proper ignition, together with the battery, sends the spark plugs the sufficient volume and current required to reliably ignite the fuel mixture.
Features of the model and its equipment
The wiring diagram still amazes with its quality. The legal successor of this vehicle was another model 31514, which began production in 1993 and immediately won a circle of its admirers. The new models are significantly different from the previous ones. Not only has the design been improved, but so has the wiring. For example, the electrical circuit of the UAZ 390994, the injector of which could cause inconvenience, did not have a special temperature sensor. New models have contactless ignition. The node includes:
- low voltage ignition coil;
- electronic transistor switch;
- distributor, i.e. sensor-distributor;
- electrical additional resistance;
- special emergency breaker;
- fuses (unit installed).
For example, type 390994, whose injector caused problems at high speeds, did not have such high-quality and sophisticated wiring. And the disadvantage of such a network element does not ensure the closure of the damper for the intake manifold. Servicing such a system is inconvenient; the absence of just one sensor is what makes 390994, whose injector is so “problematic,” not so in demand. The situation was resolved by using a better system and additional cables.
Operating principle of the ignition system
Ensuring and maintaining timely ignition of the air-fuel mixture for the efficient functioning of the internal combustion engine is the main task of ignition. This occurs in strict accordance with the established operating order of the engine cylinders. An ignition coil 16 is connected in series to the electrical circuit along with an additional resistance 14. It is automatically closed when the engine is started by the starter.
This significantly increases the breaking current of the primary circuit. Ignition coil 16 creates high-frequency pulses in the vehicle's on-board electrical system. High voltage flashes create a breakdown of the spark gap in the spark plugs 12, screwed into the top point of each cylinder, where the working fuel mixture is compressed.
The coil consists of primary and secondary windings. The primary winding is wound on top of the secondary. Inside the coil there is a core and a ring magnetic circuit. Both of these elements are made of special electrical steel. Reliable sealing of the coil is carried out by a carbonite cover in a casing with a rubber gasket.
Transformer oil is poured into the casing for cooling. This material significantly increases the insulation of the windings and effectively removes heat from the coil body. To avoid damage to the coil and its overheating, it is not recommended to leave the ignition on in a car when the engine is not running.
Distributor 8 distributes high voltage pulses to all cylinders of the internal combustion engine strictly in the established sequence. The distributor or breaker-distributor is installed in a standard place to the left of the engine cylinder block. The mechanism is driven by the oil pump roller. The roller rotates counterclockwise from the lid side.
Site about SUVs UAZ, GAZ, SUV, CUV, crossovers, all-terrain vehicles
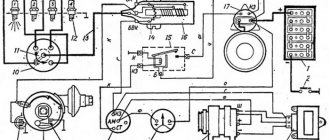
The contact ignition system of UAZ vehicles with conventional electrical equipment could include an R119-B ignition distributor, a B115-V ignition coil, A11-U spark plugs and a VK330 ignition switch.
The UAZ contact ignition system with shielded electrical equipment could include an ignition distributor P132 or P103, an ignition coil B5-A or B102-B, spark plugs SN302-B or SN433, ignition switch VK330 and an additional resistor SE40-A.
UAZ contact ignition system, composition and general structure.
Schematic diagram of the UAZ contact ignition system.
How to set the ignition correctly
In order to set the ignition on the UAZ 469, you must adhere to the following recommendations:
- Remove the distributor cover with the rotor. Check the size of the gap between the contacts. It can be adjusted. Between the contacts, separated as much as possible, there should be a gap of 0.35 - 0.45 mm. Adjustment is best done with a set of feeler gauges. Too small a gap produces a weak spark. If the gap is large, there may be no spark at all. Having made a normal gap, the rotor can be installed in its normal place.
- Using a spark plug wrench, unscrew the spark plug of the first cylinder. Close the candle hole with your finger. Using the starting handle, turn the crankshaft until the pin is pushed out by compressed air. This moment is called the beginning of the compression stroke of the first cylinder.
- Continue turning the crank until the hole on the pulley and the pin on the timing gear cover align. The rotor should be located opposite the internal contact of the cover, connected to the high-voltage wire from the spark plug of the first cylinder.
- Rotate the octane corrector plate together with the distributor so that the mark coincides with the middle mark on the scale of the plate.
- Lightly turn the timing mechanism housing counterclockwise. Scroll until the contacts of the distributor close.
- Connect the control light with socket. Connect one contact to the low voltage terminal of the distributor, the second to the ground of the machine. You can connect the warning lamp to the car body.
- Turn on the ignition and carefully turn the distributor clockwise. Rotate until the indicator light comes on, then stop rotating. It may be that the lamp does not light up. Repeat all steps from the very beginning.
- Tighten the distributor mounting bolt. Place the cover with the central wire in place. Check the adjustment starting from the first cylinder. The check is carried out counterclockwise.
Why turn on the ignition?
With the ignition set correctly:
- The engine operates efficiently, steadily and stably in all modes. Otherwise, the engine functions intermittently, knocking, and popping. Unstable engine operation causes many problems and reduces vehicle dynamics and speed characteristics.
- After correct ignition adjustment, starting a cold power unit is significantly improved.
- When the ignition is misregulated, fuel consumption increases. After adjustment it decreases significantly.
- Engine power also increases noticeably in a car after proper ignition adjustment.
What are the ignition systems on the UAZ 469
Contact ignition on UAZ 469
. Now it is recognized as obsolete. However, domestic manufacturers continue to use it. The system launches a pulse of a certain power. This impulse comes from the ignition distributor. The contact ignition circuit of the UAZ 469 is simple and uncomplicated. This is its advantage. The driver can fix any malfunction and make adjustments with his own hands. The prices of components are low.
Transistor or contactless ignition of UAZ 469
. Contactless ignition systems are installed on many types of vehicles. It has a number of advantages over the contact design. The spark produced by such a device is much more powerful. This occurs due to an increased level of electrical voltage in the secondary winding of the ignition coil. The transistor ignition system is equipped with an electromagnetic mechanism. It ensures stable, constant operation of the entire system, uninterruptedly transferring energy to components, parts, and mechanisms. Correctly configured ignition with an efficient internal combustion engine guarantees high power and significant fuel savings. Long-term reliable performance is ensured by compliance with the frequency of maintenance of the distributor drive. It must be lubricated and adjusted every 10,000 km. The difficulty of repair is a disadvantage of the contactless ignition system. It cannot be repaired independently, since this requires special diagnostic equipment, available only in service centers and service stations.
Electronic ignition on UAZ 469
. This type of ignition is the most technologically advanced, but at the same time expensive. Modern car models are equipped with similar devices. It has complex technology that provides not only high torque, but also a number of other engine indicators. Advantages: simple adjustment of the advance angle, no mandatory check of contacts for oxidation. In engines equipped with electronic spark protection, the fuel mixture burns 100%. Repairs must be carried out only at a service station.
Underwater ignition on UAZ 469
. This is a sealed ignition system, in which there is no fear of flooding with water, falling into deep holes, or driving in open areas during snow and rain. When the ignition is normal - contact or non-contact, 50% of the spark power is actually lost inside the distributor, between the cover and the runner. Let's find out why this happens.
There is a small gap between the electrical contacts, which are the distributor cap and the slider. To pass electrical energy through this space, most of the additional current is expended. With contact ignition, for these purposes, another part of the energy is spent on the functioning of the cam.
The underwater ignition is designed in such a way that the spark from the coil directly hits the spark plug. Carrying out this process, it does not lose its main power, except for the resistance of high-voltage wires. Here the loss of power is quite insignificant, so it can be ignored.
It is worth noting that on most foreign-made cars, a coil is placed separately on each cylinder, which is located immediately on the spark plug, and the loss is accordingly quite insignificant.
The UAZ distributor is considered one of the important components of the ignition system in a vehicle. Correct adjustment of this mechanism ensures optimal operation of the power unit as a whole. You can learn more about the principle of operation of the ignition system and how to set it up correctly with your own hands from this material.
What to buy
In fact, you don’t need to buy much, and if you have a working distributor and reel, then the list of purchases will be minimal.
So, you need to buy:
- Hall Sensor;
- High-voltage wires (preferably silicone);
- Switch from VAZ 08
.
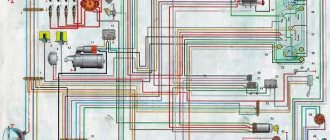
Advice: If your UAZ is already many years old, then we recommend that in addition to the already indicated list, you buy a new distributor, a coil, and you will also need UAZ 31514 wiring with connectors for the switch.
For reconfiguration and operation, you will also need a new UAZ 31514 wiring diagram, which is shown in the photo below, and which you can print for convenience.
You can also make your ignition system more powerful by upgrading it with two kits at once:
- Two switches;
- Two Hall sensors;
- Two ignition coils.
With this approach, each subsystem will be responsible for sparking 2 cylinders at once:
- First and third;
- Second and fourth.
Most often, UAZ cars that take part in competitions or are used by professional fishermen and hunters are subjected to such serious modifications. The video below shows how an engine works with such a system.
Advice: if you use your UAZ 31514 in everyday life, not related to extreme sports, then it is enough to limit yourself to alterations with one set - it’s easier to maintain it. After all, it is used on domestic all-terrain vehicles.
Review of SZ on famous UAZs
What is the connection diagram for electronic or contactless ignition on a UAZ 417, how to convert contact ignition to contactless? Why does the coil heat up and how to adjust and adjust the advance angle? First, let’s look at the main points regarding the action and types of SZ.
Operating principle of SZ
Contact system diagram
The ignition system, or rather its correct setting, plays a big role in the operation and starting of a car engine. With correct adjustment, the combustible mixture will burn correctly in the power unit as a result of the supply of charge through the spark plugs. A spark plug is placed on each cylinder of the UAZ engine, each of which is turned on in a certain order, in turn, delivering a discharge to the cylinder after a certain time. It must be taken into account that any SZ makes it possible not only to deliver the required discharge, but also determines its strength.
Due to its technical characteristics, the car’s battery cannot produce the voltage and current required to ignite the mixture. This is due to the fact that the battery can only produce a current of a certain strength. And thanks to the correct operation of the system, the current value increases significantly, which allows you to successfully ignite the air-fuel mixture.
The operating principle of the system consists of several stages:
- First, the driver inserts the key into the ignition and turns it, electrical energy is stored in a coil.
- Then the coil converts the low-voltage voltage in the on-board network of 12 volts into high-voltage. As a result, the voltage value increases to 30 thousand V.
- After this, the discharge is distributed and supplied to one or another spark plug.
- The candle itself produces a spark that ignites the mixture.
Diagram of the UAZ contactless system
What types of SZ are there?
Domestic UAZ vehicles can use one of three ignition systems; let’s look at each of them in detail:
- Contact view. This type of SZ is outdated, however, it is used on most machines. In such a system, the principle of operation is to issue a certain impulse that is formed in a distributor - a distribution device. The contact system is considered one of the simplest in terms of design, which is an advantage, since if a malfunction occurs, the car owner will be able to independently check and repair the system. In addition, prices for structural parts of the contact system are usually affordable, which is good news. The contact SZ includes a coil, a switchgear, a breaker, a capacitor and spark plugs.
- Non-contact type, also called transistor type. Compared to the contact system, the contactless system has more advantages. The resulting spark has a higher power, which is achieved due to the formation of high voltage in the secondary winding of the coil. Also, contactless systems are equipped with an electromagnetic device, which makes it possible to achieve more stable operation of the engine. Ultimately, if the UAZ power unit is configured correctly, then by using a contactless system you can not only increase its power, but also achieve fuel savings, albeit insignificant. Also, such systems are easier to maintain. One of the main nuances in terms of maintenance is the need to periodically lubricate the distributor drive - at least every 10 thousand kilometers. One of the main disadvantages is the difficulty of repair. In practice, repairing a contactless SZ will be problematic, since diagnosing the system will require equipment that is usually available at a service station.
- The ignition system can also be electronic. This option is currently considered one of the most progressive and expensive; it is installed mainly on new cars. Compared with contact and non-contact systems, the electronic system has a more complex structure. The main advantage of this system is that, if necessary, the process of adjusting the ignition angle will be much easier. In addition, there are no contacts in the electronic system that are susceptible to oxidation. It should also be noted that in practice, the combustible mixture in the cylinders of a power unit with an electronic system almost always burns completely. But despite all the advantages, electronic repair systems also have their disadvantages, which relate to device repair. It is almost impossible to repair such an SZ with your own hands, since to perform this task, again, you will need equipment (video published by Nail Poroshin).
Diesel UAZ Patriot and three famous letters
The list of “jambs” of the ZMZ-514 diesel engine can make you grab your head: the owners of cars on which this engine was installed, oh, “the valve gets into the cylinder,” “a sharp decrease in traction”... And this engine is now installed on the UAZ Patriot. Maybe give up buying a diesel Patriot? Don't rush to conclusions. ZMZ engineers say that they worked on the mistakes and, with the help of Bosch experts, made a qualitatively new product.
The diesel Patriot, equipped with “the same ZMZ-514,” drives much better than the gasoline one. During a recent test of the updated SUV, we noted that a serious drawback of the car is the “lazy gasoline engine, 128 “horses” of which are only enough to quickly accelerate the car to eighty, after which the acceleration instantly fades. If you wait and forgive the UAZ’s ruinous fuel consumption, the SUV will slowly reach 120 km/h, but then the cabin will be filled with the dissatisfied roar of the engine, insistently demanding to engage the non-existent sixth gear.”
Diesel is a completely different matter! It looks like Patriot has lost several hundred pounds. And 114 diesel horsepower is quite enough for a three-ton SUV - you can easily start from second gear (you just need to rev the engine to “gasoline” 1500-2000 rpm), and after accelerating to 50 km/h, feel free to engage fifth gear and save expensive diesel fuel these days. Need overclocking? If you “drive” the needle on the tachometer saucer between 2000 and 3000 rpm, then powerful acceleration is guaranteed - you simply don’t expect such a strong kick from the Patriot.
All cars produced in 2013 meet “fourth class environmental standards” (in other words, “Euro-4”) - you can’t put cheap diesel fuel drained from a tractor in the nearest village into a new UAZ, but you also have to worry that after refueling using fuel at an “off-brand” gas station will damage the engine, don’t. At least, that’s what both the creators of the motor and Bosch, the power system supplier, think so
Only the transmission for a diesel engine is “short” (isn’t it from a gasoline car?). As soon as the speed reaches 120 km/h, the speed exceeds 3000 rpm - a bit too much for a diesel engine! In general, an SUV running on “heavy fuel” could use a sixth stage in the box... As well as improved sound insulation. The engine rumbles, the turbine whistles recklessly. But as soon as you slow down, the cacophony stops - the ZMZ-514 becomes quiet and pleasant to the ear. As if it wasn’t this engine that recently turned off the driver with a turbo whistle.
https://www.youtube.com/watch?v=rYVqxW2fPa4
So, engaging fifth gear and driving at a speed of 60-80 km/h is doubly pleasant - it’s quiet and economical. Probably, having encountered the word “economically”, the owners of gasoline “Patriots” will re-read this paragraph to make sure: are they imagining things? No, it’s not imaginary: in the city crowd, a diesel SUV “eats” no more than 12 liters of diesel fuel, and a careful driver will not have any difficulty in moderating the appetite of a heavy car to a completely passenger-friendly 10 liters per 100 km.
This is what the external speed characteristic of the ZMZ-514 diesel engine looks like: the red curve is torque, the blue curve is rated power. Yes, diesel is inferior in power to the gasoline engine (114 hp versus 128 hp), which is installed on “Patriots” and “Pickup trucks,” but wins in terms of torque - as much as 270 Nm versus “gasoline” 218 Nm
But we don’t recommend abusing the economy and idling at idle, as many diesel owners like to do - it’s simply inconvenient to control traction at the “lower” levels. Take a look at the torque curve: at “one thousand” on the tachometer, the driver has a modest 150 N∙m of torque! Therefore, if you need to accelerate, you first look at the tachometer: is there still turbo lag or is the 2.2-liter unit ready to produce a maximum of 270 Newtons? The situation is similar when starting off - in order to confidently start moving without embarrassing jerking, you need to press the right pedal deeper.
Another satisfaction comes off-road. Here, a lower gear in the transmission helps avoid turbo lag, and therefore driving a diesel engine through gullies is a real pleasure. The torque can be dosed with precision, while the “crown number of UAZ drivers” - instantaneous gear shifting down with double squeezing and re-throttle - is no longer required: in most situations, there is enough traction to move in the gear selected in advance. Comfortable!
The price of both the diesel Patriot and the diesel Pickup is, of course, steep (if you compare similar configurations, the version of the SUV with the ZMZ-514 engine costs 90,000 rubles more than the gasoline one), but we recommend overpaying and choosing a “heavy fuel” engine. - it is noticeably more economical and makes Ulyanovsk all-wheel drive vehicles much more convenient in terms of driving characteristics
It turns out that it was in vain that fans of Ulyanovsk all-wheel drive vehicles rushed to buy a Patriot with an Iveco engine (it was installed on UAZs until the end of 2011)? Just for fun, we did a short comparative test: we drove a few kilometers on a compacted dirt road, first in a car equipped with a ZMZ-514 diesel engine, and then switched to a Patriot-Iveco.
The main advantage of the foreign unit is greater torque at low speeds. Where the “five hundred and fourteenth” demanded to switch to a downward gear, the “Italian”, even if he pulled in, pulled the car out. The rest, including noise, is parity. So representatives of ZMZ confirm that, with the help of specialists from the German (!) office of Bosch, they adjusted the characteristics of their motor to the “Ivekov” indicators.
Expert recommendations on how to configure correctly
So, how to set the advance angle yourself in order to achieve proper operation of the UAZ engine:
- First of all, you must lock your car in one place by pulling the parking brake lever. Rotate the crankshaft so that the piston of cylinder 1 reaches TDC (top point). In this case, you need to ensure that the hole on the crankshaft pulley coincides with the mark marked on the timing gear cover.
- After this, remove the cover from the distribution mechanism. After dismantling, you will be able to see the slider, which is located inside the cover itself, opposite the contact. If there is no slider, you should turn the crankshaft 180 degrees again, and then set the octane corrector to 0. Using a wrench, you will need to screw the pointer to the distribution mechanism housing so that it aligns with the middle mark. When these steps are completed, the fastening bolt with which the plates are attached to the distributor body must be loosened slightly.
- Then, holding the slider in one place with a finger to prevent it from rotating, you need to carefully rotate the housing itself, this will allow you to remove possible backlash in the drive. The housing must be rotated until you achieve alignment of the sharp end of the stator mechanism petal with the red mark located on the rotor device. After this, the plate itself must be secured to the body using the appropriate bolt.
- Once you have completed these steps, you need to replace the controller cover and check the high voltage cables. You need to make sure that these wires are installed in the correct sequence, taking into account the firing order of the cylinders. When you manage to correctly adjust the lead angle, you need to make sure that the entire procedure was performed correctly.
- To diagnose the correctness of the actions performed, you need to start the engine of your UAZ and wait about 5-10 minutes until the power unit warms up. The operating temperature of the engine is about 90 degrees; you can wait until the internal combustion engine warms up to 80 degrees. Then you need to drive onto a flat road and accelerate the car to 40 km/h, after which you should sharply press the gas. At this moment, the car will accelerate and if, when the speed increases to 60 km/h, a short-term detonation (metallic knock) is heard from under the hood, then this indicates that all actions were performed correctly. If the detonation is too long, the system will need to be adjusted. To do this, the housing of the distribution mechanism will need to be turned one notch or half, and it must be turned counterclockwise. If the diagnostics showed that there is no knocking of the “fingers” at all, then the advance angle should be increased. To do this, the mechanism should be turned in the opposite direction.
Photo gallery “How to adjust correctly”
A guide to replacing a distributor with an oil pump drive
Before installing a new distributor with a drive, you need to weigh your strengths, since it is not recommended to make mistakes when performing work.
So, how to replace and install the distributor:
- Turn off the ignition and remove the distributor cover; the tips and high-voltage cables are connected to it.
- Then you need to disconnect the wire connected to the switch from the distribution mechanism. You also need to disconnect the pipe connected to the vacuum regulator.
- Taking a 13mm wrench, unscrew the two nuts securing the device and remove the mechanism along with the oil pump drive from the power unit.
- After completing these steps, you will be able to see the gasket located under the drive. If as a result of these actions the position of the crankshaft has not changed, then simply install a new mechanism, making sure that the slider is located opposite the mark. All actions are performed in reverse order. When the installation is completed, the advance angle is adjusted.
- If, as a result, the location of the shaft has changed, then before installation it is necessary to move the piston of cylinder 1 to top dead center. You need to ensure that the marks on the pulley align with the pointer on the motor itself.
Engine ZMZ 409 UAZ Patriot: timing marks, chain replacement and phase installation
Experienced mechanics do not recommend setting ZMZ 409 timing marks for beginners and those who are poorly versed in the design of power units. Because the design of the 409 engine is complex and incorrect setting of timing marks and installation of the chain will lead to an early failure of the engine. According to experienced mechanics, operating a 409 engine does not require large investments. However, it is important to keep an eye on the engine and change the chain before it breaks.
Let's figure out how to correctly set the timing marks and install the chain on 409.