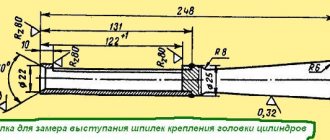
Procedure and torque for tightening the cylinder head of the UMZ-4216 engine
Before you begin adjusting the valves, it is advisable to check the tightening torque and, if necessary, tighten the cylinder head nuts.
It is necessary to tighten the cylinder head nuts in two steps: 1) Tightening torque 5.0-6.5 kg/m 2) Tightening torque 9.0-9.5 kg/m
Adjusting the valves of the UMZ-4216 engine with hydraulic compensators
There is a huge sticker on the side of the valve cover with the engine catalog number. If the number ends with a dash at 70, then without hydraulic compensators, if at 80 with hydraulic compensators.
Gazelles with a 4216 engine equipped with hydraulic compensators often misfire one or more cylinders, which leads to unstable engine operation and loss of power. As a rule, in such cases the MALFUNCTION CHECK lights up. One of the reasons may be valve misadjustment.
Before you start adjusting the valves, it is advisable to measure the compression in the cylinders and write down these parameters. After adjustment, for comparison, do the same. So let's get started: Set the crankshaft of the first (fourth) cylinder to top dead center (determined by the released, not clamped, valves, if the first cylinder is in the compression stroke, then the released valves will be: 1, 2, 4 and 6 valves, if the fourth cylinder, then 3, 5, 7 and 8 valves). It is these valves that are not clamped that should be adjusted - first loosen the lock nut on the adjusting screw, then turn out the adjusting screw until there is obvious NO CONTACT WITH the hydraulic compensator, then screw it back until it touches the hydraulic compensator, and then tighten it another 1.5 turns (tighten the compensator by 1 .5 mm). Lock the adjusting screw nut. Many people, in the process of adjusting the valves, may have a question: If you follow the above-described factory instructions “.. until contact and tighten 1.5 turns.” It turns out that when you turn the adjusting bolt 1.5 turns, the valve begins to open, and the free play of the hydraulic valve is removed (it is clamped), which in fact should not happen? It’s simple, you need to understand that when we open the valve with the adjusting screw, then after about 5 minutes the hydraulic valve, due to the force of the valve spring, settles into place as it should. P/S Yes, the valve tightens and the rod stops turning or turns very hard. But within a minute, when the hydraulic fluid releases the oil, it begins to rotate freely. This indicates that the hydraulic compensator still has free movement along the cylinder. (This refers to the design of the hydraulic valve) If the rocker rod does not rotate after adjustment (easy with your fingers), then the hydraulic valve is fully compressed and the valve is clamped. Let me remind you from adjusting the valves of the 402 engine; After adjustment, we always turn the rocker rod and look at its curvature. If it is curved, then it is clearly visible. A crooked rod gives an extraneous knock when the engine is running, touching the cylinder head. https://www.youtube.com/watch?v=isnBIJLxOw0
Autodiagnostics of a Gazelle with a UMZ 421647 Euro-4 engine, carried out using a Scanmatika-2 autoscanner: Autodiagnostics using Scanmatika-2
Read more: Sherkhan Magikar 5 alarm does not open the door
A smart person is not ashamed to call himself a fool, but a fool will never say “inpropart” to himself.
Car enthusiasts can do without the services of specialized car repair shops if they need to adjust the valves of the 4216 Gazelle engine. Let's look at how to do it yourself in a garage. This information will be useful for every car enthusiast.
Adjustment of compensators UMZ 4216 GAZelle Business.
Adjustment of compensators UMZ 4216 GAZelle Business.
Hydraulic compensator.
Maintenance of the gas distribution mechanism.
Hydraulic compensators ensure backlash-free kinematic connection of the gas distribution mechanism parts throughout the entire service life of the engine. Maintenance of the mechanism consists of periodically checking with the engine running that there are no sharp knocks from the operation of the gas distribution mechanism.
After starting a cold engine, a knocking sound may appear from the hydraulic valve compensators, which should disappear as the engine warms up to a coolant temperature of plus 80...90 °C. If the knocking noise does not disappear more than 30 minutes after reaching the specified temperature, it is necessary to check the serviceability of the hydraulic compensators as follows.
A knock that appears when starting a cold engine, repeatedly starting the engine (with several unsuccessful starts), starting the engine after a long stop and subsequently disappears when the engine warms up is not a malfunction of the hydraulic compensator. In this case, the cause of the knocking is the entry of air into the high-pressure chamber of the hydraulic compensator, which leads to a loss of its rigidity and the operation of the valve drive with shocks.
to remove air when the engine is running in idle mode. do the following:
- start and warm up the engine to operating temperature. For 3-4 minutes, set the engine operating mode at a constant speed of 2500 rpm or at a varying speed range of 2000...3000 rpm, then listen to the engine idling at 800±50 rpm for 15...30 seconds. The knocking should stop;
- if the knocking does not stop, repeat the cycle up to 5 times;
- If the knocking does not stop after carrying out the above work, work for another 15 minutes at a speed of 2000...3000 rpm, then listen to the engine idling for 15...30 seconds.
If the knocking does not go away after 5 cycles plus 15 minutes of engine operation, it is necessary to adjust the valve mechanism, for which:
- Remove valve cover
- Set the piston of the first cylinder to TDC.
- Loosen the lock nut and turn out the adjusting screw until a gap appears on valves 1, 2, 4, 6.
- Smoothly turn the adjusting screw clockwise to select the gap.
- Turn the adjusting screw clockwise 1.5 turns (corresponding to a stroke of 1.5 mm) and tighten the locknut.
- Set the piston of the fourth cylinder to TDC.
- Loosen the lock nut and turn out the adjusting screw until a gap appears on valves 3, 5, 7, 8.
- Smoothly turn the adjusting screw clockwise to select the gap.
- Turn the adjusting screw clockwise 1.5 turns (1.5 mm) and tighten the locknut.
- Install the valve cover.
- Start the engine.
If the knocking does not go away after adjusting the valve mechanism, the following work must be done:
- using a stethoscope (or other device that amplifies sound) to localize the source of the knocking;
- remove the valve cover;
- Rotating the camshaft, set the piston of the first cylinder to TDC.
In this position, check the hydraulic compensators on valves 1, 2, 4 and 6 by applying force to the adjusting screw along the axis of movement.
- Rotating the camshaft, set the piston of the fourth cylinder to TDC. In this position, check the hydraulic compensators on valves 3, 5, 7 and 8 by applying force to the adjusting screw along the axis of movement.
a) elastic elasticity with a short-term application of a force of about 10 N (1 kgf) indicates the presence of air in the high-pressure chamber of the compensator;
b) the appearance of a gap between the working end of the hydraulic compensator and the cam when a load of about 20...30 N (2...3 kgf) is applied for a period of 10...15 seconds and disappears after the load is removed, indicates a leak in the check valve of the hydraulic compensator or wear of the plunger pair;
c) the presence of a gap between the tip of the rocker arm and the valve indicates wedging of the hydraulic compensator;
- Replace hydraulic compensators that have the above symptoms.
If there are no comments listed above, dismantle the rocker arm axle, remove all hydraulic compensators from the rods and check the appearance of the hydraulic compensators and the area of the adjusting screw for rough scratches, cracks, signs of wear, foreign particles, and contamination. Check the oil supply to the hydraulic compensators and the running-in at the end of the hydraulic compensator.
Replacing pushers UMZ 4216
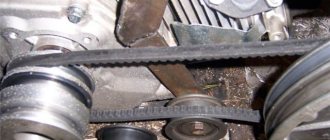
Well, what can I say, by and large, not a complicated operation again resulted in a whole day of work. Because there are no two identical spare parts for a gazelle... But first things first. We take off the front end and the attachment that is attached to the lid. There are usually no problems here. At the same time, we check the bearings of everything that rotates. We remove the pulley with the synchro disc... The oil seal is torn (or rather broken):
We unscrew all the nuts and bolts that hold the front cover and realize that the studs are in two planes: two studs connect the pan and the cover. Therefore, we unscrew all the studs and carefully, trying not to damage the pan gasket, pull the front cover up. Voila!
Gazelle until 2009. The engine slows down when you release the gas pedal
It is very important that the engine operates correctly in any mode, including idling. However, many car owners are faced with a problem: when they release the gas, the engine speed does not drop. As soon as such a defect is discovered, it is necessary to immediately find out the cause and eliminate the malfunction for the smooth operation of the car. Also, the engine may slow down for a long time, which also does not contribute to proper operation.
Typically, upon reaching operating temperature, the speed should drop to its normal level. The manufacturer indicates the indicators for each specific vehicle model in the operating manual. They may vary slightly depending on the mileage and general condition of the car, but usually stay within the range of 650-1000 rpm.
In some cases, the speed drops very slowly or even stays at the same level of 1500-2000 revolutions. In this mode, not only does fuel consumption increase, which affects the driver’s finances, but it also contributes to engine wear.
The cause of the idle failure must be diagnosed by qualified technicians. However, you can also understand on your own why the engine speed does not drop.
Problems with the carburetor system
When releasing gas, the drop in speed can be bad for both injectors and carburetor systems.
If the car has a carburetor, then there may be several defects.
Most often, the speed does not drop due to a faulty throttle valve. When the engine warms up, it is in the open position to allow more air into the system. Then it closes and the speed should drop.
If the throttle valve is not closed completely, the mixture will still be over-rich when the operating temperature is reached, and the speed will remain at the same level. If this part is heavily soiled or deformed, it cannot close completely.
You can clean the damper using a special product, which can be purchased at an automotive supply store. Deformation may require replacing the carburetor completely. The damper may not close tightly if the drive cable is severely worn. Replacing it may improve the situation.
Another common reason why the engine speed does not drop when idling is the gasket between the carburetor and the cylinder head, which has become unusable, or a damaged intake manifold.
After replacing the carburetor or cleaning the power system, you can often notice that the engine speed is slowly dropping. This occurs due to improper adjustment of the idle system; an over-enriched air-fuel mixture is often supplied. To eliminate the malfunction, it is necessary to adjust the ratio of fuel and air supply to the system.
A high level of fuel in the carburetor float chamber can also cause a malfunction. The needle valve is responsible for it. Checking this detail may correct the situation.
If your car has an injection system, there may be many more reasons for high idle speeds. Here, both mechanical elements and electronic devices responsible for adjusting the idle speed can fail.
The main injector malfunctions include:
Incorrect operation of the temperature sensor installed in the cooling system. Incorrectly received data from this device causes the electronics to recognize the engine as cold and work to warm it up, thereby maintaining high speeds necessary to reach operating temperature. Overheating can often occur, which leads to more serious damage, including major engine repairs. The same effect is possible if the idle speed control is not operating correctly. The throttle control cable may become stuck. The higher the mileage of the car, the higher the risk of encountering a similar problem. The electronic XX operation sensor often malfunctions, then the speed will either increase or disappear altogether. The spring that brings the throttle valve to its original closed position is not functioning properly, is jumping off, or is being stretched too far. Too much air enters the fuel combustion chamber due to poor quality or leaky gaskets. It is necessary to carefully check the seals of the manifold and injectors. And the simplest reason is usually the incorrect placement of the mat after a visit to a car wash or dry cleaning of the interior. It is often inaccurately placed under the accelerator pedal, which leads to the appearance of improper engine operation. If the car is oversaturated with various electronics and all the work is based on the correct functioning of the sensors, one of them may well become a problem. It will supply incorrect data to the computer, and as a result, the speed will not drop. You will most likely not be able to detect the problem on your own.
Technical features
How to adjust valves on a 4216 Gazelle engine? In fact, this work is not difficult. But it's important to do everything right. To do this, you need to know the signs of incorrect valve settings and some features of the 4216 engine.
The main sign of a malfunction is increased engine noise and misfire of the cylinders. At the same time, rhythmic, rather ringing knocks will be heard.
Also, along with this, increased fuel consumption and/or engine tripping may occur. All this indicates the need to adjust the valves.
It should be taken into account that the working stroke of the cylinders is 1-2-4-3. Do not forget that the clearances in the exhaust valves of cylinders 1 and 4 will be approximately 0.5 mm less.
Question about pushers and their correct installation
I bought a set of pushers 21-1007055-A4 ZMZ (made by ChAMZ, but specially ordered by ZMZ OJSC, blue box). Heavy, more than a kilogram.
And then I fell into a stupor. The set includes 4 pushers with 2 oil supply holes and 4 with one!
1) Why was this done and where should I put it now? 2) When installing pushers into the holes, should the holes be oriented perpendicular to the block or parallel? Or are they busy at work?
So after all, what to do? Colleagues! Please give me some good advice! Time is running. We need to finish assembling the timing belt! And I got stuck in the details. What should I do? Should I change the set to all 8 pushers with 2 holes? But I read a book from 1972, it says that all pushers have 2 holes.
Today we had a conversation with our driver. He said that the fact that there are 4 pushers with 2 holes and 4 with one is correct and no one handed you any defect! This is specifically made for the purpose of retaining oil, but not on all. No need to change anything. You just need to strictly follow the installation procedure. But, unfortunately, he forgot over the years which pushers should be installed where. Either with one hole in the holes for the intake valves, or for the exhaust valves!
How to adjust valves after disassembling the block
After a major overhaul and complete disassembly, the engine must be adjusted again, and the same applies to the operation of the valves. The principle of setting the gap remains identical, only it is necessary first of all to carry out comprehensive maintenance of the engine, that is, to run it in for at least 50-60 km. You should not pay attention to the fact that the valves will not be adjusted during this period.
The drive is necessary so that the oil gets into all parts of the engine, the gaskets are straightened, and the valves themselves are seated, as repairmen say.
And of course, adjustments are performed only on a fully functional engine. If one of the spark plugs does not work or the connecting rod is knocking due to a loose pin, all this must be corrected without fail. Next, adjustment is performed according to the above algorithm.
If the gap gets lost quite quickly, then the reasons for this may be the following:
- crankshaft malfunctions;
- problems with the gas distribution mechanism (incorrect timing of the cams);
- mechanical damage to the cylinder block;
- too aggressive driving (quick release of the clutch, which also wears out the crankshaft).
In an injection-type Gazelle (that is, without a carburetor, but with a direct injection system), the principle of valve adjustment is similar, only the receiver does not need to be removed. In this case, it is enough to simply remove the valve cover, behind which access to the necessary tightening nuts is hidden.
True, such UMZ-4216 are now quite rare, since the manufacturer produced these cars in limited quantities. After adjusting the valves, experts recommend replacing the valve cover gasket. The one that is installed directly at the factory can be immediately thrown away - its quality, as well as durability, leaves much to be desired.
It is quite difficult to adjust the gap without using a feeler gauge. You can use a special strip, but its thickness should be clearly set at exactly 0.35 mm. It is not recommended to perform “hot” adjustments - making the slightest mistake will result in significant disruptions in the operation of the motor, or even lead to its failure. The valves themselves especially suffer from this, and after a few hundred kilometers they simply burn out.
We will show you how to adjust the valves in the UMZ 4216 engine installed on the Gazelle Business. This motor without hydraulic compensators can also be found on UAZ and Volga cars. Remove the breather hose going to the intake manifold, then unscrew the 6 bolts securing the valve cover. Remove the vacuum hose. Remove the cover. Set the marks and combine them:
How to adjust valves?
In order to correctly set the gap between the valves, you must follow the sequence of actions prescribed in the vehicle repair manual.
In order to set the required valve clearance, you need to:
- Place the vehicle on an inspection pit or a special platform designed for repair work.
- Remove the protective cover from the block of cylindrical parts and dismantle the tubes along with the cable.
- Remove the air filter element housing.
- Unscrew the spark plugs from the ignition system.
- Unscrew the fasteners and the cover from the top of the power unit housing.
- Remove the timing belt guard.
- Align the cylinder piston to the top dead center of air flow compression.
- Rotate the crankshaft 1-1.5 turns clockwise. The risks of bearings and crankshaft must coincide.
- Unscrew the lock nut on the adjusting screw.
- Adjust the clearance on the engine of the Next 42 16 model so that the 0.13 mm flat feeler gauge completely occupies all the free space.
- Repeat the procedure with the dipstick and turning the crankshaft for all four cylinders.
- Reassemble the engine mechanism by performing all steps in reverse order.
- Start the engine and check that the gaps are set correctly.
Engine with carburetor
Adjusting valves on a 402 engine with a carburetor and the power unit turned off. Before starting the adjustment procedure, it is necessary to conduct an external inspection of the system for damage and defects, and if necessary, replace all worn parts.
After diagnostics, you need to turn off the ignition system and put the vehicle in neutral gear. You can then open the car hood and remove the air filter mechanism. You need to unscrew the 6 mounting bolts and remove the cover from the valve body.
After these steps, you need to turn the crankshaft 1.5-2 turns clockwise and set the required clearance for the first cylindrical element. The marks on the pulley of the first and fourth cylinders must coincide with the position of the highest dead center. The gap between the adjustable elements should not exceed 0.3 mm.
After adjusting the first and fourth cylinders, you can proceed to adjusting the second and third. The whole process takes place in the same order in which the cylindrical parts work. Before you begin adjusting cylinders number 2 and 3, you must turn the crankshaft 0.5 turns clockwise, at which time the marks of the first and fourth elements should move down.
After this, you can replace the valve body cover and filters, start the engine and check the serviceability of the entire system.
Engine with injector
To set the required gaps between valve mechanisms, you will need the following tools:
The adjustment procedure on a power unit with an injector is carried out only on a completely cooled engine.
Using a 10mm wrench, you need to unscrew the 8 fasteners that are located on the cylinder head cover. After all the bolts have been removed, you can remove the cover itself.
Then you should move the crankshaft to the highest dead center position; a 38 wrench is suitable for this. The crankshaft is turned until the mark on its gear coincides with the mark on the cylinder block.
It is also recommended to carry out an external inspection of the crankshaft chain device and, if necessary, tighten it.
Using a 13mm wrench, you need to loosen the plunger tensioner nut, which is located next to the outlet pipe. It is necessary to turn the crankshaft until it stops, after which the nut can be tightened again.
Now you can begin adjusting the intake and exhaust valves on the fourth cylinder, and then on the first. For this procedure, it is recommended to use a 0.13 mm thick probe. Instead of probes, you can use a micrometer, which is mounted on a special rail. This device allows you to quickly set the required gap between the valves.
Engine with hydraulic compensators
Before starting the procedure, it is recommended to measure the compression level in the cylindrical elements in order to compare this data with the data after adjustment.
The procedure for adjusting the valves of the GAZelle Business UMZ 4216 with hydraulic compensators is carried out in the same order in which the engine cylinders operate: 1 - 4 - 2 - 3.
It is necessary to set the crankshaft of the first and fourth cylinder mechanism to the top dead center position. Any loose valves need adjustment. To do this, you need to loosen the lock nut, which is located on the body of the adjusting screw, and unscrew this screw until it moves away from the hydraulic compensator. Then you should return the screw to its original position, and then move it away from the compensator again and turn it 1.5 turns clockwise. After this, you can lock the adjusting screw nut.
Then repeat the procedure on the remaining three cylinders. The gap between the intake and exhaust type valve should not exceed 0.13 mm. At the end, you need to install all the fasteners and mechanisms back, start the engine and check that the gaps are set correctly.
Why regulate?
They are usually tuned to make the engine run more stable across all speed ranges. Valves are a very important part of the gas distribution mechanism. If the clearance settings are lost, then the wear of various parts in the timing belt increases significantly. The noise level of the power unit increases and fuel consumption increases, which is very significant for commercial vehicles.
If you hear a ringing sound while the engine is running, if it has become more difficult to start a cold engine, and during a cold start the spark plugs are filled with fuel, then it’s time to adjust the valves of the 4216 Gazelle engine.
The gaps get lost for the following reasons. This is a failure of the engine crankshaft, incorrect timing of the cams in the gas distribution mechanism. Also, the gaps disappear if there are various violations of the integrity of the engine block.
The cause of increased or decreased clearance may also be the driver's driving style. If the driver prefers aggressive control, which is expressed in the sudden release of the clutch, then this will necessarily lead to intense and premature wear of the parts of the gas distribution mechanism.
Reasons for changing the gap size in the valve system
It should be noted that the adjustment consists of establishing a certain fixed gap between the rocker arm and the valve. Its value can change quite quickly. The following problems are considered to be the causes of such unwanted deviations:
- failure of the crankshaft;
- incorrect timing of the cams in the gas distribution mechanism;
- violation of the integrity of the cylinder block.
In addition to the listed engine malfunctions, the cause of the floating gap may be the behavior of the driver behind the wheel of the Gazelle. Extremely aggressive driving, such as rapid clutch release, for example, can lead to premature wear of functional components.
Adjusting the Gazelle Next valves
Based on the UMZ 4216 engine, the Evotek engine (UMZ Evotech) was developed.
The modernization mainly affected the cylinder block, but the principle and structural elements of the gas distribution mechanism remained unchanged. Automatic adjustment of thermal clearances of valves with compensators is provided. Engine 4216 Evotech, as it is often called by owners, with installed hydraulic compensators, is used in Gazelle Next cars. The adjustment procedure is no different from the procedure for servicing the gas distribution mechanism UMZ 4216. The only exception is dismantling the valve cover. The valve cover is made of plastic and is attached to the cylinder head with ten bolts (on the 4216 the cover is secured with six bolts).
Setting up the mechanism on GAZ
When the engine is turned on, the elements of the gas distribution mechanism (GRM) are constantly exposed to gases, resulting in a change in clearances:
- as they increase, the filling of the cylinder with a mixture of gases deteriorates;
- Reducing the gap leads to overheating.
- fuel and oil consumption increases;
- The operating life of the installation is reduced.
A number of signs warn of the need to adjust the valve:
- a clanging sound appears;
- GAS stalls at short intervals.
Undoubtedly, adjusting the valves on a car requires:
- strict adherence to the sequence of actions;
- availability of a set of probes and different keys;
- engine pre-cooling.
Adjusting valves UMZ 4216 with hydraulic compensators
The procedure for adjusting valves with hydraulic compensators installed on rods is carried out according to the same scheme as without compensators.
At the zero position of the crankshaft, the positions of the first, second, fourth and sixth plungers are adjusted using an adjusting bolt. By rotating 360 degrees (second rotation) the eighth, seventh, fifth and third are adjusted. The peculiarity of regulating the 42164 engine installed on the Gazelle business class Euro 4 is that there is no need to use test probes. The main tools for performing this procedure are open-end wrenches “14” and “11” and a slotted screwdriver.
Using a wrench set to “14” (a wrench set to “15” is rarely used), loosen the fixing nut on the adjusting bolt and unscrew the bolt until the rod with the compensator is completely relaxed. Then use a screwdriver to tighten the bolt until it comes into contact with the hydraulic compensator.
Next, using a wrench set to “11”, we continue to turn the adjusting bolt clockwise. Despite the recommendation of the bolt for two full turns, practice shows a different technique in which the compensator plunger takes the correct working position, namely:
- per one revolution, in case of adjusting the exhaust valve;
- one and a half turns on the intake valves.
The concept of “adjusting the valves” does not correspond to the actual procedures for adjusting hydraulic compensators on a Gazelle business car. After adjusting the position of the hydraulic compensators with a feeler gauge, you can check the gaps and make sure that the rocker arm pusher fits snugly against the end surface of the closed valve stem. The minimum permissible gap can be from 0.01 to 0.08 mm.
It is not difficult to adjust hydraulic compensators on internal combustion engines with your own hands. Instructions, wrenches, pliers and a screwdriver are all you need to perform maintenance on the gas distribution mechanism.
Sometimes, after operations, valves knock on a cold engine. The knocking of valves sometimes resembles the sound of an injector (nozzle) or an adsorber valve. Therefore, it is necessary to more accurately determine the source of the noise and it is better to do this with a stethoscope.
If knocking of valves with installed compensators is detected, it is necessary to warm up the engine to operating temperature and then increase the speed to 2000-3000. If the knocking does not stop, replace the hydraulic compensators.
Adjustment without hydraulic compensators
Until 2009, the Gazelle car was equipped with the UMZ 4216 engine without hydraulic compensators, the design of the gas distribution mechanism is practically no different from the previously created UMZ 100 carburetor engine (popularly called “weaving”).
With the start of production of Gazelle business cars, the “weaving” engine was modernized, an injector was installed, and the “gasket” oil seal was replaced with a standard rubber one. In addition, with the installed catalyst, the car began to belong to the Euro-3 class. Adjustment of the thermal clearances of the UMZ 4216 valves is carried out according to the manufacturer’s instructions, similar to the technology performed on the Gazelle “weaving”.
The frequency of adjustment on internal combustion engines is recommended every 10,000 km. If the car is constantly serviced by one specialist who adjusts the gaps, then, according to his recommendation, the mileage interval between adjustments can be increased to 20,000 km.
The engine reminds the driver of the need to adjust the gaps by lack of traction characteristics, increased fuel consumption, or an excessively loud ringing clatter. An experienced specialist can already determine by the sounds of an idling engine the condition of the thermal gaps. A smoothly running engine with no quiet knocking sounds from the valves is a sign of a small clearance (“pinched” valve) and, conversely, a very loud knock indicates that the clearance is too large. In both cases, it is necessary to normalize the thermal gaps, since if the gap goes positive or negative during operation, the injection phase changes.
The effect of the gap on the injection phase is explained by the rate of increase in the contact of the camshaft cam surface with the valve stem. With less clearance or no clearance, the speed increases and the valve opens and closes with some advance. If the gap is increased, the valve operates with a delay. Therefore, when the owner asks to adjust the gas gap, it is advisable to clearly explain to him the principle of gas distribution and the adjustment is made in the same way as the gas gap is set.
The regulation procedure is determined by the design of the engine and is carried out in two stages. If the car comes for servicing, it is necessary to reduce the engine temperature naturally before starting work. To do this, just open the hood of the engine compartment, and to speed up the cooling process, install an autonomous fan above the engine, powered by the car’s battery.
How to regulate?
When all the preparatory work has been completed, you need to proceed to the actual setup. The piston in the first cylinder must be set to TDC during the compression stroke. The valves are closed at this moment. Try to insert a dipstick between the pusher and the valve. If it goes very easily or, on the contrary, does not fit at all, adjustment is needed. To do this, loosen the locknut and hold it with a wrench. By rotating the adjusting screw, the desired clearance is achieved. In this way, the valves of the UMZ-4216 Gazelle engine are adjusted for elements 2, 4 and 6. After the gaps are adjusted, do not forget to tighten the lock nut.
Next, the crankshaft is rotated 180 degrees, and access to valves 3, 5, 7 and 8 will open. After these elements have been adjusted, you should turn the engine over again and use a feeler gauge to check the gap. This will guarantee that the valve adjustment of the 4216 Gazelle engine is performed correctly.
Source
GAZ 31 2002, 92 l. With. — self-repair
Comments 12
Thank you, it was useful. In the book, the adjustment is carried out in 4 turns of 180′, but here it turns out that it’s possible in 2))
thumbs up with both hands! I adjusted the valve like this, the engine just whispers =) I drove for two days without a tape recorder =)) I listened to the engine! =))
I also posted the code at ZMZ to assemble the engines, everyone there does it on both 511 and 513
The last time I adjusted the valves using this scheme. I've already driven 4000 km, the flight is normal! I drive gas and 95.
This is interesting: Replacing the Gazelle rear axle oil seal
So I drove after such an adjustment and everything was fine.
Obviously this is not according to the book. I agree that you should use it, but not completely trust it, because... Only then was I able to set the valves to a rustling state when I reduced ALL values by 0.05, BUT I still did it according to the book, that is, after adjusting the valves of EACH piston, I rotated the crankshaft by 180. This is where I disagree, because I tried to adjust two pistons at once, but one at a time is mandatory!
Anything is possible, but I did it according to this scheme, everything worked with a bang, I couldn’t hear the valves.)))