Stable operation of household milking machines for cows and goats is ensured only if the conditions of the operating temperature range are met. This applies to both the ambient air and the temperature of the power part of the installation.
The lower limit of the environment should be +5 degrees for dry vacuum pumps and more than +10 degrees in models with a closed lubrication cycle between the oil tank and the pump.
The colder it gets, the more viscous the oil becomes. It is slowly pumped through the hoses. This results in low or unstable blood pressure. The mechanisms themselves wear out, experiencing increased load for a long time.
In winter, the milking machine should be located in a heated room. Also, do not leave or operate the device in direct sunlight. In the technical documentation, the manufacturer indicates to what temperature the pump heats up. (Usually 90 degrees).
Also pay attention to the continuous operation time, which ranges from 60 to 120 minutes. The sun additionally heats the body parts, but this is not taken into account. The electric motor can be cooled by a continuously rotating impeller, but the pump does not have this capability.
It contains graphite or textolite plates. They are increasingly heated due to friction between the working end and the inside of the pump. The higher their temperature, the more wear occurs, even to the point of jamming. Replacing a unit with a new one is a very expensive purchase.
Therefore, if in winter you experience difficulties with a lack of vacuum pressure in the oil milking machine, you should first move it to a warm room where it will heat up, and then try to start it up again. Severe wear of the blades is caused by overheating.
Milking machine AID-1, 2
The AID-2 milking machine, as well as its analogue AID-1, have a similar design. Some characteristics and equipment differ. The equipment has proven itself on the positive side and is in demand in private households and small farms.
Advantages and disadvantages of milking machines for AID cows
Each AID milking machine has its pros and cons. It is reasonable to consider each model separately.
- the presence of a dry type vacuum pump;
- the equipment is suitable for work in any conditions where the air temperature does not drop below + 5 o C;
- well-fitting elastic suction cups on the glasses do not injure the udder and nipples;
- two animals can be connected to the milking machine at the same time;
- Light weight and the presence of a trolley with wheels make the device mobile.
The disadvantage is poor ventilation of the channels for transporting milk. A working device consumes a lot of air.
- The rubber coupling smoothes out vibrations of the running engine, which extends the service life of the equipment and reduces noise levels.
- Thanks to the increased size, the receiver takes a long time to fill with milk. In the event of a can overturning or another emergency situation, the device will have time to turn off before the milk is lost.
- The accessible location of the units allows for easy maintenance.
- Large diameter wheels make it easy to transport equipment on a cart.
The disadvantages of AID-1 are similar to those of the AID-2 model.
Milking machine for cows AID-2
The developer of the milking machine is Korntai LLC. The Ukrainian enterprise is located in Kharkov. The model was created to increase productivity and quality of milking. According to its characteristics, the AID-2 milking machine is designed to serve 20 cows.
The operation of the milking machine is based on the creation of vacuum oscillations in the system. Due to the ongoing processes, the nipples of the animal's udder are compressed and unclenched. From the actions taking place, milk begins to be milked, which is transported from the teat cups through milk hoses into the container. In essence, the operation of the vacuum system closely mimics the actual suckling process of a calf. The cow's teats are not subject to injury. Full expression of milk prevents mastitis from developing.
Specifications
To get acquainted with the capabilities of AID-2, to find out what the device is capable of, you need to consider its characteristics:
- push-pull type of milking;
- engine protection from overloads and overheating;
- electric motor power – 0.75 kW;
- connection to a 220 volt power supply;
- pulsation frequency 61 tacts/min with a permissible deviation up or down by five units;
- the volume of the can for collecting milk is 19 dm 3;
- working pressure measured by a vacuum gauge – 48 kPa;
- dimensions – 105x50x75 cm;
- weight – 60 kg.
Specifications may be changed by the manufacturer, as indicated in the instructions. It is possible to modernize individual components and components in order to improve productivity and quality of work.
The video shows the AID-2 milking machine, model overview:
How to assemble the AID-2 milking machine
The main components of the AID-2 device are supplied from the factory in assembled condition. All components will have to be installed independently. In essence, there are two units to be assembled: a vacuum-creating device and a milking system consisting of a can and attachments.
The step-by-step process of assembling the AID-2 milking machine consists of the following steps:
- The milking cups are collected first and connected to the collector. It is important to maintain a distance of about 7 mm on the glasses between the edge of the nipple cup and the ring. The thin edge of the milk hose is inserted into the nipple suction cup. The pipe is gradually pulled out so that the thickening on it is clamped by a ring mounted on the nipple suction cup. Milk hoses with connected nipple suction cups are placed inside the teat cups, leading the pipe out through the hole. The elastic rubber insert should stretch inside the glass body.
- The assembly of the milk can of the AID-2 apparatus begins by connecting the hose. The container lid is equipped with three holes. A hose leading to a vacuum cylinder is connected to the first one. A hose is connected to the second one, the second end of which is put on the plastic fitting of the manifold. The third hole is used to connect a unit consisting of a pulsator, the hose from which is connected to another output of the manifold to a metal fitting.
- The last step is to install a vacuum gauge on the cylinder. The device determines the working pressure.
- The can is installed on a trolley where all the components of the apparatus are located. Check functionality.
Before putting the teat cups on the teats, set the vacuum depth values specified in the instructions. The manifold valve is closed. The glasses are placed on the nipples one by one. The milking process begins. At the end of the procedure, the manifold valve is opened. In a similar sequence, the glasses are removed from the nipples one by one.
Instructions for the milking machine AID-2
In addition to the order of assembly and commissioning, the instructions for the AID-2 device contain instructions for proper installation and cleaning. The main requirement is to keep the milking machine as far as possible from the animal so that the noise of the motor does not cause fright. For a vacuum valve with a regulator, choose a place on the wall of the stall. The operator must reach the unit if necessary.
At the end of the work, the milking machine is cleaned. A special place is allocated for the procedure, where a large tank with clean water is installed. You can use a used cast iron or metal bathtub. Equipment is washed in the tank.
Advantages and disadvantages of milking machines for AID cows
Each AID milking machine has its pros and cons. It is reasonable to consider each model separately.
Advantages of AID-2:
- the presence of a dry type vacuum pump;
- the equipment is suitable for work in any conditions where the air temperature does not drop below + 5 °C;
- well-fitting elastic suction cups on the glasses do not injure the udder and nipples;
- two animals can be connected to the milking machine at the same time;
- Light weight and the presence of a trolley with wheels make the device mobile.
The disadvantage is poor ventilation of the channels for transporting milk. A working device consumes a lot of air.
Advantages of AID-1:
- The rubber coupling smoothes out vibrations of the running engine, which extends the service life of the equipment and reduces noise levels.
- Thanks to the increased size, the receiver takes a long time to fill with milk. In the event of a can overturning or another emergency situation, the device will have time to turn off before the milk is lost.
- The accessible location of the units allows for easy maintenance.
- Large diameter wheels make it easy to transport equipment on a cart.
The disadvantages of AID-1 are similar to those of the AID-2 model.
Characteristics of the AID-2 milking machine
Modern realities of the dairy processing industry require owners of private farms to raise their level of productivity. This can only be done by replacing manual labor with mechanized labor, which can be achieved using the AID-2 milking machine. It will increase the speed of the most time-consuming operation - milking cows - and increase the profitability of home production.
Operating principle of the unit
The operation of the milking machine is based on the creation of rhythmic vibrations. The main working element of the installation is the vacuum pump. It is controlled by an electric motor powered by 220 Volts. After connecting the device to the network, you only need to tightly install the glasses on the cattle's teats.
The physiological characteristics of animals - cows, goats - require squeezing the nipples one at a time, which is necessary to restore blood supply to the udder. Therefore, the pump creates excess pressure in the system and, using special rubberized cups, compresses the udder at certain intervals. Thus, it ideally imitates natural feeding of a calf or hand milking, thereby not injuring the animal.
The incoming milk flows through special milk lines into a can, where it accumulates until the end of the process. The pressure in the system is controlled by a convenient pressure gauge located next to the ball valve.
Use for dispensing
When transferring a cow to machine milking, she must be ready to fully deliver milk to the milking machine. Otherwise, the animal may damage the udder. To prevent this, milking is necessary - a set of measures aimed at achieving maximum productivity close to the genetic potential.
Using the AID-2 individual milking unit, you can significantly simplify the milking process. Immediately after calving, it is necessary to increase the amount of feed supplied and at the same time monitor the volume of milk received. If the volume of products obtained increases in proportion to the “addition” to the animal’s basic nutrition, then the amount of feed is increased again until maximum productivity is achieved.
A cow milked in this way, when milked twice, is able to “give” as much milk as when using the unit 4-5 times. This reduces the amount of time required for maximum productivity, increasing the profitability of the device.
Vacuum work
The AID-2 milking machine allows you to obtain milk from several animals simultaneously. At the same time, the risk of injury to the teats and udder is completely eliminated due to a reliable vacuum system, whose power is enough for several cattle at once. In addition, rubberized cups follow the shape of the udder and fit tightly to the nipples, creating conditions for high-quality operation of the vacuum system.
The design of the pump itself contains graphite plates, which operate on a dry principle and do not require lubrication. The rotation speed of the working elements reaches 1.5 thousand revolutions per minute, and the resulting pressure in the system reaches 50 kPa. The presented system evenly distributes the load on the udder and prevents pinching and blood stagnation.
The design has built-in control elements that monitor the safety of the unit itself. The thermal relay prevents overheating of the electric motor and protects it from power surges. However, you can't rely on electronics alone. If the first signs of malfunctions, incorrect pulsation frequency, insufficient vacuum force, or increased noise levels during operation appear, you should take the device out of service and think about repairing it.
Instructions for starting the device
Before using the milking machine for the first time, you must thoroughly rinse the storage tank. Otherwise, a characteristic odor may appear. Immediately before starting work, it is necessary to make sure that all actuating units, mainly pipes and hoses, fit tightly together to create the required level of pressure.
The device must not be connected to more animals than the instructions state.
When first starting up, the unit should be used in a ventilated, spacious room with a high ability to absorb sounds, so that the animal is not afraid of either new sounds or new smells.
After placing the device, the following operations are performed:
- Fill the housing with oil.
- Remove the plugs from the device pipes.
- Close the cover tightly.
- Move the switch to the ready position.
- Connect the unit to the network.
- Start the engine.
Only after this are the glasses with rubberized inserts attached to the udder of the cattle. It is necessary to ensure that the elements fit tightly to the nipples and do not allow air to leak through.
Assembly of AID-2
Correct assembly of the milking machine is the key to its reliable and high-quality operation throughout its entire service life. To help you understand this process and save time on studying the documentation, we offer compact instructions:
- Place the vacuum hose on the bucket lid.
- Connect the bucket lid and the cylinder to the cross with a vacuum hose.
- Connect the milk hose to the lid of the bucket, connect it to the milk manifold.
- Using an alternating vacuum hose, connect the pulsator (mounted on the cover) and the manifold.
- Place the vacuum gauge on the rubber pipe of the vacuum regulator.
After this, the device is ready for use. User reviews note that it is better to “wrap” the vacuum hose once around the storage tank before connecting it to the cylinder with a cross. This will make using the device more convenient.
Maintenance and replacement parts
To increase the service life of the device, it is necessary to comply with basic operating requirements. It is necessary to check for pulsation of the nipple rubber daily. Their quantity must correspond to the parameters specified in the instructions. In addition, the vacuum pressure must be checked every day.
Once a month it is necessary to clean the vacuum installation from dust and dirt and check the reliability of the threaded connections. For further maintenance, it is necessary to disassemble the unit, clean the seat on the body, the vacuum regulator spring and the rod from dirt, and thoroughly wash all parts of the mechanism using detergents and cleaning brushes.
However, even careful performance of all operations may not protect the AID-2 milking machine from breakdowns.
Most often the following fail:
- vacuum hoses;
- connection valves;
- couplings;
- fastening elements;
- rubberized glasses.
To avoid system downtime, you should always have connecting fittings, vacuum hoses and milk tubes on hand, and regularly inspect the described elements for damage.
Operating principle of milking devices
Every milking machine has a vacuum pump. Some products, which can be made to order, also have a unit for creating excess pressure.
But in standard milking machines, the operating principle is based on vacuum. It is he who helps the milk move from the nipples to the glasses placed on them. Then the product is transferred to any suitable container, such as a can or bucket. After this, special milk lines pump the liquid into the main tanks.
There are different types of milking machine - two-stroke or three-stroke. The work of the first is relatively simple. These are just functions of compressing the nipple and pumping milk out of it.
Three-stroke devices are somewhat more complicated, as they are adapted to the physiological characteristics of the body. This means that during operation, each nipple is compressed in turn, the milk is sucked out, and a pause is waited, during which the udder returns to its original state. This is necessary to restore blood supply.
Made for sharing
The AID 1 milking machine model was created to facilitate milking cows and for distributing animals on dairy farms. It works of the push-pull type and sucks milk from the nipple using a vacuum.
The unit includes a suspended part of the milking machine, a pulsator, a bucket with a lid, a gasket, hoses and various connecting parts. To make the milking process more efficient, an air suction system has been thought out.
Equipment called AID 1-01 is also known. The system is mobile, as it is placed on a two-wheeled cart. The principle of operation is milk suction using teat cups under vacuum.
AID 1-01 contains a vacuum gauge, a regulator, a hermetically sealed bucket, and a muffler. Electric motor power 0.6 kW. Before milking begins, the farmer needs to set the correct vacuum level. If the device is two-stroke, then it is 380-400 mm Hg, if it is three-stroke, then 450-480.
When a cow is transferred to machine milking, she must be capable of full milk production, taking into account the shape of the udder and teats.
Malfunctions in the operation of the unit, such as insufficient vacuum, incorrect pulsation frequency and varying degrees of wear of parts lead to ineffective milking. To avoid this, the functionality of the entire system is checked twice a year.
Reliable vacuum works
The AID 2 device is similar in appearance to the first presented device. It is also mobile and quite mobile. A clear advantage is that the elements are securely attached to the nipples, and high-quality operation of the vacuum installation is ensured.
Device characteristics:
- the pump with graphite plates operates as a dry type and therefore does not require lubricants;
- engine power 750 W;
- the milking elements rotate at a speed of 1500 rpm;
- the presence of a thermal relay that prevents motor overload and is suitable for places with unstable electrical networks;
- during operation, a pressure of up to 50,000 Pa is generated;
- The device is capable of doing one press per second.
With this machine you can milk several cows at the same time. In this case, the udder and nipples are absolutely not injured. The AID 2-01 milking machine was also produced, which is similar in configuration, but consumes less power and has a higher vacuum pump performance.
Starting the device
Among the varieties of AID 2, we also note the mobile individual devices “Udarnitsa”, “Victoria”, “Duet”.
They differ in their ability to serve different numbers of livestock and the materials used to make milking tanks. For example, the latter type is recommended for a herd of no more than 20 heads. The aluminum buckets used to collect the product can hold 19 or 25 liters of milk, the volume depends on the delivery package.
The milk tank should always be thoroughly rinsed, otherwise the product may spoil or develop an unpleasant odor.
Before starting AID 2, all parts must be well connected to create a vacuum. You cannot use the device for more heads than the instructions say, and it should not be used in small rooms. This is because during operation the equipment consumes air and there may be breathing problems.
Milking machine repairs and malfunctions
Stable operation of household milking machines for cows and goats is ensured only if the conditions of the operating temperature range are met. This applies to both the ambient air and the temperature of the power part of the installation.
The lower limit of the environment should be +5 degrees for dry vacuum pumps and more than +10 degrees in models with a closed lubrication cycle between the oil tank and the pump.
The colder it gets, the more viscous the oil becomes. It is slowly pumped through the hoses. This results in low or unstable blood pressure. The mechanisms themselves wear out, experiencing increased load for a long time.
In winter, the milking machine should be located in a heated room. Also, do not leave or operate the device in direct sunlight. In the technical documentation, the manufacturer indicates to what temperature the pump heats up. (Usually 90 degrees).
Also pay attention to the continuous operation time, which ranges from 60 to 120 minutes. The sun additionally heats the body parts, but this is not taken into account. The electric motor can be cooled by a continuously rotating impeller, but the pump does not have this capability.
It contains graphite or textolite plates. They are increasingly heated due to friction between the working end and the inside of the pump. The higher their temperature, the more wear occurs, even to the point of jamming. Replacing a unit with a new one is a very expensive purchase.
Therefore, if in winter you experience difficulties with a lack of vacuum pressure in the oil milking machine, you should first move it to a warm room where it will heat up, and then try to start it up again. Severe wear of the blades is caused by overheating.
The milking machine does not gain pressure
In order to quickly understand the reason why pressure is not building up or there is no pressure at all, you need to visually break down the installation into individual components. Moving sequentially through each one, you will soon find this place.
Milking equipment consists of:
Nipple rubber – cracks or cuts may appear on its walls.
Milking cups - the teat rubber should fit tightly into them without gaps. If you have a combination glass or a plastic one, then the thin outlet pipe should not have cracks, and the O-rings (combi) should not have cuts or be jammed.
The collector - its cover becomes covered with cracks over time. When this happens, replace it with a new one. There is an O-ring between the cover and the body. Check if it is there. Like any rubber, it must be intact and elastic.
Hoses - their internal diameter must correspond to the factory ones. When it does not sit tightly enough on the outlet fitting, air is sucked in there. Check its integrity. Low-quality products quickly become covered with small cracks. Replace with a new one.
Pulsator - if it has all the sealing rubber bands, and the lid is screwed on sufficiently, then it rarely becomes leaky.
Tee and corner of the can lid - cracks may appear in the plastic or the lid may not fit tightly enough.
The rubber of the milking bucket – if the lid is skewed, cracks may form. The second reason is its wear and tear.
Power section units:
Receiver cover - in the Burenka milking machine they are made of transparent plastic and have an O-ring, which may become unsuitable for further use.
Vacuum regulator - if adjusting it does not change the vacuum gauge readings, then it is faulty.
The vacuum gauge is a fairly reliable part, but sometimes it shows incorrectly.
Pump - worn out blades develop insufficient air pressure. Replacement is done as a complete set.
Electric motor - make sure there is a sufficient number of revolutions, the mains voltage may be low.
Do-it-yourself milking machine repair
Now that you know what usually doesn't work in the milking machine, you need to find a specific place. The search algorithm is as follows:
- Switch on the milking unit.
- If you have cup caps, put them on. Most of the time they are absent, so you can first block each nipple rubber with a clamp.
- After the second point with overlap, the pressure normalizes. The reason is in the glasses and nipple rubber.
- Bringing each part closer to your ear, listen to the hissing sound. Perhaps this will be enough.
- With the pump turned on, strongly bend the vacuum hose or close it with a plug at the end that goes to the lid of the milking bucket. While rotating the vacuum regulator, watch the pressure gauge. If the pressure still remains low, then the plates are most likely worn out.
- The cause may be a muffler clogged with dirt, through which air has stopped coming out. To finally make sure of this, repeat the method described in step 4 again, completely unscrewing it.
- Unscrew the regulator and close the hole on the receiver.
- Did not help? Then this is the receiver cover (Burenka) or the drain valve (AID).
- After manipulating the main hose, the pressure turned out to be normal. Then put on the lid of the milking bucket and close the two inlets. One will be for milk, a pulsator is connected to the second. The vacuum does not rise - the problem is in the gasket.
- Plug the hoses near the pulsator - this will indicate their tightness. Don't forget about the pulsator. Also close the outlet on the collector side to allow air access. When it is intact, you will hear clicks.
- The collector remains. Before this, you checked the entire system, and it turned out to be working. The collector inlet is blocked. The leak is due to the cap or the distributor at the bottom.
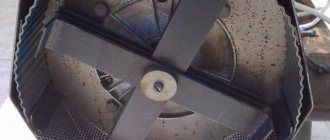
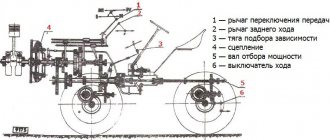
The AID-1-01 unit consists of a vacuum installation 1 (Fig.), a milking machine 8, a milking bucket 2, with a capacity of 19 liters. These line units and assemblies are installed on a trolley 4 for transporting a vacuum installation and milking equipment. Milking machine 8 is connected to vacuum installation 1 using fitting 7. The vacuum installation is started by device 3. Vacuum gauge 6 is used to determine the vacuum mode during the milking process, vacuum regulator 5 is used to regulate the value of vacuum pressure.
The milking machine and vacuum gauge of the AID-1-01 unit are unified with similar assembly units of other units.
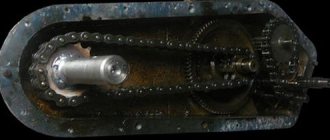
The vacuum installation consists of a vacuum pump 3 (Fig.) of an original design, an electric motor 5 with a voltage of 220V, a base 1, a coupling 2 and oil sucked from the oil can by the vacuum pump during its operation, which is not thrown into the muffler, but returns again to the oil can, ensuring thereby saving oil.
The vacuum regulator of the original design includes housing 5 (Fig.), valve 3, spring 4. A vacuum gauge is connected to the crosspiece 8 of the vacuum regulator.
For normal operation of the AID-1-01 unit, it must be prepared for operation in accordance with the unit’s passport. Before switching to machine milking of cows using the AID-1-01 unit, cows should be accustomed to the appearance and noise, and then to using the unit during milking. The efficiency of the unit largely depends on its correct operation and timely troubleshooting and maintenance.
When maintaining the AID-1-01 unit, perform the following work:
Every day check the serviceability of the electrical wiring, the presence of oil in the oiler of the vacuum installation and the serviceability of the connections to the vacuum pump body, the presence of pulsations of the nipple rubber and the number of pulsator pulsations, the magnitude
Vacuum pressure during milking; after each milking, wash the milking machine;
- once a month, clean the vacuum installation from dirt and dust, since contamination of the fins of the vacuum pump housing leads to overheating of the pump; check the reliability of threaded connections; disassemble and clean the seat, valve and spring of the vacuum regulator from dust; completely disassemble the milking machine and thoroughly wash its assembly units and parts with detergent using the brush and brushes included with the milking machine;
- once a year, wash the vacuum pump with diesel fuel, pouring it into the suction pipe; Wash the oiler wicks with diesel fuel and the muffler of the vacuum unit with kerosene.
When storing the AID-1-01 unit for more than three months, the milking machine is disassembled, the rubber parts are washed, degreased and dried (including the teat rubber) before storing, and oil is poured into the vacuum pump housing.
During operation of the unit, malfunctions may occur, the causes of which and remedies are as follows.
The reasons for a decrease in vacuum pressure in the system below 47 kPa may be air leaks, rupture of rubber hoses or nipple rubber, failure of the vacuum gauge used to check the vacuum pressure, or a drop in the performance of the vacuum pump. Depending on the identified three reasons, it is necessary to check all connections and eliminate leaks, replace hoses or nipple rubber, replace the vacuum gauge and adjust the vacuum mode.
If the performance of the vacuum pump drops, which may be caused by the laying of the textolite blades of the pump rotor or wear of the blades along the length, it is necessary to flush the pump without disassembling with diesel fuel or replace the blades with new ones, the length of which should be 94.85 ... 95 mm.
If the groove at the lower end of the milking machine collector is clogged, the groove must be cleaned.
If the pulsator is not working or is operating intermittently, the cause may be dirt getting into the pulsator or wear of its parts; in this case, it is necessary to disassemble the pulsator, wash all its parts, paying special attention to the cleanliness of the passage holes, replace worn parts and a damaged membrane.
If oil does not flow into the vacuum pump, the probable reasons are the following: the filter is clogged, the holes in the oil can are clogged, or air is leaking through the cuff or oil-conducting hoses; it is necessary to wash the filter, blow out the holes in the oil can and pump covers, or replace the cuff and eliminate leaks.
If the electric motor driving the vacuum pump does not turn on, the reasons may be a lack of power supply, a voltage drop in the network when the vacuum unit is turned on
Below 180 V, the thermal protection of the relay is triggered or the vacuum pump jams. It is necessary to check the serviceability of the electrical wiring and contacts, eliminate problems in the current-carrying line, disassemble the vacuum pump, find and eliminate its malfunction, which caused the pump to jam.
If the bearings wear out, causing a knocking noise in the vacuum pump, they need to be replaced.
If the pump drive motor hums and does not develop speed, then the relay is faulty and needs to be replaced.
During operation of the AID-1-01 unit, transparent hoses may allow water to pass through at the connection points as a result of hardening and deformation of the ends of the hoses; If this shortcoming occurs, you must carefully cut off the hardened section of the hose at a length of 20...30 mm from the edge, warm the end of the cut hose in hot water and put it in place.
If, when washing the milking unit, no water comes out of the muffler, it means that the nozzle is not installed in the bucket.
Normal operation of the AID-1 -01 unit is ensured under the following conditions: altitude above sea level 1000 m, ambient temperature not lower than 5 ° C, voltage in the electrical network supplying the drive motor 198...231 V, current frequency 50 Hz. Under these conditions, the technical data of the unit are: operating vacuum pressure created by the vacuum installation during milking and washing, 47 kPa; vacuum pump drive electric motor power 600 W; rotor speed of the electric motor and vacuum pump is 2920 min'1; vacuum pump capacity 4.5 m3/h; total weight of the unit 60 kg; the temperature of the washing and disinfecting liquid should be no more than 70°C.
Vacuum pump lubricants used at ambient temperatures below 10°C - industrial oil I12A or I20A, at temperatures above 10°C - diesel oil M8B2 or M10B2
For the safe operation of the AID-1-01 unit, it is necessary to comply with the requirements of the passport that is attached to each machine. Electrical wiring and connections must be carried out by qualified specialists, and repairs and maintenance of the unit can only be carried out after disconnecting the unit from the power supply.