Friends! So today you are on the GAZ OJSC program, code-named “Back to the Future”.
When I saw the first cars with hydraulics, I was so glad that there was no need to do valves and their adjustment, oh, sorry... how wrong I was, and now the old proven 402 engine in the guise of UMZ 4216 returned to us in a 2010 car with the need to adjust the valves.
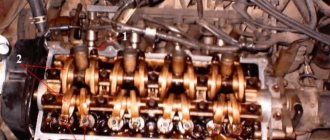
How do you know when it’s time to regulate them? The engine will remind you of this itself...
UMZ 4216 will remind you of the need for adjustment by producing a characteristic clicking, metallic sound in the engine compartment of the car, which is the first signal that the valves need to be adjusted due to a violation of the required clearance. Something like this.
It’s not worth reaching the second signal, at current prices it’s too expensive, and there are fewer and fewer normal spare parts. What didn't make it onto the assembly line ended up in stores. What they made handicraft also ended up in stores.
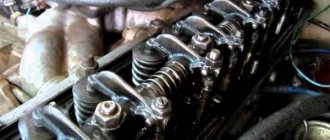
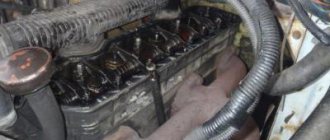
First, remove the valve cover and begin adjustment. You will need a 36mm wrench for the crankshaft to turn it. Plus a standard set of wrenches and probes. It won’t hurt to change the valve cover gasket, but if it’s OK, you can leave it.
Since this is an injector, access to the valves is easier here, on the carb, you would have to remove the air vent.
Let's set the correct position of the crankshaft.
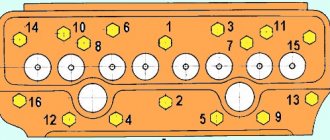
The mark on the crankshaft sprocket must match the mark on the key installed next to the fan drive. for this we use a 36 key. We adjust valve 1246. After turning the crankshaft one turn = we adjust valve 3578.
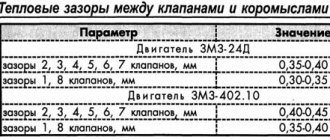
The gap should be 0.35-04.
I make a gap of 0.3 all in a circle. I adjust it a little differently, for each piston, when it is at TDC, then its valves are closed, I do it in this sequence for the cylinders 1-2-4-3. The engine should not be hot or cold, as they say 36.6 for it is just right at 0.3 in a circle. My godfather actually knew how to make them hot, the car was unrecognizable, and they only pearled on the road, and the valves never burned... With proper adjustment, the clattering and metallic sound from the engine compartment should disappear.
Car enthusiasts can do without the services of specialized car repair shops if they need to adjust the valves of the 4216 Gazelle engine. Let's look at how to do it yourself in a garage. This information will be useful for every car enthusiast.
Why regulate?
They are usually tuned to make the engine run more stable across all speed ranges. Valves are a very important part of the gas distribution mechanism. If the clearance settings are lost, then the wear of various parts in the timing belt increases significantly. The noise level of the power unit increases and fuel consumption increases, which is very significant for commercial vehicles.
Read also: Maximum bolt tightening torque
If you hear a ringing sound while the engine is running, if it has become more difficult to start a cold engine, and during a cold start the spark plugs are filled with fuel, then it’s time to adjust the valves of the 4216 Gazelle engine.
The gaps get lost for the following reasons. This is a failure of the engine crankshaft, incorrect timing of the cams in the gas distribution mechanism. Also, the gaps disappear if there are various violations of the integrity of the engine block.
The cause of increased or decreased clearance may also be the driver's driving style. If the driver prefers aggressive control, which is expressed in the sudden release of the clutch, then this will necessarily lead to intense and premature wear of the parts of the gas distribution mechanism.
Modified valves ZMZ 402
intake valves, comparison
exhaust valves, comparison When modifying the valves, two goals were pursued. Increase the flow area and reduce the weight of the valve. The second goal is of priority importance, because the valve-seat flow area, taking into account the rather strange shaped cylinder head channels, will not be of decisive importance. The valves are of course quite archaic, especially considering the 9mm stem. But on standard valves, my hand does not rise at all to assemble the cylinder head. I usually take Chelyabinsk valves as a donor. As I said above, valves from different manufacturers were brought to me for modifications, but subjectively I liked these ones. Despite their price and the fact that in their native St. Petersburg you have to run around to find them. The result of the improvements is shown in the photo. Probably no special comments are required.
Tools for work
To adjust the gaps you will need a minimum set of tools. These are the keys and a screwdriver that are needed to remove the valve cover. You should also find plate gauges for measuring gaps.
They are sold in any auto store for 200-300 rubles. You will also need a ratchet wrench and a long slotted screwdriver. The latter is needed to determine the position of the cylinder.
Preparatory operations
Despite the fact that adjusting the valves of the 4216 Gazelle engine is relatively simple, you need to understand that the process is very responsible. Before adjustment work, the machine should be carefully prepared.
The first thing you need to do is secure the car. The handbrake alone should not be trusted. It is better to additionally secure yourself with wheel chocks. Then, if the engine is hot, it is allowed to cool. The engine must be completely cold.
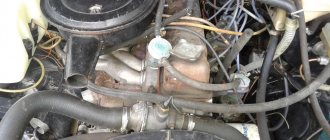
Before starting work, you need to get to the valve mechanism. This is relatively easy to do on injection engines, but more difficult on carburetor engines.
First you need to remove the air filter:
- First of all, remove the filter cover, then unscrew the fastening nuts.
- The hose of the vacuum ignition corrector and the breather pipe are also removed.
- Next, disconnect the rods from the carburetor - they will greatly interfere.
- Finally, the valve cover is unscrewed.
At this point, the preparatory work is completed and you can proceed directly to adjusting the valves of the 4216 Gazelle engine.
In what sequence should the valves be adjusted on the Gazelle?
There is a strict procedure for adjusting the valves of the 4216 Gazelle engine. The cylinders operate in the following order - 1, 2, 4, 3. If the first is in the TDC position, then you can adjust or measure the clearances on valves 1, 2, 4, 6. After turning the crankshaft 180 degrees, 3, 5, 7, 8 valves are adjusted.
Gaps within 0.35-0.4 mm are considered normal. It should be taken into account that in the first and fourth cylinders the gaps should be larger - 0.3-0.35. Practice shows that a gap of 0.35 mm is best for all valves. Experts say that the size of the gap does not particularly affect the operation of the engine and its service life.
Read also: Largus cross or Vesta sv cross
Setting up the mechanism on GAZ
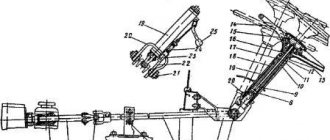
When the engine is turned on, the elements of the gas distribution mechanism (GRM) are constantly exposed to gases, resulting in a change in clearances:
- as they increase, the filling of the cylinder with a mixture of gases deteriorates;
- Reducing the gap leads to overheating.
- fuel and oil consumption increases;
- The operating life of the installation is reduced.
A number of signs warn of the need to adjust the valve:
- a clanging sound appears;
- GAS stalls at short intervals.
Undoubtedly, adjusting the valves on a car requires:
- strict adherence to the sequence of actions;
- availability of a set of probes and different keys;
- engine pre-cooling.
The valve clearance is adjusted as follows:
Adjusting the UMZ-4216 valve
- use a 10mm wrench to unscrew and remove the valve cover, the gasket of which can be replaced at the same time;
- for ease of operation, electrical wiring elements are disconnected;
- the crankshaft is turned clockwise with a 36 key;
- the gap is measured with a feeler gauge;
- its adjustment is made by turning the tightening nuts with a 14mm wrench;
- valves 1, 2, 4, 6 are the first to be adjusted - by setting the gap in the range of 0.35-0.4;
- after a full turn of the crankshaft, set - 3, 5, 7, 8;
- the valve cover is installed in place, and the GAS is checked for the presence of extraneous sounds.
If the setting is done correctly, any extraneous noise in the power plant will disappear.
How to regulate?
When all the preparatory work has been completed, you need to proceed to the actual setup. The piston in the first cylinder must be set to TDC during the compression stroke. The valves are closed at this moment. Try to insert a dipstick between the pusher and the valve. If it goes very easily or, on the contrary, does not fit at all, adjustment is needed. To do this, loosen the locknut and hold it with a wrench. By rotating the adjusting screw, the desired clearance is achieved. In this way, the valves of the UMZ-4216 Gazelle engine are adjusted for elements 2, 4 and 6. After the gaps are adjusted, do not forget to tighten the lock nut.
Next, the crankshaft is rotated 180 degrees, and access to valves 3, 5, 7 and 8 will open. After these elements have been adjusted, you should turn the engine over again and use a feeler gauge to check the gap. This will guarantee that the valve adjustment of the 4216 Gazelle engine is performed correctly.
UMZ-4216 with hydraulic compensators
There is an opinion that on engines with hydraulic compensators no adjustment of valve clearances is necessary. But this is not about this engine.
On this unit the valves never release and are constantly clamped. To determine which elements can be adjusted, you will need a level bar. It is installed between the third and fourth valve. Using the bar you can see the slope in one direction. By this slope you can understand whether the valve is clamped. If the bar is inclined towards the fourth valve, then it is weakened, and towards the third it is clamped. This will indicate that the valve adjustment of the 4216 Gazelle engine with hydraulic compensators will begin from the first cylinder. The first, second and fourth valve can be configured.
To adjust, first unscrew the nut. Then unscrew the bolt until the hydraulic compensator stops pressing on it. Make one turn of the screw on the intake valve, and two and a half turns on the exhaust valves.
After such valve adjustment, the 4216 Gazelle Business engine begins to operate much quieter. And the work itself becomes softer. For those whose Gazelle runs on gas, such adjustment is simply necessary. As for mileage and the need for tuning, everything is individual and depends on the style of use of the car. Often the interval is about 15-20 thousand kilometers. But if the engine begins to make a characteristic clattering sound, valve adjustment may be required earlier. Therefore, it is better to prevent this problem.
GAZ 31 2002, 92 l. With. — self-repair
Comments 12
Thank you, it was useful. In the book, the adjustment is carried out in 4 turns of 180′, but here it turns out that it’s possible in 2))
thumbs up with both hands! I adjusted the valve like this, the engine just whispers =) I drove for two days without a tape recorder =)) I listened to the engine! =))
I also posted the code at ZMZ to assemble the engines, everyone there does it on both 511 and 513
The last time I adjusted the valves using this scheme. I've already driven 4000 km, the flight is normal! I drive gas and 95.
This is interesting: Adjusting the HBO Lovato 2nd generation carburetor
So I drove after such an adjustment and everything was fine.
Obviously this is not according to the book. I agree that you should use it, but not completely trust it, because... Only then was I able to set the valves to a rustling state when I reduced ALL values by 0.05, BUT I still did it according to the book, that is, after adjusting the valves of EACH piston, I rotated the crankshaft by 180. This is where I disagree, because I tried to adjust two pistons at once, but one at a time is mandatory!
Anything is possible, but I did it according to this scheme, everything worked with a bang, I couldn’t hear the valves.)))
Obviously this is not according to the book. I agree that you should use it, but not completely trust it, because... Only then was I able to set the valves to a rustling state when I reduced ALL values by 0.05, BUT I still did it according to the book, that is, after adjusting the valves of EACH piston, I rotated the crankshaft by 180. This is where I disagree, because I tried to adjust two pistons at once, but one at a time is mandatory!
Based on the book! There is this method in the murzilka attached to the car!
I didn't have it written in the book.
I adjusted it literally a month ago, so I couldn’t have made a mistake) It’s not a fact that the books are the same)
Principle of clearance checking and adjustment
So, the valves on a Gazelle car are adjusted using keys 14, 11 and 36 (to rotate the crankshaft during the adjustment process). First of all, you need to unscrew the valve cover, move it to the side, and then disconnect all the electronics. There is no need to unscrew the spark plugs - they will not interfere in any way with this task. The valve cover is unscrewed using a regular 10mm wrench. By removing the electrical wiring clamps and hoses, you can gain access to the valves. According to the manufacturer's recommendations, the gaps in the first and fourth cylinders should be at the level of 0.3-0.35 mm, while on the rest - 0.35-0.4 mm.
Read also: How to make a door handle with your own hands
Step-by-step instructions for adjusting valves on a Gazelle with engine 4216
Next, you need to throw a 36mm wrench onto the crankshaft rotary shaft and turn it clockwise until the valves close. After this you need to measure the gap. This can be done using a probe. If the gap is larger or smaller than the selected one, you must turn the control tightening nut clockwise or counterclockwise to obtain the required gap size. To do this, you will need a 14mm wrench. It is also possible to squeeze the dipstick during the adjustment process, but not very much (so that it can then be removed by hand, without a specialized tool).
Valve clearance gauge
It should also be noted that valve adjustment on the 4216 engine can only be performed when the engine temperature is 15-20°C, no more. If the car has been driven before, you need to let it cool for 1.5 hours. Otherwise, the gap will be greater than the specified one by about 0.1 mm - and this is quite a lot.
How to adjust Gazelle valves
To adjust the valve in a business class Gazelle car engine, no advanced skill is required. This is more maintenance than a real repair of the Gazelle. And you can do it on your own. Each owner has numerous wrenches in stock, which will come in handy now; you will especially need a 36 wrench when rotating the crankshaft, when adjusting the Gazelle valves will be necessary.
Here, professional drivers advise at the same time to check the condition of the gasket under the cover, since it happens that it is high time to replace it, and since such an opportunity has presented itself, it is better not to put it off.